background image

- 28 -

ES

0I29

4

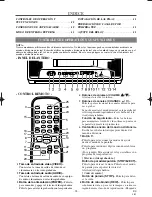
Botones de volumen (VOLUME  

X

X

Y

Y

)–

Ajustan el nivel del volumen.

5

Botones de canales (CHANNEL  

K

L

)–

Púlselos para seleccionar los canales deseados para
ver o grabar.
Se puede mostrar el menú principal en la pantalla del
televisor pulsando repetidamente este botón del tele-
visor/videograbadora.

Función de seguimiento– 

Pulse los botones

para minimizar el ruido de vídeo (líneas o puntos en
la pantalla) durante la reproducción.

6

Ventanilla sensora del mando a distancia–

Recibe las señales infrarrojas procedentes del
mando a distancia.

7

Botón 

L

•Púlselo para seleccionar los modos de ajuste

desde el menúde la pantalla.

•Púlselo para introducir dígitos cuando establezca

un  programa.
(Por ejemplo: Para ajustar el reloj o establecer un
programa de temporizador)

[ Televisor/videograbadora ]

Botón de parada/expulsión (STOP/EJECT)–

Púlselo para detener la cinta. Púlselo en el modo
de parada para expulsar la cinta del
televisor/videograbadora.

[ Control remoto ]

Botón de parada (STOP)– 

Púlselo para deten-

er la cinta.

8

Botón de rebobinado (REW)– 

Púlselo para

rebobinar la cinta, o para ver la imagen en retroceso
rápido durante el modo de reproducción. (Búsqueda

CONTROLES DE OPERACIÓN Y SUS FUNCIONES

POWER

WAKE-UP

/SLEEP

1

2

3

4

5

6

7

8

9

+100

0

TV/FM

CHANNEL

RETURN

REW

PLAY

STOP

F.FWD

GAME

RECORD

PAUSE/STILL

SPEED

SLOW

CHANNEL

T-PROG.

CLEAR

COUNTER

RESET

DISPLAY

MUTE

MENU

VOLUME

3

15

5

26

16

8

11
18

19
20

7

24

4

10

9

22

21

23

17

25

NOTA:

No recomendamos utilizar mandos a distancia universales. No todas las funciones pueden ser controladas mediante un
mando a distancia universal. Si decide utilizar un mando a distancia universal con esta unidad, tenga en cuenta que con el
número de código dado tal vez no se pueda controlar la unidad. En este caso, póngase en contacto con el fabricante del
mando a distancia universal.

- PANEL DELANTERO -

- CONTROL REMOTO -

INDICE

CONTROLES DE OPERACIÓN Y
SUS FUNCIONES . . . . . . . . . . . . . . . . . . . . . . . .28

CONEXIONES DE ANTENA/CABLE  . . . . . . . .30

MODO DE ENTRADA EXTERNA  . . . . . . . . . . .31

INSTALACIÓN DE LAS PILAS  . . . . . . . . . . . . .31

PREPARACIÓN DE CANALES POR 
PRIMERA VEZ  . . . . . . . . . . . . . . . . . . . . . . . . . .31

AJUSTE DEL RELOJ  . . . . . . . . . . . . . . . . . . . . .31

1

Toma de entrada de vídeo (VIDEO)–

Conéctela a la toma de salida de vídeo de su
videocámara u otra videograbadora.

2

Toma de entrada de audio (AUDIO)–

Conéctela a la toma de salida de audio de su equipo
de audio, videocámara u otra videograbadora.

3

Botón de la alimentación (POWER)– 

Púlselo

para encender y apagar el televisor/videograbadora.
Púlselo para activar la grabación con temporizador.

T5408UJES  03.1.9  5:29 PM  Page 28

Содержание SRC2213X

Страница 1: ...GY STAR guidelines for energy efficiency ENERGY STAR is a U S registered mark If you need additional assistance for set up or operating after reading owner s manual please call TOLL FREE 1 800 968 342...

Страница 2: ...net and the back or bottom are provided for ventilation and to ensure reliable operation of the TV VCR and to protect it from overheat ing and these openings must not be blocked or covered The opening...

Страница 3: ...age Requiring Service Unplug this TV VCR from the wall outlet and refer servicing to qualified service per sonnel under the following conditions a When the power supply cord or plug is damaged or fray...

Страница 4: ...agnetic fields Avoid moving TV VCR to locations where temper ature differences are extreme Do not handle the power cord with wet hands Do not pull on the power cord when disconnecting it from an AC wa...

Страница 5: ...11 CHANNEL SET UP AGAIN 12 DELETING OR ADDING CHANNEL 12 SELECTING THE LANGUAGE 13 DAYLIGHT SAVING TIME 13 C TV OPERATION 14 WATCHING A TV PROGRAM 14 GAME MODE 14 DEGAUSSING 14 PICTURE CONTROL 14 CLOS...

Страница 6: ...ed in SLP mode will show a fairly clear picture Digital Auto Tracking DTR Automatically adjusts the tracking for each tape you play Rental play mode Improves playback picture quality from worn tapes s...

Страница 7: ...k or Slow mode See page 20 6 Remote Sensor Window Receives the infrared signals from the remote control 7 STOP EJECT button TV VCR Press to stop the tape motion Press in the Stop mode to remove tape f...

Страница 8: ...nect to a standard AC outlet 120V 60Hz 9 PLAY button Press to begin playback K button Press to select setting modes from the on screen menu Press to enter digits when setting program for example setti...

Страница 9: ...or antenna NOTE The connection of an indoor antenna may not always give acceptable TV reception Note to CATV system installer This reminder is provided to call the CATV system installer s attention to...

Страница 10: ...to point to AUTO PRESET Then press the F FWD B button The tuner scans and memorizes all active channels in your area NOTES The TV VCR distinguishes between standard TV channels and cable channels If y...

Страница 11: ...MENU button on the remote control to start the clock PLEASE NOTE If there is no local PBS station in your area or on your cable system select AUTO CLOCK and press the F FWD B or REW s button to turn O...

Страница 12: ...n until AUTO CLOCK ON appears 3 Begin AUTO CLOCK CH SEARCH Press the STOP L button to select AUTO CLOCK CH SEARCH Press the F FWD B button The TV VCR is now searching for the station which contain the...

Страница 13: ...GLISH CAPTION OFF ZERO RETURN TIME SEARCH INDEX SEARCH CHANNEL SET UP B ADD DELETE CH TV AUTO PRESET 08 ADD DELETE DAYLIGHT SAVING TIME Select this feature and the TV VCR s clock automati cally will a...

Страница 14: ...ture controls BRIGHT CON TRAST COLOR TINT and SHARPNESS are preset to factory specifications Although they are usually the best you may need to make some further adjustments for a natural looking imag...

Страница 15: ...ON The On Screen Display will disappear after 5 sec onds This is also true when the MUTE button is pressed and when the PAUSE STILL button is pressed while recording If there is a power failure of any...

Страница 16: ...Select a TV rating to be unblocked by press ing the PLAY K or STOP L button Then press the F FWD B button to unblock the rating 3 Press the MENU button on the remote control to exit the screen MPAA RA...

Страница 17: ...tenna mode to INT internal or EXT external by following the step below 1 Press the MENU button Press the PLAY K or STOP L button to point to CHANNEL SET UP Then press the F FWD B button 2 Press the PL...

Страница 18: ...ndefinitely without touching the PLAY button ALL REPEAT Repeat playback from the beginning to the end of the tape BLANK REPEAT Repeat playback from the begin ning to a blank part of more than 10 secon...

Страница 19: ...remote control to return to the TV mode 4 Start playback Press the PLAY button to start playback RENTAL PLAY B appears Once you select the Rental mode it stays in effect even after you turn off the T...

Страница 20: ...5 seconds then disappear 2 Stop the recording by pressing the STOP button when recording is completed If you decide to record on the tape again cover the hole with plastic tape Tracking adjustment wil...

Страница 21: ...aily or weekly within a 1 year period In the example below the timer is being set to record DATE July 4th 2003 SETTING TIME from 7 30PM to 8 50PM CHANNEL CH61 TAPE SPEED SP Make sure If your TV VCR is...

Страница 22: ...tch ing TV TIMER REC STANDBY starts flashing on the TV screen 2 minutes before the programmed start time TIMER PROGRAMMING CH DATE BEGIN END B 61 7 04 FRI 7 12P M TIMER PROGRAMMING CH DATE BEGIN END B...

Страница 23: ...SET UP Press the MENU button on the remote control Press the PLAY K or STOP L but ton to point to USER S SET UP Then press the F FWD B button M E N U TIMER PROGRAMMING PICTURE CONTROL SETTING CLOCK C...

Страница 24: ...remote control until SLEEP TIMER appears To view the time left for sleep timer press the WAKE UP SLEEP button twice then press the MENU button on the remote control to exit the sleep timer setting SLE...

Страница 25: ...800 488 1222 to locate an Authorized Service Center ON SCREEN DISPLAY To check the Counter Clock and Channel number on the TV screen press the DISPLAY button on the remote control Each time you press...

Страница 26: ...olor of the TV picture Move the TV VCR away from the appliances the TV VCR can repair itself automatically If you want to repair immediately unplug the TV VCR power cord then plug it in again 30 minut...

Страница 27: ...e companies often designate channels with letters or letter number combinations Please check with your local cable company The following is a chart of common cable channel designations TV Display TV D...

Страница 28: ...te el modo de reproducci n B squeda CONTROLES DE OPERACI N Y SUS FUNCIONES POWER WAKE UP SLEEP 1 2 3 4 5 6 7 8 9 100 0 TV FM CHANNEL RETURN REW PLAY STOP F FWD GAME RECORD PAUSE STILL SPEED SLOW CHANN...

Страница 29: ...y luego el bot n 1 a 9 Bot n 100 Cuando seleccione canales de tele visi n por cable cuyo n mero sea superior al 99 pulse primero este bot n y luego pulse los dos lti mos d gitos Para seleccionar el ca...

Страница 30: ...Utilizar el mando a distancia del televisor videograbadora para seleccionar canales 2 Programar uno o m s canales sin codificar para realizar la grabaci n autom tica con temporizador NOTA Con esta un...

Страница 31: ...Luego pulse el bot n F FWD B 5 Pulse el bot n PLAY K o STOP L hasta que aparezca el a o deseado Ejemplo 2003 Luego pulse el bot n F FWD B 6 Pulse el bot n PLAY K o STOP L hasta que aparezca la hora d...

Страница 32: ...y para ordenar piezas 1 888 SU HOGARSM 1 888 784 6427 Au Canada pour service en fran ais 1 800 LE FOYERMC 1 800 533 6937 www sears ca Your Home For repair in your home of all major brand appliances la...

Отзывы: