background image

77

Editing DVD-RW discs in VR mode (Playlist) (cont’d)

Editing

Recor

ding

Pla

ying discs

Editing

Bef

or
e y
ou star

t

Connections

Getting star

ted

Changing the SETUP men

u

Others

Español

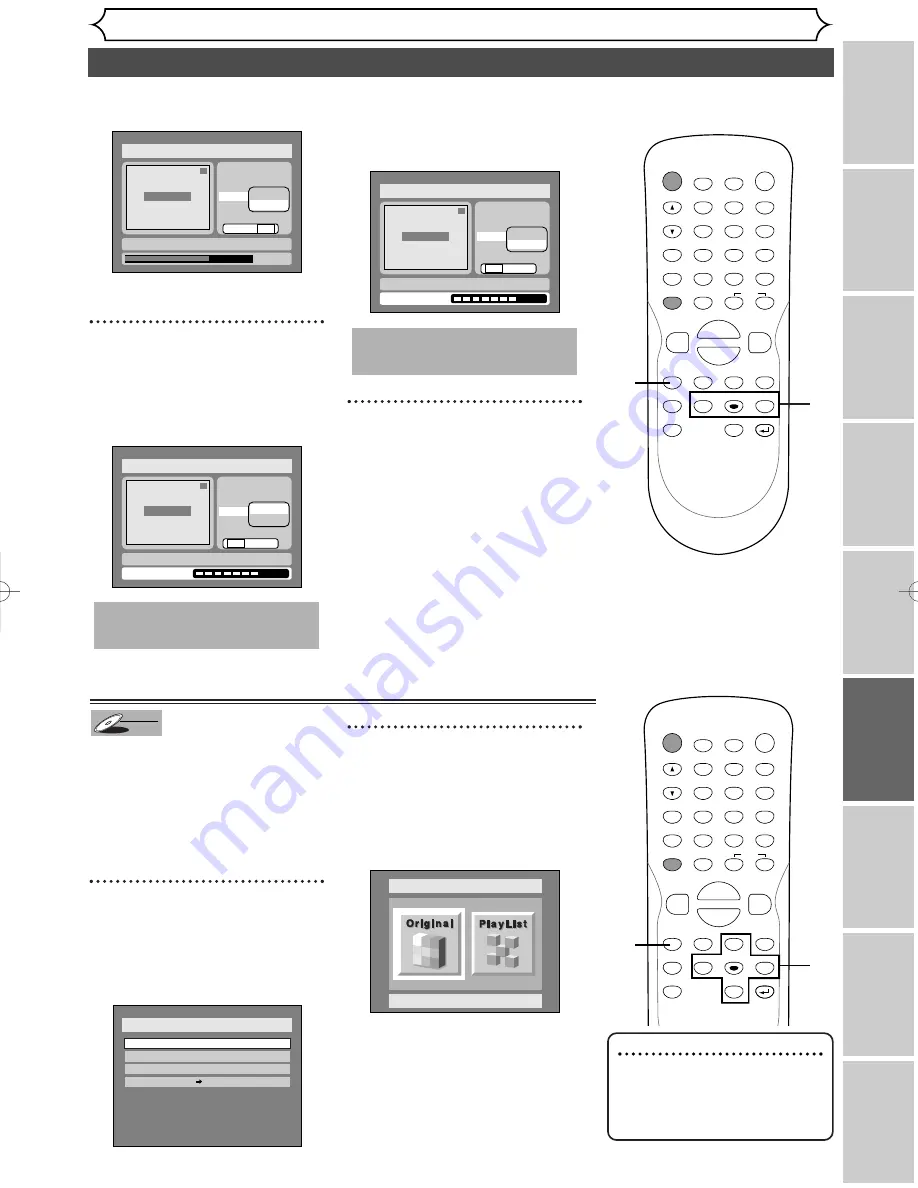
<Delete>:

• You cannot delete the first

chapter of each title.

7

Select “Yes” using 

{

B

but-

tons, then press ENTER button.

A chapter marker will be added.

<Add>:

The chapter marker which you
selected will be deleted.

<Delete>:

8

After writing to disc is com-
pleted, press SETUP button
to exit DISC menu.

This operation may take a
while to be completed.

1

Title Delete
Scene Delete
Edit Title Name
Chapter Mark
Index Picture Set

Add
Delete

Yes        No

Writing to Disc

JAN/ 1   1:00AM  CH12     XP

Disc > Edit > Playlist

Chapter 2/2

This operation may take a
while to be completed.

1

Title Delete
Scene Delete
Edit Title Name
Chapter Mark
Index Picture Set

Add
Delete

Yes        No

Writing to Disc

JAN/ 1   1:00AM  CH12     XP

Disc > Edit > Playlist

Chapter 1/1

1

0:01:25

Title Delete
Scene Delete
Edit Title Name
Chapter Mark
Index Picture Set

Add
Delete

Yes        No

JAN/ 1   1:00AM  CH12     XP

Disc > Edit > Playlist

Chapter 2/2

F

Note

• If a selected picture for a

thumbnail is deleted by delet-
ing a part of a title, a default

picture will be selected.

Setting pictures for thumbnails

You can set a picture to each title
for a thumbnail. It helps you to
remember the contents of the
title you are playing.The begin-
ning picture has been selected as
the default.

1

Press SETUP button. Select
“DISC” using 

{

B

buttons,

then press ENTER button.

DISC menu will appear.

2

Select “Edit”  using 

K

L

but-

tons, then press ENTER but-
ton.

Original/PlayList menu will appear.

Screen:

Disc > Edit

Original

Disc

Edit

Format

Finalize

Disc Protect OFF

ON

DVD-RW

DVD-RW

VR

POWER

DISPLAY

REC SPEED CLEAR

CM SKIP

SKIP

REC

PAUSE

SETUP

REPEAT

ZOOM

ENTER

RETURN

REC

MONITOR

OPEN/CLOSE

TIMER

PROG.

MENU/LIST

TOP MENU

SPACE

1

2

3

4

5

6

7

8

9

0

F

A

 {

B

FWD

g

STOP

C

PLAY

 B

REV

h

H

G

CH

.@/:

ABC

DEF

GHI

JKL

MNO

PQRS

TUV

WXYZ

K

L

8

7

POWER

DISPLAY

REC SPEED CLEAR

CM SKIP

SKIP

REC

PAUSE

SETUP

REPEAT

ZOOM

ENTER

RETURN

REC

MONITOR

OPEN/CLOSE

TIMER

PROG.

MENU/LIST

TOP MENU

SPACE

1

2

3

4

5

6

7

8

9

0

F

A

 {

B

FWD

g

STOP

C

PLAY

 B

REV

h

H

G

CH

.@/:

ABC

DEF

GHI

JKL

MNO

PQRS

TUV

WXYZ

K

L

1

1
2

  E6501UD_DVR90DEA.qx3  04.3.17  16:28  Page 77

Содержание DVR90DEA

Страница 1: ...u need additional operating assistance after reading this owner s manual or to order replacement accessories please call TOLL FREE 1 800 968 3429 or visit our web site at http www funai corp com Befor...

Страница 2: ...lar installation If this equipment does cause harmful interference to radio or television reception which can be determined by turning the equipment off and on the user is encouraged to try to correct...

Страница 3: ...e receptacles and the point where they exit from the appliance 13 Outdoor Antenna Grounding If an outside antenna or cable system is connected to the product be sure the antenna or cable system is gro...

Страница 4: ...case of 525 progressive scan picture problems it is recommended that the user switch the connection to the standard defin ition output If there are questions regarding our TV set compatibility with th...

Страница 5: ...Audio 88 Settings for Parental lock level 90 Others 92 Troubleshooting 92 Language code 95 Glossary 96 Specifications 97 Espa ol 98 Before you start 2 Precautions 2 Table of contents 5 Features 6 Fun...

Страница 6: ...search function Search for a desired point on a disc by title chapter or time Start to play from Original and Playlist Title playing is available from either an Original list or Playlist Editing Setti...

Страница 7: ...nnect the S Video output of external equip ment with an S Video cable Rear Panel 1 3 6 2 11 10 9 7 4 8 5 1 AC Power Cord Connect to a standard AC outlet to supply power to this unit 2 AUDIO OUTPUT jac...

Страница 8: ...D button Press to switch the recording speed 6 CLEAR button Press to clear the password once entered or to cancel the programming for CD or to clear the selecting marker num ber in the marker setup mo...

Страница 9: ...OP EN C LO SE TIME R PRO G ME NU PL AY LIS T TOP ME NU OR IGIN AL SPA CE 1 2 3 4 5 6 7 8 9 0 k A K FW D g STO P C PLA Y B RE V h H G CH ABC DEF GHI JKL MNO PQR S TUV WXY Z Remote control 60 Within abo...

Страница 10: ...lock of the DVD recorder as you need 6 Channel To make the channel setting of the DVD recorder as you prefer 1 Edit Turns on a title list When a disc with VR mode is inserted Original or PlayList is a...

Страница 11: ...give you the information on the playing disc Some operations are available while disc is playing Details are on page 41 1 Indicates a disc type and a format mode 2 Indicates a recording mode and possi...

Страница 12: ...3 Recording speed Indicates the recording speed of the disc Display message 1 2 3 4 5 6 4 Title Track and Chapter mark Appears when indicating a title track number Appears when indicating a chapter n...

Страница 13: ...e A V cables are connected to aVCR pictures may be distorted due to the copy protection system When progressive scanning mode is selected no video signal will be output from theVIDEO OUT or S VIDEO OU...

Страница 14: ...y selecting the channel on the DVD recorder You cannot record scrambled channels that require a cable box or satellite box When connecting to a cable box or satellite box with many scrambled channels...

Страница 15: ...o Stream for the Digital Out setting in the SETUP menu Refer to pages 88 89 The audio source on a disc in a Dolby Digital 5 1 channel surround format cannot be recorded as digital sound by an MD or DA...

Страница 16: ...c from SETUP menu Video format Video mode or Video recording format VR mode will be available depending on the disc type inserted This is necessary to prepare the disc for record ing Details are on pa...

Страница 17: ...s are very accessible on a disc the proce dure is simple really as you choose a title on a chapter from the menu screen What is titles and chapters The contents of DVD disc are generally divided into...

Страница 18: ...CH 18 Setup Channel Preset Auto Preset Manual Preset TV Audio Select Stereo Setup Playback Setting Note If the auto presetting is can celled during presetting some channels not yet preset may not be r...

Страница 19: ...Channel Preset Manual Preset CH18 Add Delete CH2 Add Delete Setup Channel Preset Manual Preset Adding deleting chan nels The channels you no longer receive or seldom watch can be deleted from the memo...

Страница 20: ...ayback Setting Setup Menu 4 Select TV Audio Select using K L buttons then press ENTER button Option window will appear 5 Select Stereo or SAP using K L buttons then press ENTER button Stereo Outputs m...

Страница 21: ...ect Auto using K L buttons then press ENTER button If you know your PBS chan nel number select Manual using K L buttons then press ENTER button Enter your PBS channel number using Number or K L button...

Страница 22: ...ess B button to move the cursor 6 Enter the time hour minute using K L buttons then press B buttons A cursor will move on AM or PM Setup Clock Clock Setting Auto Clock Setting Daylight Saving Time Aut...

Страница 23: ...C PAUSE SETUP REPEAT ZOOM ENTER RETURN REC MONITOR OPEN CLOSE TIMER PROG MENU LIST TOP MENU SPACE 1 2 3 4 5 6 7 8 9 0 F A B FWD g STOP C PLAY B REV h H G CH ABC DEF GHI JKL MNO PQRS TUV WXYZ K L 8 7 4...

Страница 24: ...ard one hour on the first Sunday in April and move back one hour on the last Sunday in October 1 Press SETUP button to dis play SETUP DISC menu SETUP DISC menu will appear Screen 2 Select SETUP using...

Страница 25: ...red option using K L buttons then press ENTER button 6 Press SETUP button to exit Setup Playback TV Aspect Parental Lock Disc Menu Language Audio Language Subtitle Language Digital Out Dynamic Range C...

Страница 26: ...g You cannot record copy protected video using this DVD recorder Copy protected video includes DVD Video discs and some satellite broadcasts If copy protected material is encountered during a recordin...

Страница 27: ...e Mode DVD RW ver 1 1 ver 1 1 CPRM compatible Video mode DVD R ver 2 0 Video mode Disc type format VR mode DVD RW ver 1 0 ver 1 1 ver 1 1 CPRM compatible Video mode DVD RW ver 1 1 ver 1 1 CPRM compati...

Страница 28: ...R mode using K L buttons then press ENTER button The recording mode will be set Setup Recording Auto Chapter Timer Programming Video mode DVD Player Compatibility mode VR mode Editing possibility mode...

Страница 29: ...TER button Chapter marks will be put as you specified 8 Press SETUP button to exit SETUP menu Setup Recording Auto Chapter Timer Programming DVD RW Recording Format VR mode 10 minutes OFF 5 minutes 10...

Страница 30: ...t ton Formatting will start 6 Formatting is complete 100 will be indicated Formatting 100 Formatting 58 Disc Edit Format Finalize Yes No Disc Protect OFF ON Are you sure Yes No Disc Edit Format Finali...

Страница 31: ...26 3 Make sure that the recording format is set to the desired mode Refer to Formatting a disc on pages 28 30 When a DVD RW disc is loaded You can choose Video mode or VR mode from SETUP menu Video mo...

Страница 32: ...ed If you want to change the recording speed press REC SPEED button repeatedly The recording speed will be changed as you press the button as shown Refer to Recording speed on page 26 You cannot chang...

Страница 33: ...R mode from SETUP menu Video mode has been selected as the default Refer to pages 28 29 Settings for the recording for mat to a blank disc When a DVD R disc is loaded DVD R discs will always be in Vid...

Страница 34: ...SAT JAN 01 DEC 31 L MON FRI L SAT L FRI L SUN L L Setup Recording Timer Programming Date Start End CH Speed 1 2 3 4 JAN 01 AM AM CH8 Setup Recording Timer Programming Date Start End CH Speed 1 2 3 4...

Страница 35: ...on the list you will need 4 To clear the timer programming select your desired program using K L buttons Then CLEAR button To correct the timer program ming select your desired pro gram using K L but...

Страница 36: ...ority Hints for timer recording If there is a power failure or this unit has been unplugged for more than 30 seconds the clock setting and all timer set tings will be lost If a disc is not on the tray...

Страница 37: ...1 Press SETUP button to display SETUP DISC menu 2 Select SETUP using B buttons then press ENTER button 3 Select Select Video then press ENTER button 4 Select L1 Rear then press ENTER button 5 Select...

Страница 38: ...1 on the remote control or the CH L K buttons To use the input jacks on the front of this unit select L2 position by pressing 0 0 2 on the remote control or the CH L K buttons 4 Select a recording sp...

Страница 39: ...nalizing discs in Video mode automatically creates title menus 1 Press SETUP button to dis play SETUP DISC menu SETUP DISC menu will appear Screen 2 Select DISC using B buttons then press ENTER button...

Страница 40: ...ER button Option window will appear 4 Select Yes using B but tons then press ENTER but ton A disc will be protected Writing to Disc 58 Disc Edit Format Finalize Disc Protect OFF ON Yes No Disc Edit Fo...

Страница 41: ...or the symbols below on your DVDs If these region symbols do not appear on your DVD you cannot play the DVD in this DVD recorder The number inside the globe refers to region of the world Region 1 repr...

Страница 42: ...title menu You can change Original or Playlist of VR mode using MENU LIST button Video mode VR mode MENU LIST button 5 Select a desired title using K L B buttons then press ENTER button Playing will...

Страница 43: ...H G CH ABC DEF GHI JKL MNO PQRS TUV WXYZ K L 1 2 5 4 For MP3 playback REC SPEED CLEAR CM SKIP SKIP REC PAUSE SETUP REPEAT ZOOM ENTER RETURN MENU LIST TOP MENU SPACE 7 8 9 0 F B FWD g STOP C PLAY B RE...

Страница 44: ...the TV screen 2 Select an item using K L B buttons then press ENTER button to confirm Continue this step to set up all the features you want or to start playing the disc from the menu MENU LIST button...

Страница 45: ...lable may appear on the TV screen 2 Select a title to play using the K L B buttons then press ENTER button Play will begin at the title you selected TOP MENU button Displays the Title menu of a DVD di...

Страница 46: ...fixed at x8 with sound For MP3 files approximate speed is fixed at x8 To return to the normal play press PLAY Bbutton x20 Normal speed playback x2 x20 x5 x40 x40 FWD g REV h FWD g REV h FWD g REV h FW...

Страница 47: ...ing 30 seconds Playback will restart automatically B CM Skip 30 sec DVD RW DVD RW VR DVD RW DVD RW Video DVD R DVD R Pause 1 During play press PAUSE F button Play will pause and sound will be muted 2...

Страница 48: ...ll be changed as follows To return to the normal play press PLAY B button x1 8 Pause x1 16 x1 8 x1 16 x1 2 x1 4 FWD g REV h FWD g REV h FWD g REV h FWD g REV h FWD g REV h FWD g REV h DVD RW DVD RW VR...

Страница 49: ...ws you to assign a specific point on a disc to be called back later 1 During play press DISPLAY button The display menu will appear Screen 2 Select icon using B buttons then press ENTER button Marker...

Страница 50: ...R button T for title will be highlighted Title Enter a desired title number to search using K L buttons or number buttons then press ENTER button Title search will start Chapter To move to C for chapt...

Страница 51: ...P REC PAUSE SETUP REPEAT ZOOM ENTER RETURN REC MONITOR OPEN CLOSE TIMER PROG MENU LIST TOP MENU SPACE 1 2 3 4 5 6 7 8 9 0 F A B FWD g STOP C PLAY B REV h H G CH ABC DEF GHI JKL MNO PQRS TUV WXYZ K L 3...

Страница 52: ...y CD MP3 only Group The current group will be played repeatedly MP3 only OFF Title Chapter A B 1 1 01 23 45 DVD Video MP3 MP3 MP3 CD CD CD DVD RW DVD RW VR DVD RW DVD RW Video DVD R DVD R DVD V DVD V...

Страница 53: ...but tons then press ENTER but ton CD Playback Mode menu will appear 3 Select Program Play using K L buttons then press ENTER button Program play list will appear 4 Select a desired track using K L but...

Страница 54: ...b audio R or a mix of both L R 1 During play press DISPLAY button The display menu will appear Screen 2 Select icon using B buttons then press ENTER button Audio menu will appear DVD Video DVD RW VR m...

Страница 55: ...the case usually tells you which subtitle languages are available You can switch subtitle languages anytime during playback 1 During play press DISPLAY button The display menu will appear Screen 2 Sel...

Страница 56: ...uttons then press ENTER button Your setting will be activated This function reduces noise in the playback picture When playing back discs recorded in long time mode such as SLP or SEP mode select Type...

Страница 57: ...6 Time status bar of the title 7 The arrow icon which means the title list includes a next or a previous page Press Bor button by following direction of the icon 8 Playback status of the current disc...

Страница 58: ...t you can edit as you prefer without losing original titles The following items you can edit with a playlist Deleting titles Refer to page 72 Deleting parts of titles Refer to pages 73 74 Putting name...

Страница 59: ...buttons then press ENTER button Option window will appear 5 Select Yes using B but tons then press ENTER but ton Title will be deleted 6 After writing to disc is com pleted press SETUP button to exit...

Страница 60: ...1 1 00AM CH12 XP Disc Edit 1 Title Delete Edit Title Name Chapter Mark 0 01 25 JAN 1 1 00AM CH12 XP Disc Edit 1 1 3 2 5 4 JAN 1 1 00AM JAN 1 4 00AM JAN 1 2 00AM JAN 1 3 00AM JAN 1 5 00AM Disc Edit For...

Страница 61: ...ated for the title 7 After writing to disc is com pleted press SETUP button to exit DISC menu This operation may take a while to be completed Disc Edit Edit Title Name 1 A B C a b c 1 2 3 abc Yes No W...

Страница 62: ...lect a desired time using K L buttons then press ENTER button Option window will appear 6 Select Yes using B but tons then press ENTER but ton A chapter marker will be added 7 After writing to disc is...

Страница 63: ...TER but ton Title will be deleted 7 After writing to disc is com pleted press SETUP button to exit DISC menu This operation may take a while to be completed 1 Title Delete Scene Delete Edit Title Name...

Страница 64: ...NTER button Option window will appear 6 Press ENTER button to decide a start point then press ENTER button to decide an end point A cursor will move to Preview You can check a preview 1 0 00 55 Title...

Страница 65: ...s You can put title names on the titles and change the names from this menu The names you put on the titles will be displayed on a titlelist 1 Press SETUP button Select DISC using B buttons then press...

Страница 66: ...iginal Edit Title Name 1 0 01 25 A B C a b c 1 2 3 JAN 1 1 00AM CH12 XP Disc Edit Original 1 Title Delete Scene Delete Edit Title Name Chapter Mark Index Picture Set Protect OFF JAN 1 1 00AM CH12 XP 0...

Страница 67: ...t Chapter Mark using K L buttons then press ENTER button Option window will appear 6 Select Add or Delete using K L buttons then press ENTER button Option window will appear Add 1 0 01 25 Title Delete...

Страница 68: ...c Edit Original Chapter 2 2 F Note If a selected picture for a thumbnail is deleted by delet ing a part of a title a default picture will be selected You can set a picture to each title for a thumbnai...

Страница 69: ...ration may take a while to be completed Disc Edit Original 1 Yes No Title Delete Scene Delete Edit Title Name Chapter Mark Index Picture Set Protect OFF ON Writing to Disc JAN 1 1 00AM CH12 XP Disc Ed...

Страница 70: ...Select Disc Protect from Disc menu then select Yes This operation may take a while to be completed Disc Edit Original 1 Yes No Writing to Disc JAN 1 1 00AM CH12 XP ON Title Delete Scene Delete Edit Ti...

Страница 71: ...m pleted press SETUP button to exit DISC menu This operation may take a while to be completed Disc Edit Original 2 Yes No Writing to Disc JAN 1 2 00AM CH12 XP OFF Title Delete Scene Delete Edit Title...

Страница 72: ...com pleted press SETUP button to exit DISC menu This operation may take a while to be completed Disc Edit Playlist 1 Title Delete Scene Delete Edit Title Name Chapter Mark Index Picture Set Yes No Wr...

Страница 73: ...ill appear 5 Select Scene Delete using K L buttons then press ENTER button Option window will appear 6 Press ENTER button to decide a start point then press ENTER button to decide an end point A curso...

Страница 74: ...ENTER button DISC menu will appear 2 Select Edit using K L but tons then press ENTER but ton Original PlayList menu will appear Screen 3 Select PlayList using B buttons then press ENTER button Playlis...

Страница 75: ...tle Name 1 0 01 25 A B C a b c 1 2 3 JAN 1 1 00AM CH12 XP Disc Edit Playlist Edit Title Name 1 0 01 25 A B C a b c 1 2 3 JAN 1 1 00AM CH12 XP Disc Edit Playlist 1 Title Delete Scene Delete Edit Title...

Страница 76: ...or Delete using K L buttons then press ENTER button Option window will appear Add 1 0 01 25 Title Delete Scene Delete Edit Title Name Chapter Mark Index Picture Set Add Delete Yes No JAN 1 1 00AM CH12...

Страница 77: ...Delete Yes No JAN 1 1 00AM CH12 XP Disc Edit Playlist Chapter 2 2 F Note If a selected picture for a thumbnail is deleted by delet ing a part of a title a default picture will be selected Setting pict...

Страница 78: ...e Delete Scene Delete Edit Title Name Chapter Mark Index Picture Set Writing to Disc JAN 1 1 00AM CH12 XP Disc Edit Playlist Disc Edit Playlist 1 0 01 25 Yes No Title Delete Scene Delete Edit Title Na...

Страница 79: ...g to disc is com pleted press SETUP button to exit DISC menu To delete a title from Playlist refer to Deleting titles on page 72 To delete a Playlist refer to Deleting a Playlist on page 80 Disc Edit...

Страница 80: ...ress ENTER but ton A Playlist will be erased 6 After writing to disc is com pleted press SETUP button to exit DISC menu Disc Edit Playlist Add New Title Delete Playlist 1 1 3 2 5 4 JAN 1 2 00AM JAN 1...

Страница 81: ...Option window will appear 5 Select Yes using B but tons then press ENTER but ton Title will be deleted 6 After writing to disc is com pleted press SETUP button to exit DISC menu This operation may tak...

Страница 82: ...isc Edit Edit Title Name 1 0 01 25 A B C a b c 1 2 3 JAN 1 1 00AM CH12 XP Disc Edit Edit Title Name 1 0 01 25 A B C a b c 1 2 3 JAN 1 1 00AM CH12 XP Disc Edit 1 Title Delete Edit Title Name Chapter Ma...

Страница 83: ...me to work the screen saver on the screen Set the type of sound signal which outputs from the digital audio output jack Set whether the sound recorded in 96kHz will be down sampled in 48kHz Compressin...

Страница 84: ...al Out Dynamic Range Control Fast Forward with Audio 4 3 Letter Box All English Original OFF ON OFF Setup Playback Setting Setup Menu Note Only the languages supported by the disc can be selected Audi...

Страница 85: ...ayback TV Aspect Parental Lock Disc Menu Language Audio Language Subtitle Language Digital Out Dynamic Range Control Fast Forward with Audio 4 3 Letter Box All English Original OFF ON OFF Original Eng...

Страница 86: ...item using K L buttons then press ENTER button Setup Display OSD Background Transparency OSD Background Color OSD Language FL Dimmer Screen Saver 10 minutes Bright 1 English 35 Setup Playback Setting...

Страница 87: ...d Select a setting using K L buttons then press ENTER button Your setting will be activated Select a setting using K L buttons then press ENTER button Your setting will be activated OSD Background Col...

Страница 88: ...l Out Dynamic Range Control Fast Forward with Audio 4 3 Letter Box All English Original OFF ON OFF Setup Playback Setting Setup Menu 88 POWER DISPLAY REC SPEED CLEAR CM SKIP SKIP REC PAUSE SETUP REPEA...

Страница 89: ...ting using K L buttons then press ENTER button Your setting will be activated Dynamic Range Control Default ON Set to ON to compress the range between soft and loud sounds Fast Forward with Audio Defa...

Страница 90: ...REC SPEED CLEAR CM SKIP SKIP REC PAUSE SETUP REPEAT ZOOM ENTER RETURN REC MONITOR OPEN CLOSE TIMER PROG MENU LIST TOP MENU SPACE 1 2 3 4 5 6 7 8 9 0 F A B FWD g STOP C PLAY B REV h H G CH ABC DEF GHI...

Страница 91: ...ton to exit SETUP menu A password has been set already Setup Playback TV Aspect Parental Lock Disc Menu Language Audio Language Subtitle Language Digital Out Dynamic Range Control Fast Forward with Au...

Страница 92: ...enna Adjust the picture see the TV s instruction manual Place the DVD recorder and TV farther apart Place the TV and any bunched antenna cables farther apart TV program reception does not fill the scr...

Страница 93: ...hat lasted for more than 30 seconds Reset the clock pages 22 23 Disconnect the AC power cord from the AC outlet and connect it again The program contains copy protection signals that restricts copying...

Страница 94: ...ot recordable inVideo mode This program is not allowed to be recorded on this disc Unplayable disc is inserted in the DVD recorder Insert the standardized disc which bear the marks on page 41 Recordin...

Страница 95: ...Sesotho 6566 Setswana 6660 Shona 6560 Sindhi 6550 Singhalese 6555 Siswat 6565 Slovak 6557 Slovenian 6558 Somali 6561 Spanish 5165 Sundanese 6567 Swahili 6569 Swedish 6568 Tagalog 6658 Tajik 6653 Tami...

Страница 96: ...y MP3 files on CD R RW discs from the comput er and play the files on this unit Finalize To make DVD discs which have been recorded on possible to play in DVD players With this DVD recorder it is poss...

Страница 97: ...ling frequency Compression format 13 5MHz MPEG 48kHz Dolby Digital Video input Input level Jacks Video output Output level Jacks Component video output Output level Jacks S Video input Y Iuminance Inp...

Страница 98: ...n los formatos de video modo deVideo o de grabaci n de video modo VR seg n el tipo de disco colocado Esto es necesario para preparar el disco para grabaci n Vea los detalles en las p ginas 28 30 Tipos...

Страница 99: ...el procedimiento es simple ya que s lo tiene que elegir el t tulo en un cap tulo de la pantalla del men Qu son t tulos y cap tulos La grabaciones del disco DVD se divi den generalmente en t tulos Los...

Страница 100: ...improper maintenance commercial use such as hotel rental or office use of this product or damage which results from fire flood lightning or other acts of God THIS WARRANTY DOES NOT COVER PACKING MATE...

Отзывы: