background image

AUDIO OUT

DIGTAL
OUT PCM/
BITSTREAM

COAXIAL

S-VIDEO 

OUT

VIDEO

OUT

L

Y

R

Cb

Cr

13

15

12

11

9

10

14

I   P

PROGRE

SSIVE

COMPONENT

VIDEO OUT

REAR VIEW

1

6

8

2

3

4

5

7

POWER

/

 E

D

/

 G

B

PLAY

P

STOP

OPEN/CLOSE

FRONT PANEL

REMOTE CONTROL

RETURN

ZOOM

MODE

MENU

SKIP

PAUSE

A-B

REPEAT

ANGLE

AUDIO

SUB

TITLE

CLEAR

TITLE

STOP

PLAY

FWD

REV

SETUP

ENTER

OPEN/

CLOSE

SEARCH

MODE

DISPLAY

1

2

3

4

5

6

7

8

9

0

+10

POWER

1

2

3

4

5

6

7
8
9

10
11

14

12

13

15

18

19

17

16

21
20

22

23

24

25

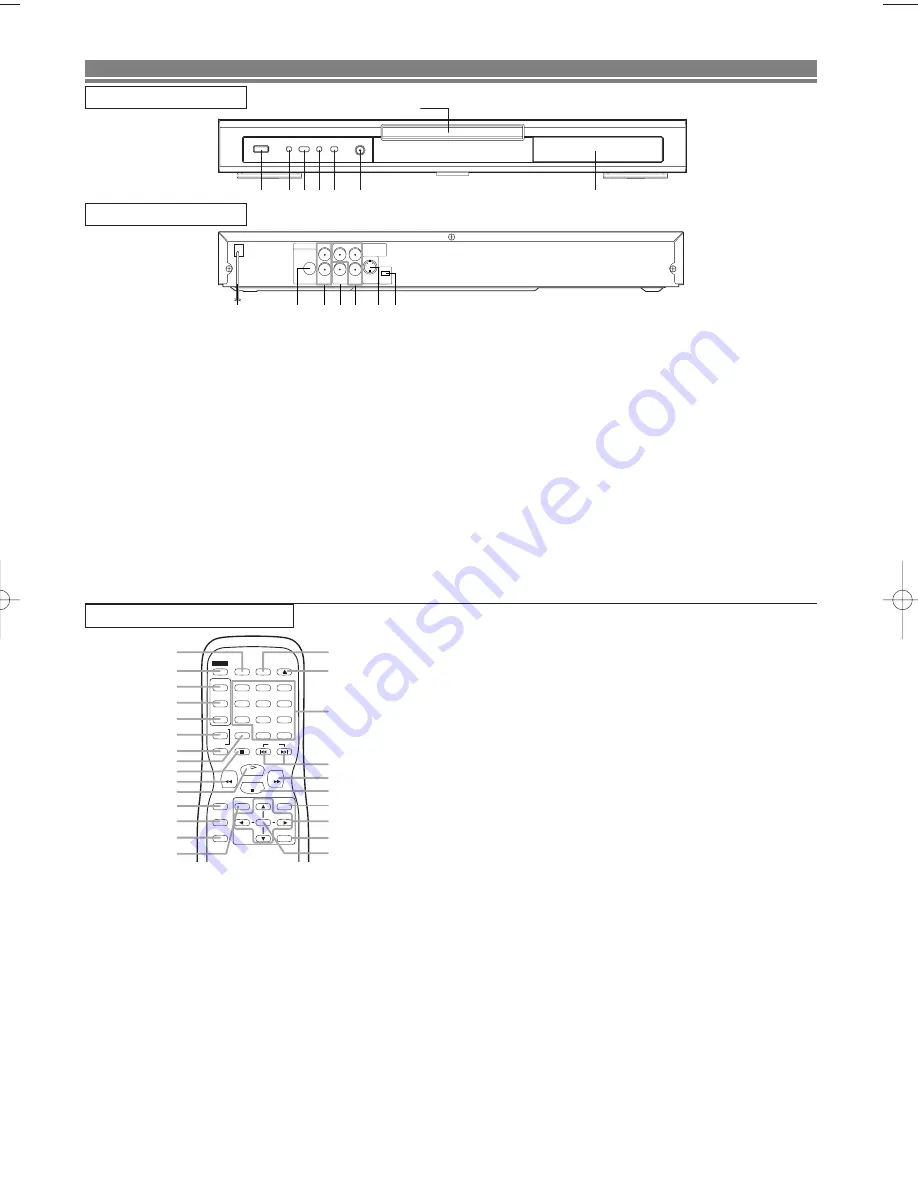
1. POWER

to switch the player to ON or OFF

2.

H

/

h

h

goes to previous chapter or track during playback; press
and hold for 1.5 seconds for a reverse search

3. PLAY

to start or resume disc playback

4.

g

/

G

goes to next chapter or track during playback; press and
hold for 1.5 seconds for a forward search

5. STOP

to stop playback

6. OPEN/CLOSE

to open/close the disc tray

7. Disc tray
8. Display

FUNCTIONAL OVERVIEW

9. MAIN (AC Power Cord)

connect to a standard AC outlet

10. COAXIAL (Digital audio out)

connect to AUDIO inputs of a digital (coaxial) audio
equipment

11. AUDIO OUT (Left/Right)

connect to AUDIO inputs of an amplifier, receiver or
stereo system

12. VIDEO OUT

connect to the Video Input of a TV.

13. COMPONENT VIDEO OUT

connect to a TV with Component video in jacks.

14. S-VIDEO OUT

connect to a TV with S-Video inputs

15. INTERLACE/PROGRESSIVE SCAN SELECTOR

to select interlace or progressive scanning 

Caution: Do not touch the inner pins of the jacks on the
rear panel. Electrostatic discharge may cause permanent
damage to the player.

9. PAUSE

pause playback temporarily / frame-by-frame playback 

10. REV

h

h

to view DVD picture in fast reverse motion

11. PLAY

to start a DVD disc playback

12. SETUP

to access or remove the DVD setup menu

13. MODE

to set up programmed or random playback (Audio CD)
to set the black level and virtual surround during DVD 
playback

14. ZOOM

enlarge DVD video image

15. TITLE

to display title menu of a disc

16. ENTER

acknowledge menu selection

17. RETURN

to return previous or remove setup menu

18. Arrow (

s B K

K L

L

)

(left/right/up/down) select an item in the menu

19. MENU

to display the menu of the DVD disc

20. STOP

to stop a DVD disc playback

21. FWD

g

g

to view DVD picture in fast forward motion

22. SKIP

H

,

G

to skip chapter/tracks

23. 0-9 numerical buttons

select numbered items in a menu

+10

use this button to enter number 10 and above

24. OPEN/CLOSE

to open/close the disc tray

25. SEARCH MODE

to locate a desired point

1. DISPLAY

to access or remove the display screen during DVD or
Audio CD playback

2. POWER

switch DVD player ON or OFF

3. AUDIO

to choose audio languages or sound modes

4. SUBTITLE

subtitle language DVD selector

5. ANGLE

select DVD camera angle

6. REPEAT

repeat chapter, track, title, all.

7. REPEAT A-B

repeat a specific segment

8. CLEAR

to reset the setting

– 6 –

EN

[Fig. 1]

[Fig. 2]

[Fig. 3]

E57S1UD.QX3  02.12.20 9:32 PM  Page 6

Содержание DVL700D

Страница 1: ...r added protection for this product during a light ning storm or when it is left unattended and unused for long periods of time unplug it from the wall outlet and disconnect the antenna or cable syste...

Страница 2: ...rt 15 of the FCC Rules These limits are designed to provide reasonable protection against harmful interference in a residential installation This equipment generates uses and can radiate radio frequen...

Страница 3: ...ITLE CHAPTER 10 REPEAT TRACK 11 REPEAT A B 11 Program CD 11 Random Playback CD 11 MP3 Playback 11 On Screen Information 11 Track Selection 12 Random Playback MP3 12 Program MP3 12 Audio Language 12 St...

Страница 4: ...r with the same region code 1 ABOUT THE DISCS For Customer Use Read carefully the information located at the bottom of your DVD player and enter below the Serial No Retain this informa tion for future...

Страница 5: ...ynamic range control You can control the range of sound volume Black Level Setting DVD Data on a DVD is divided into sections called titles and then into subsections called chapters each of which is g...

Страница 6: ...E PROGRESSIVE SCAN SELECTOR to select interlace or progressive scanning Caution Do not touch the inner pins of the jacks on the rear panel Electrostatic discharge may cause permanent damage to the pla...

Страница 7: ...connecting Read through the operation manual for the equipment to be connected Be sure that the colors of the jacks and plugs match up when using VIDEO AUDIO cables Be sure to keep the Player connect...

Страница 8: ...r cable box connection remove that cable from your TV s antenna terminal and reconnect it to the coaxial antenna input terminal of the RF Modulator usually marked ANT IN then con nect the RF modulator...

Страница 9: ...the DVD player or the disc With DVDs that use some titles for playback program signals playback may start from the second title or it may skip these titles During the playback of two layered disc pict...

Страница 10: ...G G During playback press SKIP G G to move to the next track Press it repeatedly to skip subsequent tracks Press SKIP H H to go back to the beginning of the current track Press it repeat edly to go to...

Страница 11: ...ou may determine the order in which tracks will play In stop mode press MODE The PROGRAM screen will appear Press or to select a track then press ENTER Press CLEAR to erase the The most recently enter...

Страница 12: ...languages e g DVDs which allow audio language set ting on the disc menu Some discs allow audio language setting subtitle language setting on the disc menu Operation varies between discs so refer to th...

Страница 13: ...t only affect during the playback of DVD discs of the DVD player Press SETUP in STOP mode Press B to select CUSTOM then press ENTER CUSTOM mode will appear Press s or B to select AUDIO then ENTER to c...

Страница 14: ...A B Abkhazian 4748 Afar 4747 Afrikaans 4752 Albanian 6563 Amharic 4759 Arabic 4764 Armenian 5471 Assamese 4765 Aymara 4771 Azerbaijani 4772 Bashkir 4847 Basque 5167 Bengali Bangla 4860 Bhutani 5072 B...

Страница 15: ...ver capabilities No DTS audio is output This player does not support DTS audio This is not a malfunction No sound and picture Check that the VIDEO AUDIO cable is connected to the correct device See Co...

Страница 16: ...d to TROU BLESHOOTING GUIDE in this Owner s Manual the laser optical pickup unit may be dirty Consult your dealer or an Authorized Service Center for inspection and cleaning of the laser optical picku...

Страница 17: ...utton to enter number 10 and above 24 Bot n de abertura cierre OPEN CLOSE P lselo para introducir discos en la bandeja o sacarlos de ella 25 Bot n del modo de b squeda SEARCH MODE P lselo para localiz...

Страница 18: ...alidad de est ndar profesional como el que puede o rse en los cines Para hacer las conexiones de audio utilice cables digitales coaxiales de audio de venta en el comercio Consulte la figura 8 de la p...

Страница 19: ...PEN CLOSE La bandeja de carga del disco se abrir Ponga un disco en la bandeja Aseg rese de que el disco est correctamente asenta do en el hueco correcto con el lado de la etiqueta hacia arriba Pulse e...

Страница 20: ...ion improper maintenance commercial use such as hotel rental or office use of this product or damage which results from fire flood lightning or other acts of God THIS WARRANTY DOES NOT COVER PACKING M...

Отзывы: