background image

– 15 –

EN

Functions

4

AUDIO

DRC ON
DOWN SAMPLING ON
DOLBY DIGITAL BITSTREAM

ENTER

Hint

STILL MODE:

• Select “AUTO” usually.
• If you select “AUTO”, 

automatically select the 
best resolution setting 
(FRAME or FIELD) based 
on the data characteristics 
of the pictures. (default).

• If you select “FIELD”, 

the picture in the still 
mode will be stabilized.

• If you select “FRAME”, the 

picture in the still mode 
will be highly defined.

• An individual picture on 

TV screen is called a 
“frame”, which consists 
of two separate images 
called a “field”. 

• Some pictures may be 

blurred  if you select 
“AUTO” in the still 
mode due to their data 
characteristics.

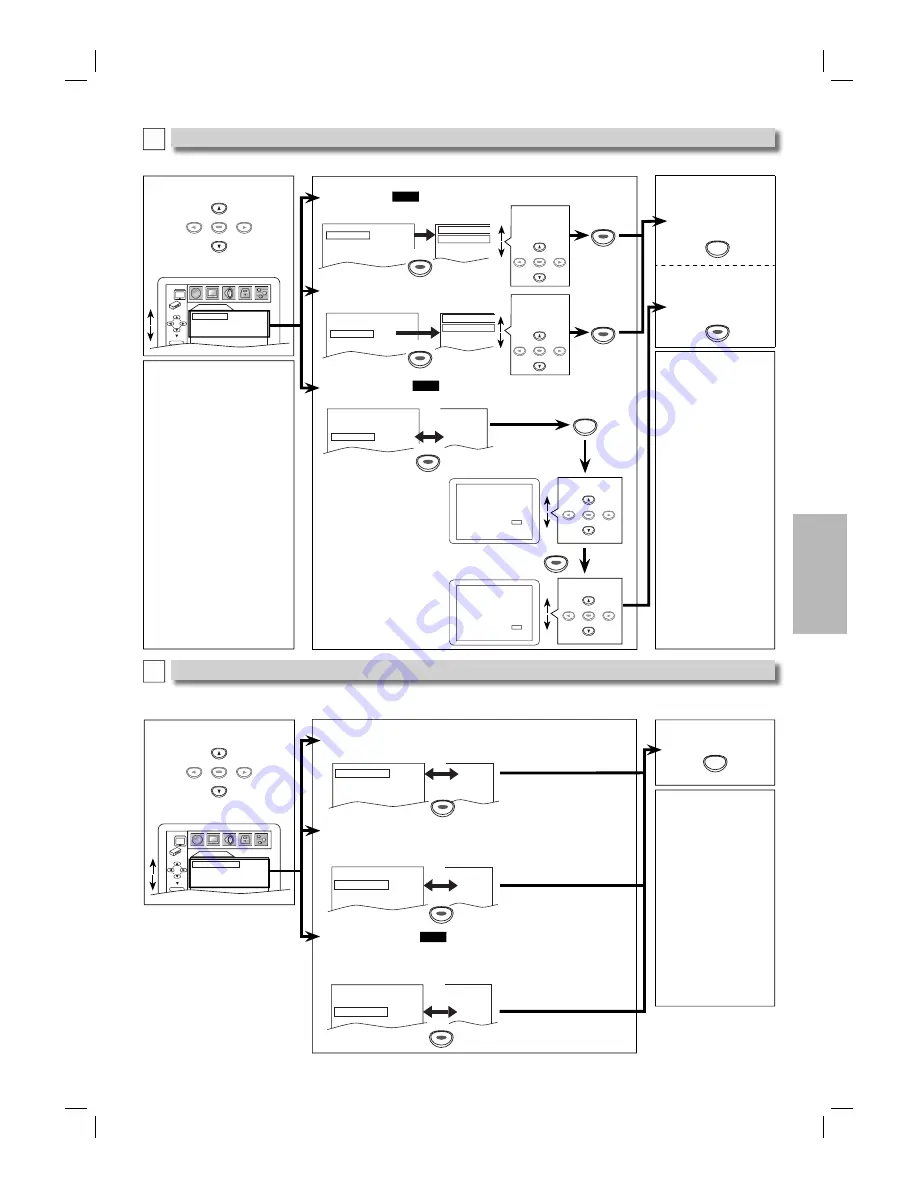
You can change the display functions. Follow steps 1 to 3 in the “CUSTOM Menu” section on page 14.

Select the desired item.

DISPLAY menu

Choose the appropriate audio settings for your equipment. It only affects during the playback of DVD discs. Follow steps 1 to 
3 in the “CUSTOM Menu” section on page 14.

Select the desired item.

AUDIO menu

5

SETUP

Hint

DRC:

• This function is 

available only on 
the discs which are 
recorded in the Dolby 
Digital format.

DOWN SAMPLING:

• When playing disc with 

copyright protection, 
the sound will be down 
sampled at 48kHz, even 
if you set to “OFF”.

• 

This function is 

available only on 
digital outputting of 
a disc recorded in 
96kHz.

DISPLAY

TV ASPECT 

4:3 LETTER BOX

STILL MODE 

AUTO

PROGRESSIVE OFF

ENTER

DISPLAY Setting

B

AUDIO Setting

C

6  

SETUP

To exit the menu

ENTER

ENTER

6

   To exit 

the TV ASPECT 
or STILL MODE 
screen

To complete the 
PROGRESSIVE 
setting

ENTER

ENTER

ENTER

Hint

TV ASPECT:

• Select “4:3 LETTER BOX”, so 

that black bars may appear on 
the top and bottom of the screen.

• Select “4:3 PAN & SCAN” for 

a full height picture with both 
sides adjusted.

• Select “16:9 WIDE” if a wide 

screen TV is connected to this unit.

PROGRESSIVE:

• You can set “PROGRESSIVE” 

to “OFF” in the DISPLAY menu 
or press and hold 

[PLAY 

B

]

 on 

the front of the unit for more than 
5 seconds during playback, so 
that the “PROGRESSIVE SCAN” 
indicator on the front panel lights 
off.

• When “PROGRESSIVE” 

is “ON”, video signals from 
the unit’s VIDEO OUT and 
S-VIDEO OUT jacks will be 
distorted or not be output at all.

5

4

TV ASPECT: 

QUICK

  (Default: 4:3 LETTER BOX)

See Hint on the left.

TV ASPECT

4:3 LETTER BOX
4:3 PAN & SCAN
16:9 WIDE

TV ASPECT 

4:3 LETTER BOX

STILL MODE AUTO
PROGRESSIVE OFF

ENTER

ENTER

ENTER

ENTER

ENTER

ENTER

STILL MODE:


(Default: AUTO)

See Hint on the right.

TV ASPECT 

4:3 LETTER BOX

STILL MODE AUTO
PROGRESSIVE OFF

STILL MODE

AUTO
FIELD
FRAME

ENTER

ENTER

ENTER

Select the 
desired 
setting.

ENTER

TV ASPECT           4:3 LETTER BOX
STILL MODE           AUTO
PROGRESSIVE      OFF

4:3 LETTER BOX
AUTO
ON

ENTER

ENTER

ENTER

ENTER

ENTER

ENTER

SETUP

PROGRESSIVE: 

QUICK

  (Default: OFF)

See Hint on the left.

DRC (Dynamic Range Control):  (Default: ON)

Set to “ON” to compress the range between soft and loud sounds.

DOLBY DIGITAL:  

QUICK

  (Default:  BITSTREAM)

Set to “BITSTREAM” when the unit is connected to a Dolby Digital decoder.
•  BITSTREAM: Outputs a Dolby Digital Signals.
•  PCM: Convert the Dolby Digital into PCM (2 channel).

DRC ON
DOWN SAMPLING  ON
DOLBY DIGITAL 

BITSTREAM

OFF
ON
BITSTREAM

DOWN SAMPLING:  (Default: ON)

Set to “ON” when outputting in 48kHz.
Set to “OFF” when outputting the original sound.

DRC ON
DOWN SAMPLING ON
DOLBY DIGITAL 

BITSTREAM

ON
ON

PCM

DRC ON
DOWN SAMPLING ON
DOLBY DIGITAL 

BITSTREAM

ON
OFF
BITSTREAM

ENTER

ENTER

ENTER

ENTER

ENTER

ENTER

ENTER

ENTER

ENTER

Select “Yes”.

ENTER

Before proceeding…

1. Make sure your TV has progressive scan.
2. Connect with component video cable

NOTE:  If there is no picture or picture is 
 

distorted after selecting ‘YES’, 


wait about 15 seconds for auto recovery.

  
A c t i va t e   P r o gr e s s i ve ?  

SELECT:  

K

 / 

L

               SET:ENTER

NO
YES

NO
YES

NO
YES

Confirm again to use progressive scan.
  If Picture is good, select ‘YES’.

SELECT:  

K

 / 

L

SET:ENTER

Select “Yes”.

ENTER

Select the 
desired 
setting.

ENTER

ENTER

ENTER

ENTER

If there is no picture or 
you do not press any 
buttons for 15 seconds, 
Progressive scan will 
switch to “OFF” and it 
will exit the setup menu.

DVL150G_E6C21UD.indd   15

DVL150G_E6C21UD.indd   15

2006/05/10   9:37:13

2006/05/10   9:37:13

Содержание DVL150G

Страница 1: ...O input jack Owner s Manual Please read before using this unit If you need additional operating assistance after reading this owner s manual please call TOLL FREE 1 800 968 3429 or visit our web site...

Страница 2: ...e or use radio frequency energy Changes or modifications to this equipment may cause harmful interference unless the modifications are expressly approved in the manual The user could lose the authorit...

Страница 3: ...Power supply cords should be routed so that they are not likely to be walked on or pinched by items placed upon or against them paying particular attention to cords at plugs convenience receptacles a...

Страница 4: ...ded for home and other limited viewing uses only unless otherwise authorized by Macrovision Reverse engineering or disassembly is prohibited Notice for Progressive Scan Outputs Consumers should note t...

Страница 5: ...portion of the disc is too small smaller than 55mm across it may not be played back 10 Do not glue paper or put stickers on to the disc These may damage the disc and the unit may not read it correctly...

Страница 6: ...n Method 3 above and progressive scanning mode To set the mode set PROGRESSIVE to ON in the SETUP menu so that the PROGRESSIVE SCAN indicator on the front panel lights up See pages 14 15 for more deta...

Страница 7: ...TREAM Connecting to the other equipment an MD deck or DAT deck etc without Dolby Digital decoder PCM Connection Setting Digital audio input jack Front Panel Indicator and Rear Terminals Front Panel PO...

Страница 8: ...To search forward backward through a disc To begin slow forward reverse play back in the pause mode To search forward backward through a disc MENU To call up the Menu on a disc To call up the file lis...

Страница 9: ...ck press PLAY B Hint Slow forward or reverse speed is different depending on the disc Approximate speed is 1 1 16 2 1 8 and 3 1 2 Set STILL MODE to FIELD in the DISPLAY menu if pictures in the slow pl...

Страница 10: ...iles You can copy MP3 WMA files on CD R RWs from the computer and play the files on this unit Hint Some selections may take a while to be recognized Press TOP MENU to return to the first item Folders...

Страница 11: ...active T Track repeat A All Tracks repeat A B A B repeat 11 16 0 00 00 0 03 30 1 3 0 00 00 1 23 45 T L1 BIT RATE The amount of audio and video data currently being read ALL Current track number Total...

Страница 12: ...R at step 2 While a program is being played back STOP C works as follows Press STOP C and PLAY B next so that the programmed playback restarts CD playback restarts from the current point MP3 WMA playb...

Страница 13: ...disc may not have that language However some discs allow subtitle language set ting on the disc menu Operation varies depending on the disc so refer to the manual along with the disc When NOT AVAILAB...

Страница 14: ...TITLE OFF DISC MENU ENGLISH PLAYER MENU ENGLISH LANGUAGE Select the desired item 1 QUICK SETUP PLAYER MENU ENGLISH TV ASPECT 4 3 LETTER BOX PROGRESSIVE OFF DOLBY DIGITAL BITSTREAM ENTER STOP SETUP QUI...

Страница 15: ...ack so that the PROGRESSIVE SCAN indicator on the front panel lights off When PROGRESSIVE is ON video signals from the unit s VIDEO OUT and S VIDEO OUT jacks will be distorted or not be output at all...

Страница 16: ...t ON Set to ON to show the angle icon when multiple camera angles are available during DVD playback AUTO POWER OFF Default ON Set to ON to turn this unit off automatically after 30 minutes of no use A...

Страница 17: ...soft cloth wiping from center to edge Disc can t be played Clean the disc Ensure the disc is inserted in correct direction Check if the disc is defective by trying another disc Cancel the parental lo...

Страница 18: ...fect in materials or workmanship as follows DURATION PARTS FUNAI CORP will provide parts to replace defective parts without charge for one 1 year from the date of original retail purchase Certain part...

Страница 19: ...el men Para volver a la operaci n anterior en el men SEARCH MODE Para buscar un cap tulo t tulo o tiempo Para colocar o buscar los marcadores Para buscar una canci n Para buscar el tiempo CD Para col...

Страница 20: ...To clear the numbers entered incorrectly To cancel the point for A B repeat CD DISPLAY To display the current disc mode To display the current disc mode REV FWD To search forward backward through a d...

Отзывы: