– 10 –
EN
1L25
45.
g
Button
●
DVD mode [page 23]
Press to fast forward the Disc. Press PAUSE, then
press this button to begin slow motion playback.
Press this button repeatedly to change the forward
speed of slow motion.
●
VCR mode [page 18]
Press to rapidly advance the tape, or view the picture
rapidly in forward during playback (Forward Search).
46.
PLAY Button
●
DVD mode
Press to begin playback.
●
VCR mode
Press to begin playback.
47.
VCR Button [page 12]
Press to select VCR mode for the remote control.
●
You can switch the OUTPUT mode either by pressing
OUTPUT on the front panel, or by pressing DVD or
VCR on the remote control. However, if you press
OUTPUT on the front panel first, you need to re-
select the corresponding mode by pressing DVD or
VCR on the remote control.
48.
PAUSE Button
●
DVD mode [page 22]
Press to pause Disc playback. Press repeatedly to
advance the DVD picture step by step (or one frame
at a time).
●
VCR mode [page 19]
While recording, press to temporarily stop the record-
ing (pause). Press a second time to resume normal
recording. You can not pause a One-Touch
Recording. Or, press during tape playback to freeze
the picture. Press to advance the picture one frame at
a time during still mode.
49.
SLOW Button [page 18]
During tape playback, press to view the video tape in
slow motion. Press again to resume normal playback.
This button does not affect DVD playback.
50.
VCR/TV Button [page 19]
Use to select VCR or TV position.
●
VCR Position
To view playback, to monitor video recordings or to
watch TV using the VCR tuner.
●
TV Position
To watch TV or to view one program while recording
another.
51.
SKIP/CH. Buttons
●
DVD mode
Press to skip Chapters or Tracks.
●
VCR mode
Press to change TV channels on the VCR.
52.
AUDIO Button [page 27]
Press to select a desired audio language or sound mode.
53.
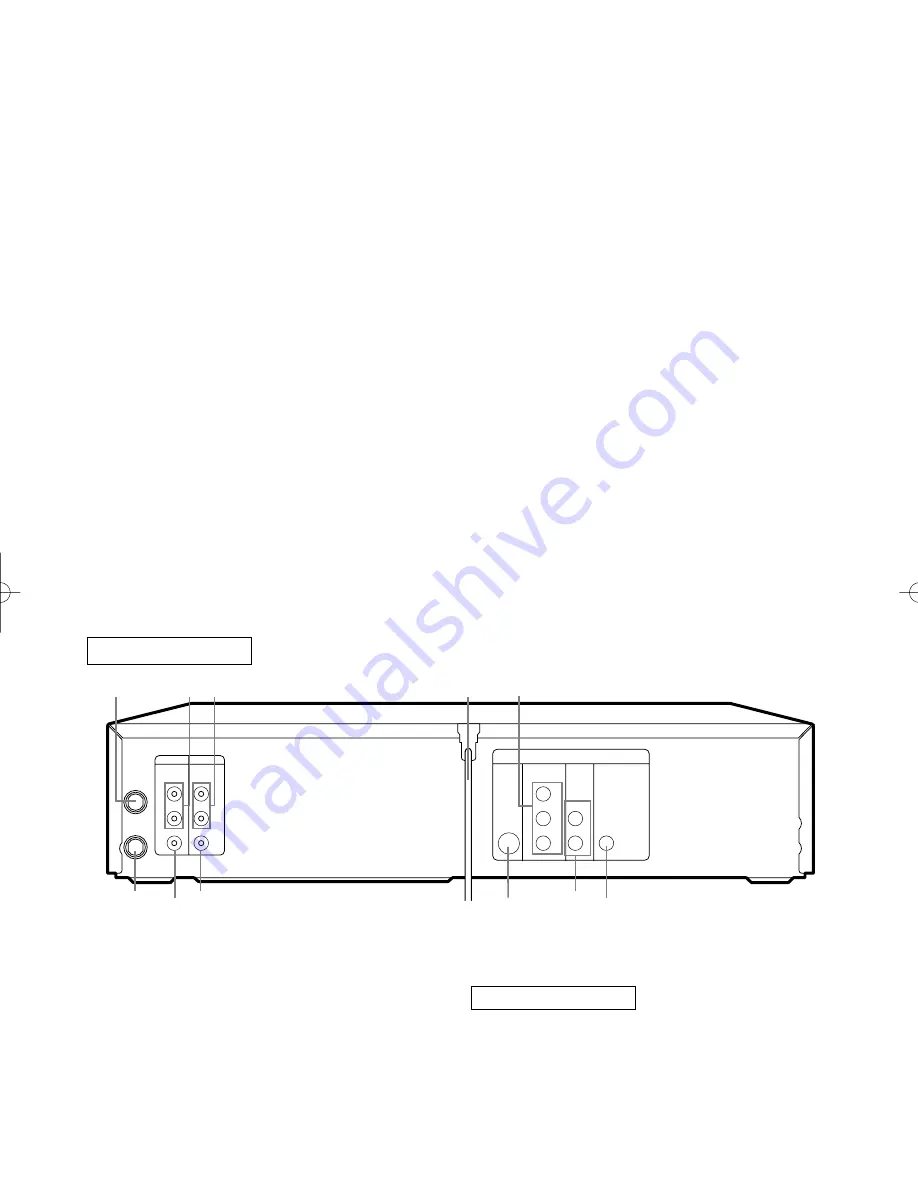
ANT-IN (Antenna In) Jack
Connect your antenna, Cable Box, or Satellite decoder
box.
54.
DVD/VCR AUDIO OUT Jacks
Connect the supplied audio cables here and to the Audio
In jacks of a television or other audio equipment.
55.
AUDIO IN Jacks
Connect audio cables coming from the audio out jacks
of a camcorder, another VCR, or an audio source here.
56.
AC Power Cord
Connect to a standard AC outlet to supply power to the
DVD/VCR COMBINATION UNIT.
57.
COMPONENT VIDEO OUT Jacks
Connect optional component video cables here and to
the component Video In jacks of a television.
58.
COAXIAL Jack
Connect an optional coaxial digital audio cable here and
to the Coaxial Digital Audio In jack of a decoder or
audio receiver.
DVD Playback only
DVD/VCR
VCR
AUDIO OUT AUDIO IN
VIDEO OUT VIDEO IN
S-VIDEO
OUT
COMPONENT
VIDEO OUT
AUDIO
OUT
DVD
Y
Cb
L
Cr
R
L
ANT-IN
ANT-OUT
R
L
R
DIGITAL
AUDIO OUT
COAXIAL
63
62 61
60
59 58
54
53
55
56
57
REAR VIEW
Notes
¡
To use the remote control to operate the DVD/VCR
COMBINATION UNIT and its features, press DVD
on the remote control before pressing other DVD’s
operation buttons. Verify that the green DVD OUT-
PUT Light is on.
¡
To use the remote control to operate the VCR and its
features, press VCR on the remote control before
pressing other VCR’s operation buttons. Verify that
the green VCR OUTPUT Light is on.
H9435UD.qx33 03.3.18 10:13 AM Page 10
Содержание DVC880D
Страница 41: ...41 EN 1L25 MEMO...
Страница 42: ...42 EN 1L25 MEMO...
Страница 43: ...43 EN 1L25 MEMO...


