


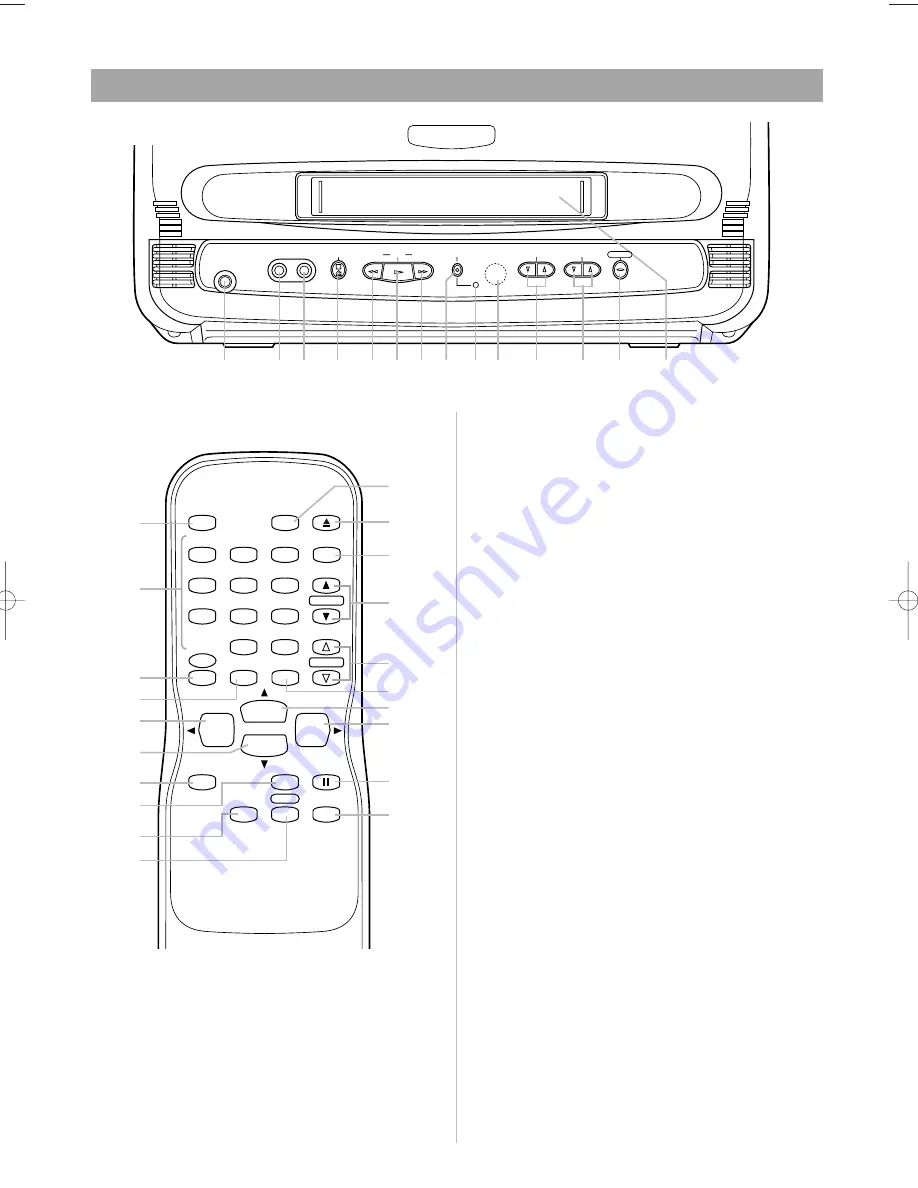
- 29 -
ES
0B19
1
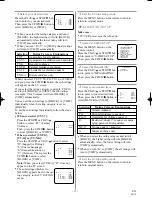
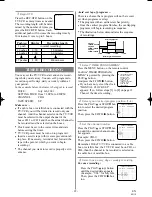
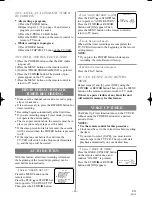
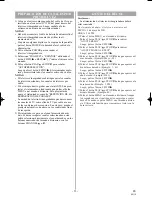
Toma de auriculares (EARPHONE)–
Para conec-
tar los auriculares (no suministrados) y escuchar en pri-
vado. La toma es mono y tiene un tamaño de 3,5 mm.
2
Toma de entrada de audio (AUDIO)–
Conéctela a
la toma de salida de audio de su equipo de audio,
videocámara u otra videograbadora.
3
Toma de entrada de vídeo (VIDEO)–
Conéctela a
la toma de salida de vídeo de su videocámara u otra
videograbadora.
4
Botón de parada (STOP)–
Púlselo para detener la
cinta.
Botón de expulsión (EJECT)–
Púlselo en el modo
de parada para expulsar la cinta del
televisor/videograbadora.
Botón
L
–
• Púlselo para seleccionar los modos de ajuste desde el
menúde la pantalla.
• Púlselo para introducir dígitos cuando establezca un
programa.
(Por ejemplo: Para ajustar el reloj o establecer un pro-
grama de temporizador)
5
Botón de rebobinado (REW)–
Púlselo para rebobi-
nar la cinta, o para ver la imagen en retroceso rápido
durante el modo de reproducción. (Búsqueda con
rebobinado)
Botón
s
–
•
Púlselo para seleccionar un modo desde un menúpar-
ticular.
(Por ejemplo: IDIOMA o ADJUST DE USER)
6
Botón de reproducción (PLAY)–
Púlselo para ini-
ciar la reproducción.
Botón
K
–
• Púlselo para seleccionar los modos de ajuste desde el
menúde la pantalla.
• Púlselo para introducir dígitos cuando establezca un
programa.
(Por ejemplo: Para ajustar el reloj o establecer un pro-
grama de temporizador)
7
Botón de avance rápido (F.FWD)–
Púlselo para
avanzar rápidamente la cinta, o para ver la imagen en
avance rápido durante el modo de reproducción.
(Búsqueda con avance rápido)
Botón
B
–
• Cuando establezca un programa (por ejemplo: para
ajustar el reloj o para establecer un programa de tem-
porizador), púlselo para determinar su elección y vaya
al paso siguiente que quiera introducir.
CONTROLES DE OPERACIÓN Y SUS FUNCIONES
EARPHONE
AUDIO
VIDEO
STOP/EJECT
r
REW
PLAY
F.FWD
q
REC/OTR
CHANNEL
VOLUME
POWER
1
9
2 3
4
5 6 7 8
12 13
10 11
14
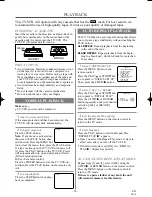
POWER
WAKE-UP
/SLEEP
1
2
3
4
5
6
7
8
9
+100
0
EJECT
CHANNEL
RETURN
REW
PLAY
STOP
F.FWD
GAME
RECORD
PAUSE/STILL
SPEED
TIME SEARCH
CHANNEL
T-PROG.
CLEAR
COUNTER
RESET
DISPLAY
MUTE
MENU
VOLUME
13
15
11
4
16
5
8
18
19
20
4
24
12
7
6
22
21
23
17
25
- PANEL DELANTERO -
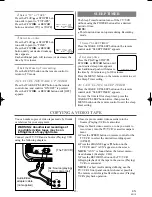
- CONTROL REMOTO -
T5207ES.QX33 01.3.19 10:24 AM Page 29
Содержание D6313CB
Страница 34: ...34 ES 0B19 MEMO...
Страница 35: ...35 ES 0B19 MEMO...


