SwiftColor SCC-2000D Скачать руководство пользователя страница 21

20

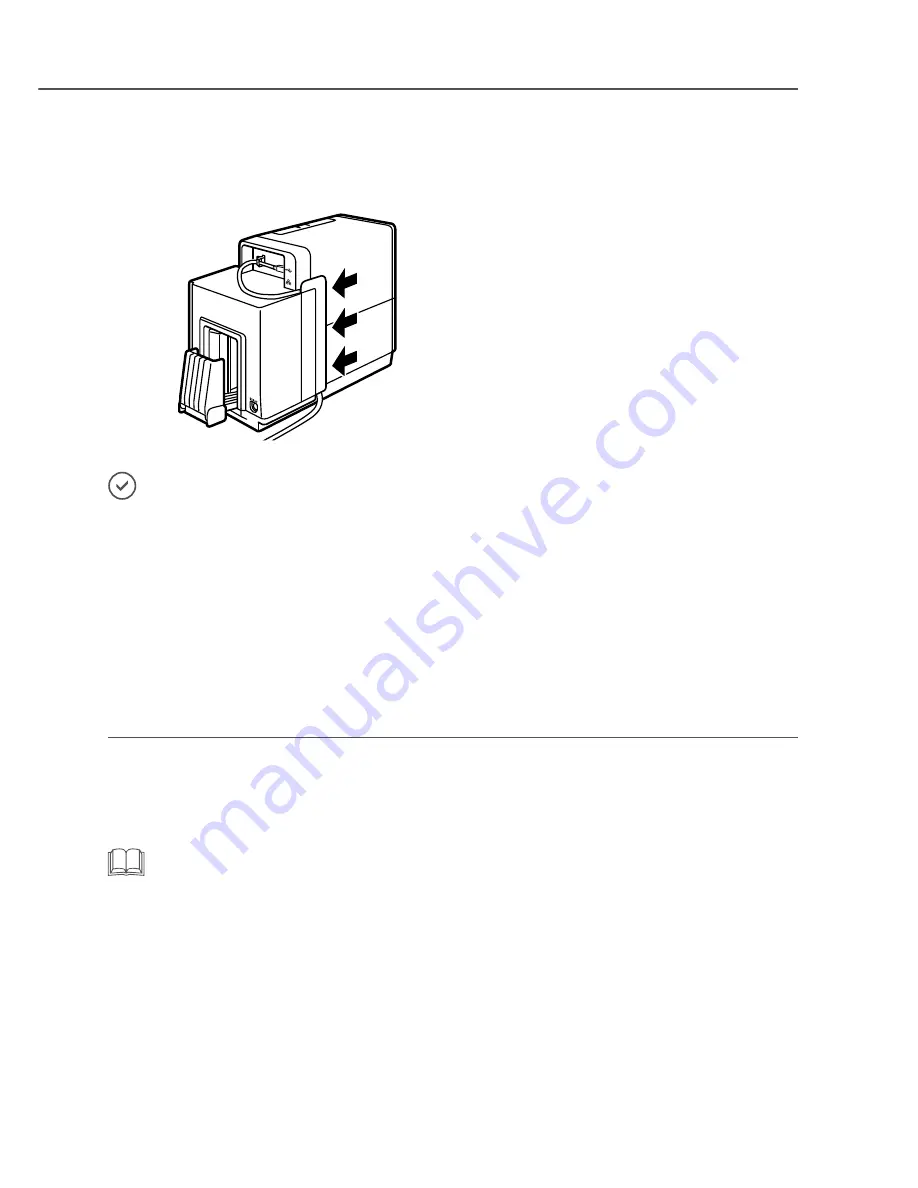
3.■ Fit■the■USB■cable■in■the■groove■on■the■

printer’s■rear■panel.

Keep■the■USB■cable■from■getting■in■the■way■of■
the■feeder■lift■tray.

IMPORTANT

•■ USB■cable■can■be■connected■or■disconnected■when■the■computer■and■the■printer■are■powered■(hot-swappable).■

However,■do■not■insert■or■remove■USB■cable■in■the■following■cases:

■- When■the■computer■is■being■booted■(before■the■desktop■screen■appears)
■- When■printing■is■in■progress
■- When■the■printer■driver■is■being■installed

•■ When■disconnecting■USB■cable■while■the■computer■and■the■printer■are■powered,■disconnect■the■connector■on■

the■computer■side■(USB■hub■side).■Wait■for■at■least■5■seconds■before■reconnecting■USB■cable.■Otherwise,■the■
printer■could■malfunction.

Turn■on■the■printer.

When■the■printer■is■recognized,■installation■starts.

NOTE

•■ If■the■computer■is■used■in■a■network■environment,■recognition■of■the■printer■may■take■long.

Содержание SCC-2000D

Страница 1: ...Read this guide first Please read this guide before operating this product After finish reading this guide store it in a safe place for future reference SCC 2000D Setup Guide...

Страница 2: ...or contains additional explanations for a procedure Reading these notes is highly recommended Indicates an operation that must not be performed Read these items carefully and make sure not to perform...

Страница 3: ...ion P 3 Step2 Installing Printer P 7 Step4 Connecting Power Cord P 12 Step6 Installing Software P 14 USB Connection P 15 LAN Connection P 23 Installing User s Guide P 34 Step3 Installing Ink Tanks P 9...

Страница 4: ...on Power supply Use a 1 5A or higher outlet cable WARNING Do not place the following objects on the printer Necklaces and other metal objects Cups vases flowerpots and other containers filled with wat...

Страница 5: ...ifier A location exposed to rain or snow A location exposed to salty wind A location subject to high temperatures A location near open flames Do not place the printer in an unstable location e g on a...

Страница 6: ...of Power Cords come with Printer Use appropriate Power Cord for the power supply used at the installation site NOTE Keep the shipping box packing materials and protectors for future use for example s...

Страница 7: ...This is due to ink used in the manufacturing process and does not signify a printer problem To maintain print quality this product absorbs excessive ink produced during printing in an ink absorber As...

Страница 8: ...shown in the figure securely hold the printer with both hands when taking out the printer CAUTION Securely hold the printer with both hands to avoid dropping the printer Do not hold the feeder lift t...

Страница 9: ...ctors Press and raise the lock knob B to remove the protector Do not discard the protectors and store them along with the shipping box and other items from the time of purchase It may be needed for sh...

Страница 10: ...hown in the figure Remove the protective cap while holding it so that the fingers are not stained with ink Do not discard the protective caps and store them along with the shipping box and other items...

Страница 11: ...om the ink supply opening could stain your clothes or the area around the printer Be careful not to stain the clothes or the area around the printer with the ink adhered on the removed protective cap...

Страница 12: ...e as shown in the figure IMPORTANT Install the ink tanks at correct positions according to the labels If any ink tank is installed at a wrong position the printer cannot print In addition Ink colors c...

Страница 13: ...e printer inlet 2 Insert the power plug of the power cord in the outlet CAUTION When disconnecting AC adapter from the printer be sure to remove the power plug from the power outlet first If the conne...

Страница 14: ...forming the initial ink filling Keep the following precautions until Status Lamp green stops blinking and lights up Do not turn off the printer Do not open close the ink tank cover and the transport u...

Страница 15: ...n P 15 To connect the printer to the computer via LAN and use the printer in the network environment LAN Connection P 23 Operating Environment The printer driver and User s Guide can be used in the fo...

Страница 16: ...off IMPORTANT Do not connect the printer to the computer with USB cable at this time 2 Start the computer and log on to the computer as a user with administrative privileges IMPORTANT Log on to the c...

Страница 17: ...screen appears 2 Click Run autoplay exe If User Account Control dialog box appears click Yes NOTE If Auto Play screen does not appear Carry out the following operation 1 Double click CD ROM drive ico...

Страница 18: ...17 2 2 Click OK 3 4 3 Select Agree Confirm the software license agreement carefully 4 Click Next 5 5 Click Next Confirm the cautions...

Страница 19: ...t 8 9 10 8 To change the printer name enter a new printer name 9 When not using the printer as the default printer uncheck Set as the default printer checkbox 10 Click Next 11 12 11 Check Always trust...

Страница 20: ...select it The selected destination port can be changed after completing of installation of the printer driver 1 Connect the printer to the computer with USB cable 2 Fix USB cable in place with the cl...

Страница 21: ...er is being booted before the desktop screen appears When printing is in progress When the printer driver is being installed When disconnecting USB cable while the computer and the printer are powered...

Страница 22: ...nt Registration NOTE Registering Server Client To register the server client click Server Client Registration radio button The server client can be registered after completion of installation of the p...

Страница 23: ...move Printer Software CD ROM and then click Yes Rebooting of the computer starts automatically NOTE When No is selected be sure to restart Windows before using the printer Go to Installing User s Guid...

Страница 24: ...strative privileges Terminate in advance the virus detection program and other programs resident in the system if any 3 Set the supplied CD ROM in CD ROM drive 2 1 Set the supplied Printer Software CD...

Страница 25: ...24 4 Install the printer driver 1 1 Click Install the printer driver 2 2 Select the model of the printer 3 4 3 Select Agree Confirm the software license agreement carefully 4 Click Next...

Страница 26: ...25 5 5 Click Next Confirm the cautions 7 6 6 Select Connect via network 7 Click Next 8 8 Click Next...

Страница 27: ...n regarding the security software which is shown on the screen 10 10 Click Yes Confirm the instruction regarding the firewall settings which are shown on the screen This screen may not appear dependin...

Страница 28: ...to the printer 1 Connect the printer to the computer with LAN cable 2 Fix LAN cable with the clamp A 3 Fit LAN cable in the groove on the printer s rear panel Keep LAN cable from getting in the way of...

Страница 29: ...talled on different networks and therefore the computer cannot find this printer If the IP address necessary for network operation is not set connection to the network could fail If no printer name is...

Страница 30: ...for the network setup Contact the network administrator The password can be changed with the network utility after completing of installation Default password admin For more details refer to About the...

Страница 31: ...t check Have an IP address automatically checkbox Change the default IP address 11 11 Click Next 12 12 Click Next NOTE The network utility is a tool for configuring network settings for the printer Th...

Страница 32: ...ew printer name in Printer text box 14 When not using the printer as the default printer uncheck Set as the default printer checkbox 15 Click Next 16 17 16 Check Always trust software from CANON FINET...

Страница 33: ...32 19 19 Click Finish 20 20 Click Finish If the printer driver was installed in the computer to be used as a server click Server Client Registration...

Страница 34: ...mpletion of installation of the printer driver 1 Start CD ROM 2 Click Install the printer driver 3 Select Server Client Registration 4 Click OK 6 Remove Printer Software CD ROM and then click Yes Rebo...

Страница 35: ...RTANT Log on to the computer as a user with administrative privileges Terminate in advance the virus detection program and other programs resident in the system if any 1 Set the supplied CD ROM in CD...

Страница 36: ...35 2 Install User s Guide 1 1 Click Install the User s Guide 2 2 Click OK 3 3 Click Yes 4 4 To create the shortcut icon for opening User s Guide click Yes...

Страница 37: ...n was not created select it from Start menu To read User s Guide stored on CD ROM click Read the User s Guide Setup of the printer has been completed For how to operate the printer refer to the follow...

Страница 38: ...37 4Y8 8087 010...

Страница 39: ......

Страница 40: ...rf Head Office Oststrasse 34 D 40211 Duesseldorf Germany URL www swiftcolor com E mail info swiftcolor com Contact Information Swiftcolor Kanematsu KANEMATSU USA INC 100 Randolph Road Somerset NJ 0887...

Отзывы: