


6
W3/W4.170420
All rights to changes reserved.
www.swegon.com
2. Installation
2.1 Unboxing
The ventilation unit is delivered in a cardboard box.
Remove the staples to open the box cover. The best way
to take the unit out is by opening the vertical seam of the
cardboard box and spreading it out from around the unit.
2.2 Lifting the ventilation unit
The ventilation unit is heavy and is not intended to be
moved by hand. When installing the ventilation unit, it is
lifted with a suitable lifting device that lifts evenly from
the bottom of the unit.
2.3 Ventilation unit’s installation site
The temperature in the space where the unit will be installed
must be more than +10 °C. The ventilation unit can be
installed in a machine room, laundry room, store room, etc.
Due to the risk of disruptive noise, the ventilation unit
should not be installed on the wall towards the living
room or bedroom.
Make sure it is easy to access the power and control
cables as well as accessories.
The ventilation unit can be mounted either on the wall
with a wall mounting bracket or on the ceiling with a
ceiling mounting frame. The required mounting bracket
is purchased separately as an accessory.
The unit should be installed on the wall and ceiling so
that the ducts remain above the ceiling surface. The
space between the unit and the wall/ceiling must be
insulated to prevent the transmission of sound coming
from the rear wall and top of the unit to the room.
Particularly noteworthy; if the unit is not mounted on
the ceiling, the sound from top of the unit and from the
duct connections must be isolated from the room space.
Connect the extract air from a CASA cooker hood, if in-
stalled, via a duct to the extra duct connection spigot on the
top side of the ventilation unit, which on delivery is plugged.
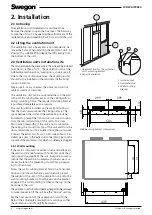
2.3.1 Wall mounting
If the wall is composed of vertical studs and wallboards,
the wall must be reinforced with horizontal studs that
will support the weight of the unit. Swegon also recom-
mends that the wall be insulated with mineral wool or
similar insulation for preventing sound from propagat-
ing to other rooms.
Screw the wall mounting bracket firmly in a horizontal
position onto the wall where a wall stud will support
the weight of the unit. Lift the ventilation unit onto the
wall mounting bracket so that the ears on the bracket
engage in the corresponding notches at the top on the
backside of the unit.
The ventilation unit’s door and heat exchanger can be removed
to make it easier to lift the unit. See the ”Service” section.
Set the final position of the ventilation unit with the
help of the adjustable anti-vibration mountings so that
the ventilation unit tilts slightly backward.
1
2
1. Horizontal stud for the ventilation
unit’s mounting bracket
2. Acoustic insulation
1
2
3
1. Insulated wall
2. Horizontal stud
3. Wall mounting
bracket
Wall mounting bracket’s dimensions
299
299
505
68
54
14
505
370
300
76
299
299
505
68
54
14
439


