


W3/W4.170420
All rights to changes reserved.
23
www.swegon.com
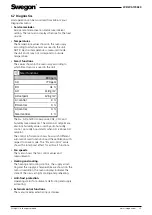
6.1 Service reminder
The service reminder is activated with preset time inter-
vals and the
symbol is displayed on the control panel’s
screen and cooker hood indication LEDs. As a factory
setting, the service reminder is not in operation.
It can be
activated from
Main menu/Diagnostics / Service reminder
menu. The recommended service interval is six months.
When servicing has been performed, the service re-
minder is reset from “Alarm” in the main menu. Service
reminder can always be reset under the main menu item
“Diagnostics / Service reminder”.
Service reminder
Service reminder
Service interval
Next service
Reset counter
6 m
6,0 m
6.2 Opening the ventilation unit
Always isolate the power supply by pulling out the plug
from the wall socket before you begin any service work.
Wait a few minutes before you open the inspection
door on the ventilation unit, so that the fan will have
time to stop and the air heaters can cool down.
Open the door by turning the lock with a screw driver
for slotted screw heads.
Support the top edge of the
door with one hand when you open the lock bolt. Tilt
the top edge outwards, towards you, and then lift the
door away from its place.
Turn the operating switch to the 0-position prior to
commencing servicing.
Wear protective gloves if needed.
6.3 Filters
The filters should be replaced at least every six months.
The filters may need to be replaced more often in
homes where there is considerable dust or if there are
many impurities in the outdoor air.
In a new home, there is still moisture from the construc-
tion period, and the filters can become soiled more
quickly than usual. The first filter change should, there-
fore, be made more often.
The ventilation unit must not be operated without fil-
ters. Use only original Swegon filters.
This is important,
as filters with the same appearance and size can have very
different pressure losses and filter capacity. If an incorrect
filter is used, the ventilation unit may not work as designed
and Swegon can’t be responsible for possible mailfunction.
Check correct filters from the list of components.
6.4 Heat exchanger
Check the condition of the heat exchanger whenever
you service the unit.
6. Service
Ensure that the heat exchanger has not frozen to the
ventilation unit’s frame during cold period. If needed
keep the door open for a while before removing the heat
exchanger from the unit, so that the temperatures have
time to equalize and to prevent damage to the seals.
Withdraw the heat exchanger from the unit for inspec-
tion. Do not damage the heat exchanger fins.
Make sure that the passages through the heat exchang-
er are not clogged and clean them e.g. with running
warm water if required. Never use cleaning agents.
The
passages of the heat exchanger should be dry be-
fore you reinstall the heat exchanger in the unit.
6.5 Fans
The ventilation unit’s fans must be checked at least
every two years. If dirt builds up in the fans this can af-
fect the functionality of the ventilation unit.
Dismantling the fans for cleaning
(qualified service personnel only)
• Remove the filters and heat exchanger from the
ventilation unit.
• Open the locking latches on the fans and loosen the
locks (picture B: 3 and 4). Summer bypass damper
(picture C) must be in “winter” position to be able to
reach the locking latch of the supply air fan. A long ex-
tension arm for the screwdriver is required for remov-
ing the locking latch of the extract air fan. Othervise
the pre-heater (picture A: 6) must be remowed.
• Tilt the lower part of the fan toward the rear wall until
the fan disconnects from the mounting bracket behind.
• Turn the fan sideways and pull it away from its posi-
tion. Be careful not to damage the insulation on the
electric cables.
• If necessary, clean the fan with a soft brush. Be care-
ful not to dislocate the impeller balancing weights. If
significant amounts of dirt collect on the fan impeller
cleaning should be left to a professional.
• Reinstall the fan by sliding it towards the rear wall
and lift it into place.
• Install the locking latch.
• Fit the heat exchanger and filters.
The ventilation unit’s fans must betaken off from
their locations and protected, for example, with
plastic bags, while the ventilation ducts are cleaned.
6.6 Other servicing
Clean the inner surfaces of the ventilation unit by
vacuum cleaning or with a damp cloth.
Check that the condensate discharge outlet is not
clogged and check its outflow by pouring water on
the bottom of the ventilation unit. The condensate
discharge connection is located on the rear of the unit
under the heat exchanger.
Check that dirt has not collected on the surfaces of the
air heater, clean if necessary.
Check that the ventilation unit works normally and no
alarms are shown on the screen or on the cooker hood.


