background image

ThermShield Standard Square/Rectangular Installation Guide

20

Swegon reserves the right to alter specifications.           20210615 - L00010                                                                               

Periodic Maintenance

Manufacturer Recommended Service 

Intervals

• 

After commissioning and handover (see DW145 check 

sheet), in order to remain compliant with 15650:2010, 
we recommend that you follow a regular service and 
inspection programme to ensure correct operation 
of dampers in the event the damper is required to 
actuate.

•  In addition to regular physical inspections (in 

accordance with 15650:2010) we recommend using a 
dedicated damper control panel with a digital reporting 

mechanism (such as an Actionpac LNS system) to 

frequently monitor and report on regular remote 
damper testing. 

•  Ensure maintenance is performed in line with the latest 

best practice and relevant local or specialist guidance.

•  Our recommended service intervals for life safety 

products are as follows:

Interval

Action

Competence

6 Months

Check Actuator Wiring (if appli-

cable) for Damage

Specialist 

Persons

6 Months

Check Limit Switch Wiring (if 

applicable) for Damage

Specialist 

Persons

6 Months

Check Damper Cleanliness, Clean 

and Lubricate if necessary.

Specialist 

Persons

6 Months

Check Condition of Blades and 

Seals, report and rectify if neces-

sary.

Specialist 

Persons

6 Months

Check for blade obstructions

Specialist 

Persons

6 Months

Check Damper Release Me-

chanism (through activation or 

release of the ETR or Thermal 

Fuse Device)

Specialist 

Persons

6 Months

Check damper is left in normal 

operational position after inspec-

tion.

Specialist 

Persons

Monthly

Complete actuation of damper 

from control panel (if installed)

and check all faults. Consult spe-

cialist persons to investigate any 

reported faults.

Facility Ma-

nager

• 

*Specialist Persons: A recognised and experienced 
person with prior experience in the inspection and 
assessment of the functional safety of smoke and fire 

damper products. If in doubt, please consult with our 
technical support team for advice. To talk about our 
OEM maintenance inspections, contact our nationwide 
service team.

BS EN 15650:2010 - Ventilation for Buildings 

- Fire Dampers

• 

Section 8.3 states regular testing/ inspection should 

be undertaken to meet regulatory requirements, or at 

intervals not exceeding six months.

• 

A comprehensive example of the maintenance 
procedure is given in Annex D of the standard. Some 

automatic systems may allow more frequent testing 

(48hr or less) and this may be required by a national 

standard.

Approved Document B, Volume 2

•  Clause 10.12 states adequate means of access must be 

provided to allow inspection, testing and maintenance 

of both fire damper and its actuating mechanism.

BS 9999:2017 - Code of Practice for the Fire 

Safety in the Design, Management and Use 

of Buildings - Annex I

Smoke Control Systems

•  For means of escape states actuation of the system 

should be simulated once a week. It should be ensured 

that any fans and powered exhaust ventilators operate 

correctly, smoke dampers close (or open in some 

systems), natural exhaust ventilators open, automatic 

smoke curtains move into position, etc.

Three Monthly

•  In addition to the checks recommended in V.2, V.3 and 

V.4, the actuation of all smoke control systems should 

be simulated once every three months. All zones should 
be separately tested and it should be ensured that any 

fans and powered exhaust ventilators operate correctly, 

smoke dampers close (or open in some systems) etc.

Yearly

•  In addition to the following checks should be made 

for annual inspections and tests of the following to 
be carried out by competent persons, for any defects 
to be logged and the necessary action taken, and for 

certificates of testing to be obtained.


Fire detection and fire alarm systems;


– Self-contained luminaires with sealed batteries, if more 

than 3 years old;


– Sprinkler, drencher and watermist systems;


– Smoke ventilators and smoke control systems;


– Fire dampers

BS 9999:2017 - Code of Practice for the Fire 

Safety in the Design, Management and Use 

of Buildings - Annex W

•  Maintenance of air conditioning and ventilation 

equipment including air filters, motors, fire dampers 

and their controls, smoke detectors and alarms is 

of paramount importance both in preventing fire 

and in ensuring that measures taken to mitigate 
its consequences are effective when needed. 

Arrangements should be made for all fire dampers to 

be tested by a competent person on completion of the 

installation and at regular intervals not exceeding 2 

years. They are to be repaired or replaced immediately 

if found to be faulty. Spring operated fire dampers 
should be tested annually and fire dampers in dust 

laden and similar atmospheres should be tested much 
more frequently, at periods suited to the degree of 
pollution.

Содержание Actionair ThermShield FD

Страница 1: ... and inspecting dampers as they are likely to close without warning due to loss of electrical power or a temperature rise in the ductwork This is their prime function Do not insert any items fingers or limbs between the blades Larger dampers must be handled in accordance with current regula tions and good practice due to weight Contents Applies to 1 Health and safety 1 CE Installation Method Overv...

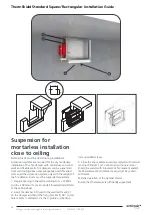
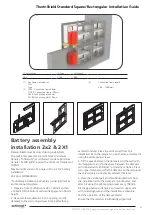
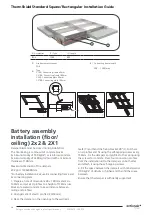
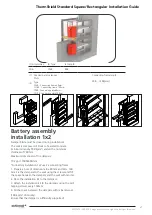
Страница 2: ... ceiling Page 14 Battery assembly installation 2x2 2X1 Page 15 Battery assembly installation floor ceiling 2x2 2X1 Page 16 Battery assembly installation 1x2 Page 17 Minimal separation distance installation Page 18 For full classifications please refer to our Declaration of Performance DoP which can be found on our website The methods in this manual should be followed to ensure a CE marked installa...

Страница 3: ... opening between the fire damper and the wall ceiling can be increased by up to 50 of the gap area or decreased to the smallest dimension B 60 x H 60 The installation must comply with the tests that were performed during certification Avoid any obstruction of the moving blade by the con nected ducts The class of air tightness is maintained in case the installation of the damper is made in accordan...

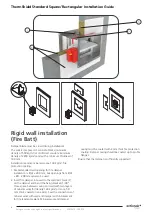
Страница 4: ... Prepare opening in the wall according to B H 80 mm or more up to 50 more Insert fire damper into wall to the wall limit mark 7 on the damper and bend the fixing bracket 1 90 2 Fix the fire damper to the wall with the screws Bracket screw hole is 6 mm in diameter 3 Fill the space between the damper and the wall with mortar 2 Minimum seperation between fire dampers either next to each other or ceil...

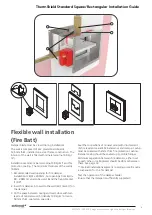
Страница 5: ...covered with plasterboard cover boards 1 Prepare opening in the wall according to B H 80 mm or more up to 50 more Insert fire damper into wall to the wall limit mark 7 on the damper and bend the fixing bracket 1 90 bracket screw hole is 6 mm in diameter 2 Fix the fire damper to the wall with the screws refer to page 15 3 Fill the space between casing and wall with mineral wool 3 4 Cover the wool w...

Страница 6: ...ommended wall opening for fire damper installation is B H 200 mm but openings from B H 80 300mm can also be used 2 Insert fire damper into wall to the wall limit mark 7 on the damper and bend the fixing bracket 1 90 Close space between casing and wall with two layers of mineral wool 5 density 140 kg m or more 50 mm thick coated on one side Seal the connections of mineral wool with wall and damper ...

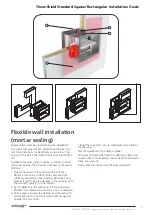
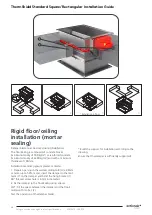
Страница 7: ...the wall according to B H 80 mm or more up to 50 more and build the subframe according to the drawing Bend the fixing bracket 1 90 Place the damper in the opening up to the wall limit mark 7 on the damper 2 Fix the damper to the wall using self tapping screws Ø3 5x45 mm bracket screw hole is 6 mm in diameter 3 Fill the space between the damper and the wall with mortar sealing 2 Cover the mortar wi...

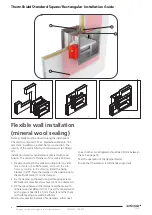
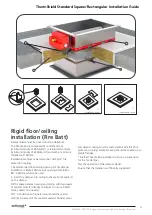
Страница 8: ...according to B H 80 mm or more up to 50 more and build the sub frame according to the drawing Bend the fixing bracket 1 90 Place the damper in the opening up to the wall limit mark 7 on the damper 2 Fix the damper to the wall using self tapping screws Ø3 5x45 mm bracket screw hole is 6 mm in diameter 3 Fill the space between the damper and the wall with mineral wool 100 kg m 3 Cover the mineral wo...

Страница 9: ...m can also be used Bend the fixing bracket 1 90 2 Insert fire damper into wall to the wall limit mark 7 on the damper 3 Fill the space between casing and wall close with two layers of mineral wool 5 density 140 kg m or more 50 mm thick coated on one side Seal the connections of mineral wool with intumescent 6 fire resistant sealant Mineral wool and damper casing must be coated with 2mm thick fire ...

Страница 10: ... thickness of 100mm Installation material gypsum plaster or mortar 1 Prepare opening in the wall according to B H 80mm or more up to 50 more insert the damper to the limit mark 7 on the damper and bend the fixing bracket 1 90 bracket screw hole is 6 mm in diameter 2 Fix the damper to the floor ceiling using screws 3 3 Fill the space between the damper and the floor ceiling with mortar 2 Test the o...

Страница 11: ...for fire damper installation is B H 200mm but openings from B H 80 300mm can also be used 2 Insert fire damper into ceiling to the wall limit mark 7 on the damper Fill the space between casing and ceiling with two layers of mineral wool 5 density 140 kg m or more 50mm thick coated on one side 3 3 Connections of mineral wool should be sealed with 6 intumescent fire resistant sealant Mineral wool an...

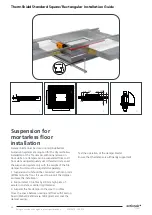
Страница 12: ...pension system only with the weight of the fire damper Ducts must be suspended separately 1 Suspension strut should be connected with drop rods 8 10mm to the floor It is used to support the damper and ease the installation 2 Support steel C profiles by 90 mm high piece of aerated concrete or similar rigid material 3 Suspend the fire damper to the steel C profiles Close the space between casing and...

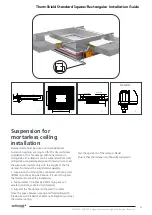
Страница 13: ... the suspension system only with the weight of the fire damper Ducts must be suspended separately 1 Suspension strut should be connected with drop rods 8 10mm to the ceiling slab above It is used to support the damper and ease the installation 2 Support steel C profiles by 90mm high peace of aerated concrete or similar rigid material 3 Suspend the fire damper to the steel C profiles Close the spac...

Страница 14: ... only with the weight of the fire damper Ducts must be suspended separately 1 Prepare opening in the wall according to H 130mm and B 200mm or more and install threaded rods 8 mm to the ceiling above 2 Insert fire damper into wall to the wall limit mark 7 on the damper and bend the fixing bracket 1 90 screw hole is 6mm in diameter Fix the C profile on the drop rods using M8 screws 3 Close the space...

Страница 15: ... Prepare a hole of dimensions 2B 140 mm and 2H 140mm fill the bottom with mortar gypsum in 50mm height 2 Place two lower dampers in the opening and fix dampers to the wall using screws only 2 sides facing aerated concrete Place the vertical part from the installation kit to the dampers on both sides and attach it using the self tapping screws 3 Fill the space between the dampers and the wall with ...

Страница 16: ... and profiles 2 Arrangement of steel C profiles 27x18mm 3 Place the dampers in the openings to the wall limit mark 7 and bend the fixing bracket 90 1 Put them on U profiles and fix using the self tapping screws every 150mm Fix the dampers and profiles to the ceiling using the screws for concrete Place four connection profiles from the installation kit to the dampers on both sides and attach it usi...

Страница 17: ...epare a hole of dimensions B 80mm and 2H 140 mm Fix the dampers to the wall using the screws and fill the space between the dampers and the wall with mortar 2 Place the installation kit to the dampers 3 Attach the installation kit to the dampers using the self tapping screws every 150mm 4 Fill the space between the dampers with mineral wool 100 kg m of density Ensure that the damper is sufficientl...

Страница 18: ...e wall according to page 3 B H 80mm or more Firebatt installation build the subframe according to the drawing Fire damper can be installed with minimal distance of 30mm between wall ceiling and 60mm from other dampers 2 Insert the fire dampers into the wall and fill the space between the casings with mineral wool 140kg m up to flanges Fill the space between the wall ceiling with mineral wool 140kg...

Страница 19: ...should be prepared according to the drawings below Support for Installation with Mortar In fire damper installations with mortar it may be necessary to use wooden supports to prevent the casing from deforming while mortar is setting Before filling the gap between wall and fire damper close the damper blade and install the wooden supports as seen in the drawings below Place the wooden support as cl...

Страница 20: ...hs A comprehensive example of the maintenance procedure is given in Annex D of the standard Some automatic systems may allow more frequent testing 48hr or less and this may be required by a national standard Approved Document B Volume 2 Clause 10 12 states adequate means of access must be provided to allow inspection testing and maintenance of both fire damper and its actuating mechanism BS 9999 2...

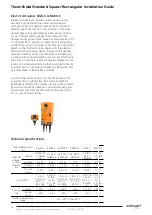
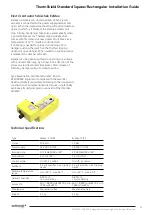
Страница 21: ...00x600 It is available in version with R S and without R end switches End swit ches and thermal fuse are easily replaceable and available as service parts R40 R40 right manual actuator is installed on FD40 fire dam pers from 800x600 to 1500x800 It is available in version with R S and without R end switches End switches and thermal fuse are easily replaceable and available as service parts Technica...

Страница 22: ...tion by fast turning back handle a quarter of a turn counter clockwise for Belimo BF and by puling brake on Belimo BFL and BFN To unlock the electro motor turn handle clockwise for a quarter of a turn for Belimo BF or release brake for Belimo BFL and BFN After release damper will be closed by return spring When damper is opened manually elec tric actuator will not move the damper into closed posi ...

Страница 23: ...llen key by turning in the direction of the arrow on electric actuator clockwise After release of Allen key damper will go to closed position Type Examination Certificate Number EXA 14 ATEX0064X Equipment complies with the essential health and safety requirements relating to the design and construction of equipment intended to use in potentially explosive atmospheres given in annex II of the direc...

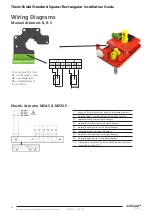
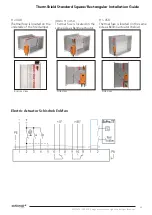
Страница 24: ... 13 14 15 16 1 negative direct current or neutral alternating current 2 positive direct current or faze alternating current S1 common micro switch closed damper S2 normally closed micro switch closed damper S3 normally open micro switch closed damper S4 common micro switch open damper S5 normally closed micro switch open damper S6 normally open micro switch open damper Tf temperature sensor on the...

Страница 25: ...tangular Installation Guide H 300 Thermal fuse is located on the underside of the fire damper 300 H 450 Thermal fuse is located on the same side as Belimo actuator H 450 Thermal fuse is located on the same side as Belimo actuator below Bottom View Side view Side view Electric Actuator Schischek ExMax ...

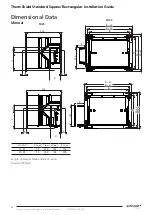
Страница 26: ...t to alter specifications 20210615 L00010 Dimensional Data E C A 350 x x D H H 30 H 60 B 60 B 30 B 230 H 60 E H H 30 B 60 B 30 B 190 C A x x D 350 Manual Product A mm C mm D mm E mm FD 25 55 150 105 150 FD 40 55 200 105 200 Length of damper blade outside of casing X H 2 175 mm FD25 FD40 ...

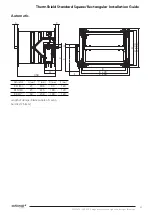
Страница 27: ...d Standard Square Rectangular Installation Guide 380 n Y A C D n 2 12 n 2 22 E C A B 60 B 30 B E C A H 60 H 30 H X X C D 350 A Automatic Actuator A mm C mm D mm E mm BFL M 25 200 90 120 BFN M 25 225 100 120 BF M 50 250 100 120 Length of damper blade outside of casing X H 2 175 mm ...

Страница 28: ...nning vertically 6 Is access through the ductwork to the damper unob structed Unobstructed space should be provided for safe access to the damper This must include access through ceiling voids and adjacent services Damper installer to advise the system designer if problems are foreseen 7 Has the space around the damper and within the opening been left clear and not been used for other services Oth...

Отзывы:

Похожие инструкции для Actionair ThermShield FD