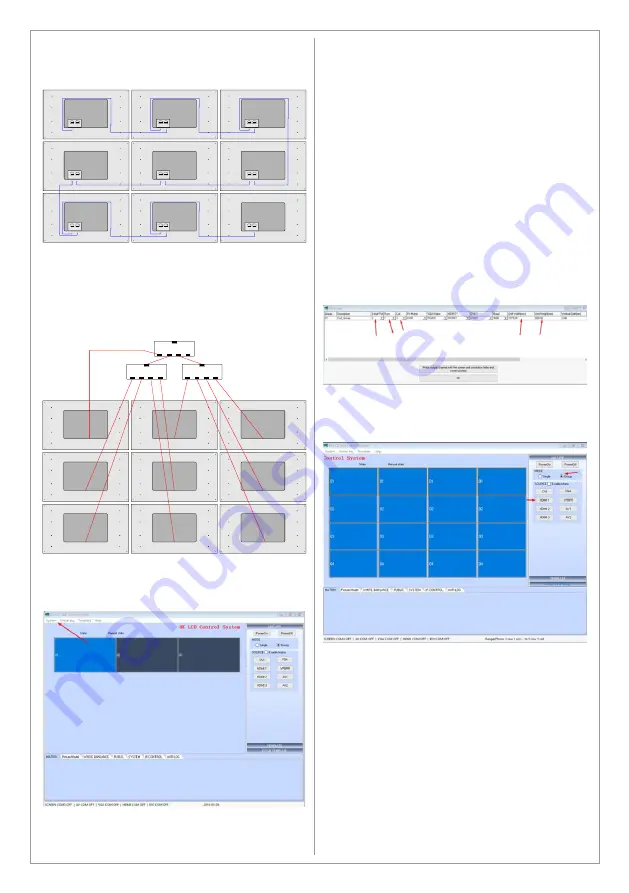
Connect the RS232 OUT from the first screen to
the RS232 IN in the second screen and so on
according to the figure below
The figure above illustrate 3x3 setup but the
principal is the same for other setups
Distribute the HDMI signal to the screens using
the included HDMI splitters and cables according
to the figure below
Start the LCD Wall Software
(the password is 1)
Choose Set screen in the System Menu
In the Set screen options set the following:
Serial: Set the COM-port number assigned in the
device manager
Row: Set the desired rows quantity
Col: Set the desired columns quantity
Unit Width: Input the screen’s width
Unit Height: Input the screen’s height
Vertical Split/Horizontal split: Adjust these values
to achieve desired GAP/BEZEL to be removed or
offset of the picture sent to the screens (or to
compensate the BEZEL)
NOTE: The screens indicate accepting the set
configuration by FLASHING (after you click on
the OK button). If the screens did not flash,
please use the Set Screen Menu to set the
configuration again.
Press OK to save the settings. The software will
ask for restart
After the software restarts select all screens,
choose Group and click on the HDMI input that
the screens are connected with
After pressing the HDMI input the screens will
show full picture on all screens together. If you
want to show single picture on each screen
choose Single and click the HDMI input
RJ 45
In
RJ 45
Out
RJ 45
In
RJ 45
Out
RJ 45
In
RJ 45
Out
RJ 45
In
RJ 45
Out
RJ 45
In
RJ 45
Out
RJ 45
In
RJ 45
Out
RJ 45
In
RJ 45
Out
RJ 45
In
RJ 45
Out
RJ 45
In
RJ 45
Out
1 in - 4 out
1 in - 4 out
1 in - 4 out
20
Содержание MX-40K8-01
Страница 24: ......
Страница 25: ...www swedx com Your Digital Signage Partner ...


