Introduction
Hard Disk Drive Installation Steps
This Quickstart guide gives you a brief over view of the main features of the DVR PRO 4000 and
will allow you to set the basic functions required for you to monitor, record and play back security
video footage. Please consult the manual for more detailed descriptions of the various functions.
Note:
Your hard drive must be jumpered for Master to work correctly while fitted to this
unit (most HDD are jumpered for Cable Select by default and this setting will not work in
this DVR). Please consult with your HDD supplier or manufacturer for more information on
how this is done. Do not try to view the contents of the HDD on a PC once it is formatted
for the DVR PRO 4000, as the HDD will not be recognised correctly and all information on
it will be erased.
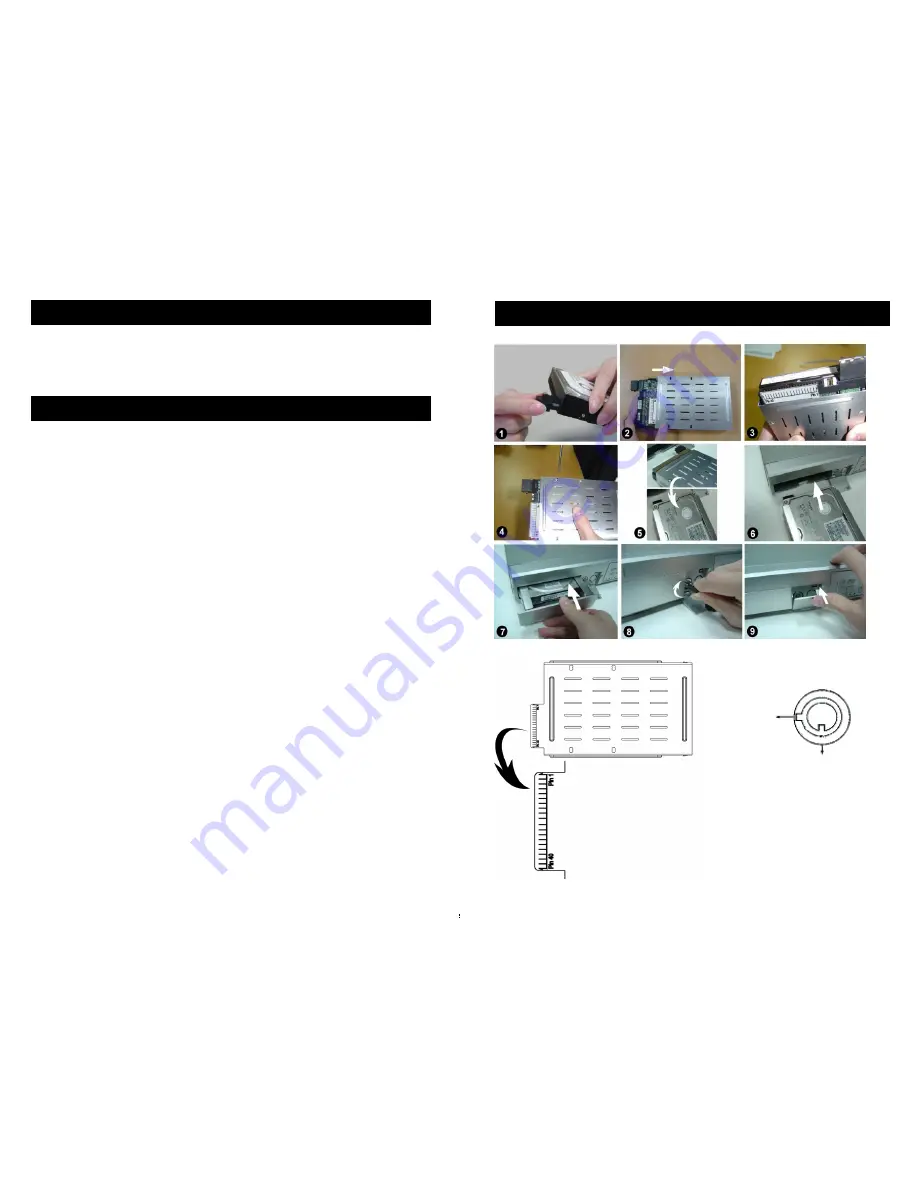
Please use the step by step guide over the page for reference when installing the hard drive into
your Swann DVR PRO 4000.
Step 1
Connect the Molex connector to the HDD’s power socket (
refer to Picture 1
).
Step 2
Put HDD into the HDD cartridge. Please note the power connector goes to the bottom
of the caddy. (
refer to Picture 2
).
Step 3
Because the screw holes from different HDD brands can be in different alignment to the
data pins, you will have to align pin
1
of your HDD to the pin
1
mark on the base of the caddy, then
carefully screw the HDD to the cartridge using the supplied screws.
(refer to Picture 3 and 4
).
Step 4
Reverse the HDD and put it into DVR (
refer to Pictures 5 and 6
).
Step 5
Firmly push the HDD into the DVR until it is flush with the front panel
(
refer to Picture 7
).
Step 6
Lock the cabinet by turning the key clockwise (
refer to Picture 8
).
Step 7
Close the key-switch cover (
refer to Picture 9
).
Hard Disk Drive Installation
B
(unlocked)
A
(locked)
A
(locked)


