cheese…), rubbery (e.g. candied peel…), and uneatable parts of ingredients
(e.g. bones) or crush ice.
-Do not remove the lid and never replace accessories without switching off the
appliance and if the accessory being used has not stopped working.
-Do not remove the ingredients from the bowl before removing the blade
MIXING BOWL
I. Chopping Function
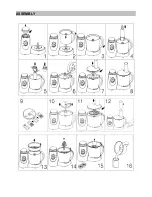
-Put the plastic bowl on power unit and turn the handle in clock-wise direction,
as shown in Diagram 2.
-Put the blade support on the axis in the middle of the bowl,and press it to the
bottom.Then fix the chopping blade to blade support,as shown in Diagram
3&4.
Warning
: The blade is sharp. Please only hold the plastic part while using.
- Put the food (e.g. Meat) into the bowl, as shown in Diagram 5. Cut larger
food items into smaller pieces. (Approx 2 cm × 2 cm × 2 cm).
- Put the cover on the bowl, and turn it until hearing the "click" sound, as
shown in Diagram 6 &7.
- Connect the plug to the electric socket, rotate the button switch to choose
the suitable speed, there are 10 different speeds in all,as shown in diagram 8.
- TURBO is a contact switch,by which the appliance can achieve maximum
speed momentarily. When the chopping is finished,rotate the button switch to
“0”.After the blade stops, pour out the food.
II. Whisking Function
Mixing function has almost the same operating steps as chopping function.
Only change the chopping blade to shredding blade. It is used for mixing and
whisking of food, e.g. egg.
III. Slicing & Shredding Function
- Put the slicing/shredding knife into the blade cover, as shown in Diagram 9.
Slicing knife makes the food into slices. Shredding knife make the food into
Содержание SP13050N
Страница 5: ...ASSEMBLY...


