(MENU)
TIMER
CAMERA
RECORD
ALARM
DWELL
PIP
MOTION
DISPLAY
REMOTE
USER
SYSTEM
EVENT
(SYSTEM)
AUDIO INPUT
1
BUZZER
ON
EXT ALARM
ON
VLOSS ALARM
ON
MOTION ALARM
ON
HDD OVERWRITE
YES
MESSAGE LATCH
YES
DATE DISPLAY
D/M/Y
DATE
17-AUG-2004 [SAT]
TIME
20:15:34
CLEAR HDD
YES
SYSTEM RESET
YES
Before using the DVR 4 Motion, you will need to set the
time and date:
Press the “
” button, then use the
or
arrow until “
” is highlighted and press the
“
” button.
Use the
or
button to highlight
“
” then use the
or
button to highlight
the digits.
Use the
or button to adjust the digits to the
correct time.
•
Menu
Up
Down
System
Enter
Up
Down
Time
Left
Right
+
-
•
Up
Down
Time
Left
Right
•
+
-
•
•
Up
Down
Date
Left
Right
•
+
-
Menu
Use the
or
button to highlight “
” then
use the
or
button to highlight the digits.
Use the
or button to adjust the digits to the
correct time.
Use the
or
button to highlight “
” then
use the
or
button to highlight the digits.
Use the
or button to adjust the digits to the
correct date then press “
” until you return to the
main screen to save the settings.
Next you need to set up the Motion
Recording settings:
Press the “
” button and use the
or
button until “
”
is highlighted then press the “
”
button.
or
Menu
Up
Down
Motion
Enter
Up
•
•
Down
OFF
MOTION RECORD
+
-
ON
Use the
button to
highlight the “
” next to
“
” and press the
or button until “
” is shown.
(MOTION)
SEN MD-NVM RE DET
CAM1
70
03
64 ON
AREA
CAM2
70
03
64 OFF AREA
CAM3
70
03
64 ON
AREA
CAM4
70
03
64 ON
AREA
MOTION RECORD : ON
DAY
START
END
DAILY
00 : 00
00 : 00
(MOTION)
SEN MD-NVM RE DET
CAM1
70
03
64 ON
AREA
CAM2
70
03
64 OFF AREA
CAM3
70
03
64 ON
AREA
CAM4
70
03
64 ON
AREA
MOTION RECORD : ON
DAY
START
END
DAILY
00 : 00
00 : 00
•
Up
Down
Left
Right
OFF
+
-
ON
•
Right
AREA
Enter
•
-
Use the
or
button to Highlight the Camera you wish to enable, then use the
or
button to highlight the “
” next to that camera and press the
and keys to adjust the
setting to “
”.
key to highlight “
” next to the camera you wish to enable, and press the
“
” button.
Press the button to turn on Motion Detection for the whole screen as shown by a green
overlay, then do the same for your other active cameras.
Use the
AREA
Setting Time and Date
Configuring Motion Recording
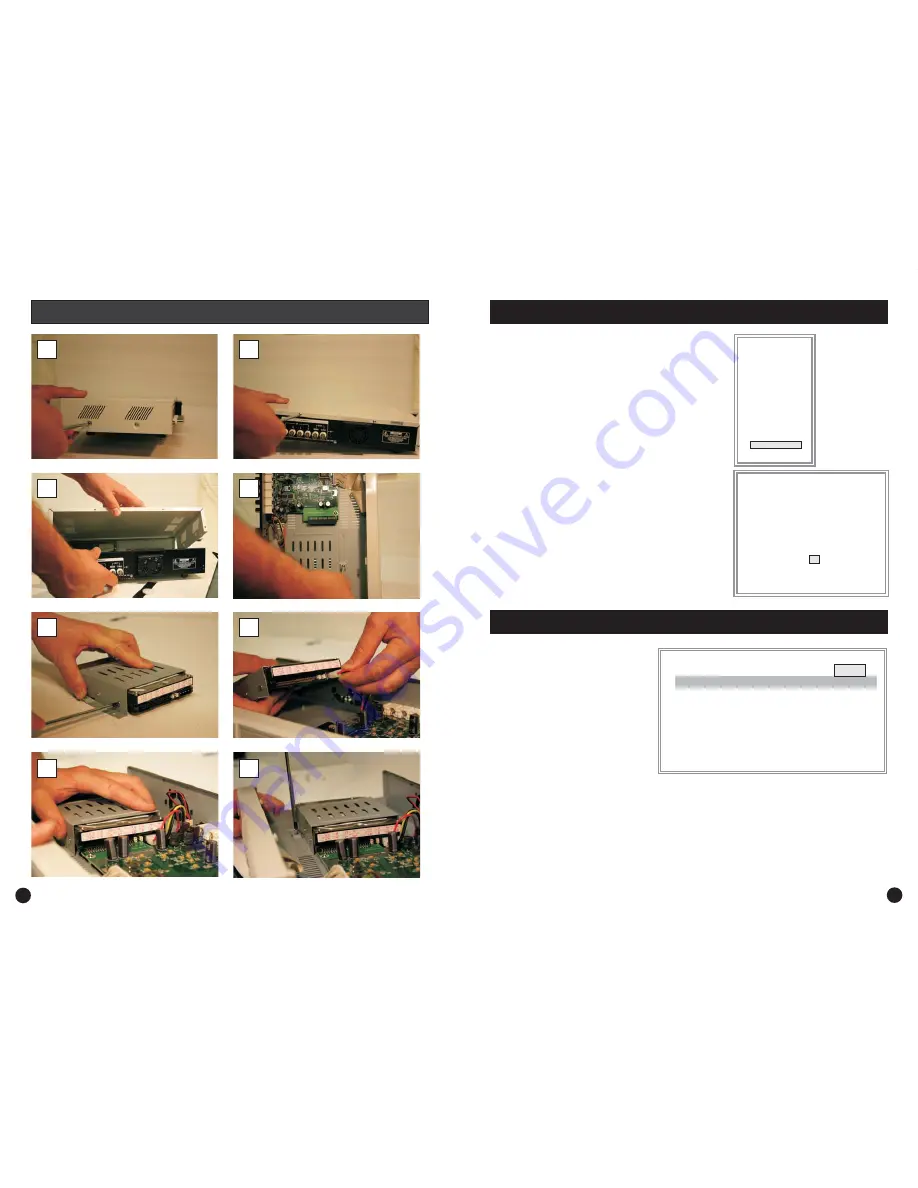
Hard Disk Drive Installation Steps
1
2
3
4
5
6
7
8
6
3


