background image

20

Playing recorded video on your PC:

1.  Pop the CD into the CD/DVD ROM drive of your PC: 

Grab the CD out of the pack and 

place it carefully into the CD tray of your PC or Laptop

2.  Install the software:

 Open the CD drive on your PC (Start > Computer > DVD RW Drive or 

similar) and double click on the file Sec24 Media Player, wait for the installation to finish. 

3.  Run the Sec24 Software.

 Depending on which version of Microsoft Windows you use 

the location will vary, but on Windows 7, Start > All Programs > Sec24 Media Player > 

Sec24 Media Player

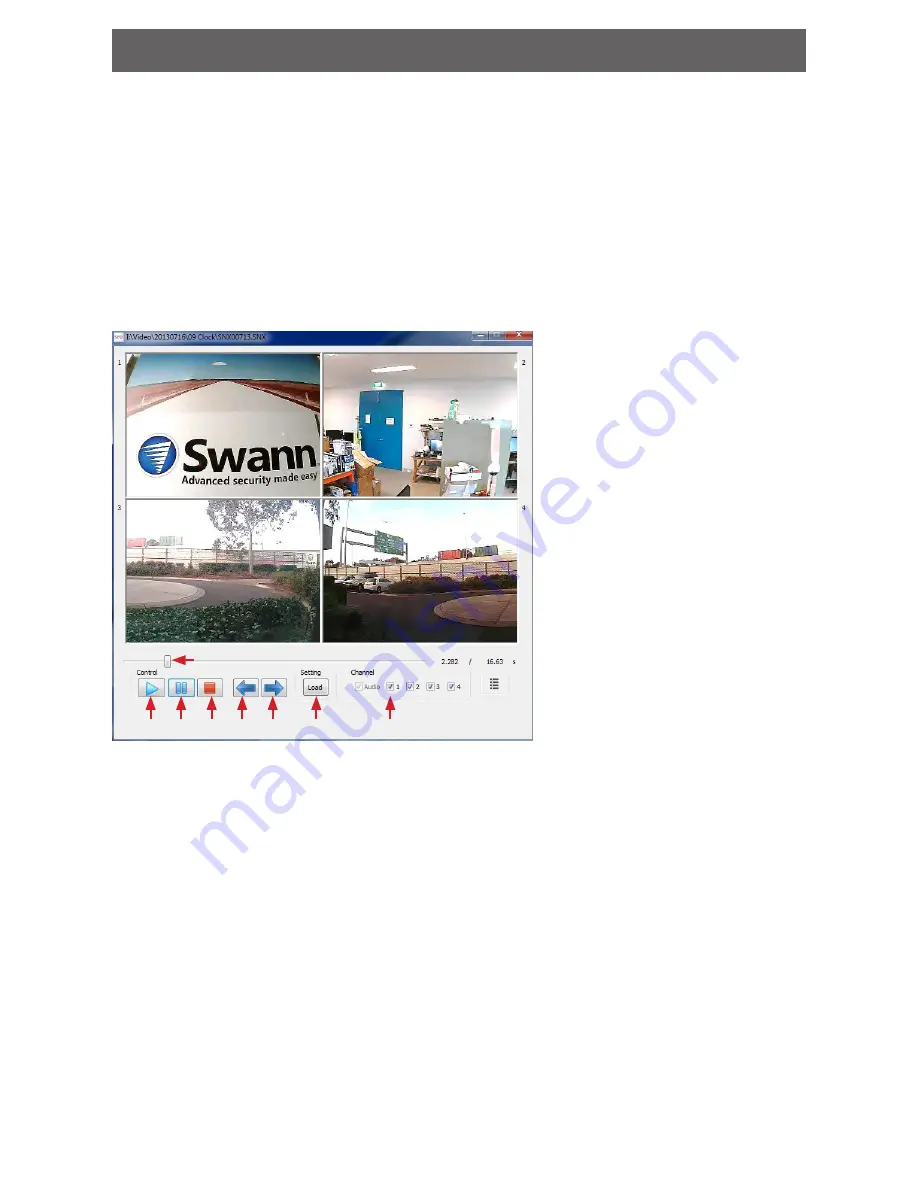
The player interface

Playback: Play video on a PC

1 2 3 4 5

6

7

Controls

1.  Play
2.  Pause
3.  Stop
4.  Previous Recording
5.  Next Recording
6.  Load Recording
7.  Select playback channel/s
8.  Time slider

To Load a video from your ADW-340, remove the MicroSD card and fit it to an appropriate 

card reader then connect that to your PC/Laptop.

Run the Sec24 software as shown earlier and then click 

Load

 (

6

) and navigate to the 

Remov-

able Disk

 in the explorer window (the actual name may vary depending on your computer 

and its settings). You will see the folder 

Video

, then the folder named for the date in YYYYM-

MDD format (for example 20130623) and then the hour (e.g. 09 Clock) and inside here are the 

recordings for that hour. If there are multiple files in the folder, unless you know the specific 

time just choose the first file as you can then use the skip forward (

5

) and skip backward (

4

buttons to navigate through the recordings. Click on the file to choose it then click 

Open


to open the file and begin playback. If you wish to give recordings to another person or the 

Police, please make sure you also give them the Sec24 playback software as well so they 

can play back your recordings. If you are playing back a recording and only want to view 

one channel, click 

Pause 

and you can use the Channel select option (

7

) to untick all but one 

of the channels, leaving only the one you want to see. Now that one channel will playback 

taking up the whole playback window. You can then click 

Play

 again and the single channel 

will play as normal. 

Note:

 You can only select which channels to playback when the video is paused!

The playback interface showing 4 

channel (Quad) playback. The soft-

ware works much like a VCR with 

buttons to control the playback and 

the ability to drag the time slider to 

any section of the recording.

8

Содержание ADW-340

Страница 1: ...1 INSTRUCTION MANUAL EN Digital Wireless Security System ADW 340 ...

Страница 2: ...e goods repaired or replaced if the goods fail to be of acceptable quality and the failure does not amount to major failure Warning Modifications not approved by the party responsible for compliance could void user s authority to operate the equipment IMPORTANT SAFETY INSTRUCTIONS Make sure product is fixed correctly and stable if fastened in place Do not operate if wires and terminals are exposed...

Страница 3: ...ayout The Camera 7 Basic Setup Setup Guide 8 Menu System Setup 9 Advanced Configuration Menu Camera Setup 12 Menu Record Setup 13 Menu Event List Playback 17 Menu Miscellaneous 18 Playback Play video on a PC 20 Reference Mounting Guide 21 Tips Tricks Getting the most out of your ADW 340 22 Troubleshooting Cameras Receiver 23 Helpdesk Technical Support Details 24 ...

Страница 4: ...buttons Drink the tea or coffee you made a moment ago Then look at Setup Guide on page 8 IMPORTANT INFORMATION Read this before proceeding Not all MicroSD cards are supported We cannot guarantee universal compatibility The unit has been tested with many well known brands such as Kingston and Sandisk MicroSD cards up to 32GB Many higher capacity cards cannot be read by the unit as well as some card...

Страница 5: ... up to get the best signal Stand If you want to put the receiver on a table shelf or other flat surface but have it at a useful angle the flip out stand on the back has you covered Speakers The built in stereo speakers are located on the rear They re louder than their size may indicate in this picture one speaker is hidden behind the stand A V Out If the LCD isn t enough for your needs you can con...

Страница 6: ... recording in progress if it is If pressed while in the playback interface or navigating the file list it acts as the delete button ZOOM Increases the zoom on the image to 200 from standard view or returns to the standard view if pressed while zoomed ALARM Toggles the alarm buzzer on and off Signal Pairing LED While lit this indicates that the receiver is able to receive images from at least one o...

Страница 7: ...or Light Sensor Detects light levels and turns the LEDs on and off automatically Stand The camera should be firmly mounted to a wall ideally about 10 3m off the ground At this height it s low enough to see detail where needed but high enough to be out of harm s way See the Mounting Guide on page 21 for more information on mounting the camera Power Socket For connecting the included 5V power supply...

Страница 8: ...cedure 1 Set the Date and Time We recommend you start here and make sure everything looks right If you want to use the video as evidence of a crime it is crucial that the time and date are set correctly see Menu System Setup on page 9 2 Prepare your MicroSD card as the storage medium For the longest ongoing operation use a 32GB MicroSD card with Overwrite enabled see Menu Miscellaneous contin ued ...

Страница 9: ...e System Setup icon highlighted to access the following Date and Time Use the arrows and menu key to select and change the following settings Menu selects the menu section Left Right arrows to highlight the option and Up Down arrows to modify the setting ESC to go back Press the menu button then use the arrow buttons left right to select up down to change to set the date and time press the menu bu...

Страница 10: ...L for AU UK Once you have the correct option highlighted press the Menu button to select Choose when to turn off the LCD screen recording will still happen as per your recording settings press any button to activate the screen again Menu System Setup continued ...

Страница 11: ... the unit will automatically return to quad screen or cycle through the active channels when idle You can also set the amount of time each screen will display here Choose the system language Menu System Setup continued ...

Страница 12: ...ontrols how light dark the image on the screen will be shown Increasing the brightness will not help the camera see more detail in dark areas it will just make the dark shadows less dark however they won t contain any new information Select the Image Brightness option with the left right arrows While highlighted press up down to adjust the brightness Activate Deactivate The receiver can support up...

Страница 13: ...tion is required to trigger the detection by adjusting the Motion Detection Sensitivity setting and this can be different for all four channels S Schedule Scheduled recording is the most direct time based control The receiver will record from the start of the scheduled recording period until the end although the recording will be broken into multiple files X Manual By selecting manual you can chan...

Страница 14: ... with different values until you find the right one for you Remember to test the sensitivity during the day and at night time the camera s active infrared night vision makes quite a difference to the motion detection sensitivity at different distances from the lens The full red squares indicate the level of sensitivity Format Storage Formatting the MicroSD card will prepare a MicroSD card to store...

Страница 15: ...d in that section of the screen This is a good idea if for example you re monitoring your front yard and a tree swaying in the wind keeps triggering motion events Press Menu to select Setup Masking Area this will take you to the mask adjustment screen Use the arrows to highlight a camera and press Menu to select it and go to the mask adjustment screen Use the Arrow Buttons to navigate between squa...

Страница 16: ...ress the menu button to save the setting Notes on Recording Audio is available for one channel only even when performing QUAD recording By default audio is active for channel 1 but when the ADW 340 is performing motion triggered recording audio will automatically switch to the channel that triggered the recording This means that during playback you will only hear the audio recorded from the channe...

Страница 17: ...d beneath each event if the box containing the number is shaded then this channel was actively recording Use the Menu button to initiate playback and ESC to exit the playback interface To delete a video press REC DEL when it s highlighted in the Event List Press Menu to confirm a deletion or ESC to abort Playback Interface While in the Playback Interface the controls are Play Pause Menu Quad Singl...

Страница 18: ...ture allows you to Pan Tilt and Zoom around the image it doesn t actually move the camera but allows you to look at a cameras image at a higher level of zoom than the standard view When zoomed in you can use the Arrow buttons to virtually pan or tilt the view or rather choose where the magnified portion of the image is centred The ZOOM button on the front panel can be used to quickly access this f...

Страница 19: ...rn automatic overwrite on or off Enabling automatic overwrite will allow your receiver to manage the files on the MicroSD card by deleting the oldest files to create free space when your card is full so that it can record new events Remember if you have an event you wish to keep you need to take it off the card copy it to your PC or use a second MicroSD card before the overwrite happens Note If au...

Страница 20: ... the folder Video then the folder named for the date in YYYYM MDD format for example 20130623 and then the hour e g 09 Clock and inside here are the recordings for that hour If there are multiple files in the folder unless you know the specific time just choose the first file as you can then use the skip forward 5 and skip backward 4 buttons to navigate through the recordings Click on the file to ...

Страница 21: ...uspended from the ceiling by use of a suitable bracket or mounting block if more space is needed Surfaces not suitable for screwing are not recommended as a mounting point for the camera To mount the camera from the ceiling screw the stand into the thread on the top of the camera s body making sure you leave room to adjust the antenna angle We suggest that between 2 5 and 3m about 9 10 feet off th...

Страница 22: ...they re easier to hear over the noise but they take longer to say the same thing This translates into a lower frame rate rather than appearing smooth and fluent everything will seem staccato or jerky Try changing the location of the camera or receiver or adjust the antenna position if this happens it can help Q How does the receiver sense movement A The ADW 340 doesn t see the world like we do The...

Страница 23: ...card and then turn the receiver back on Check the integrity of the MicroSD card Not all SD cards are supported however brands such as Kingston Sandisk Panasonic Kingmax or Transcend are suggested for compatibility Make sure you have set the recording mode correctly check page 13 16 for more information My cameras seem to have turned themselves off Check the red power LED on the rear of the camera ...

Страница 24: ...ls Swann Technical Support All Countries E mail tech swann com Telephone Helpdesk USA Toll Free 1 800 627 2799 USA Exchange Repairs 1 800 627 2799 Option 1 M F 9am 5pm US PT AUSTRALIA 1300 138 324 NEW ZEALAND Toll Free 0800 479 266 UK 0203 027 0979 M340KIT270513E ...

Отзывы: