background image

17

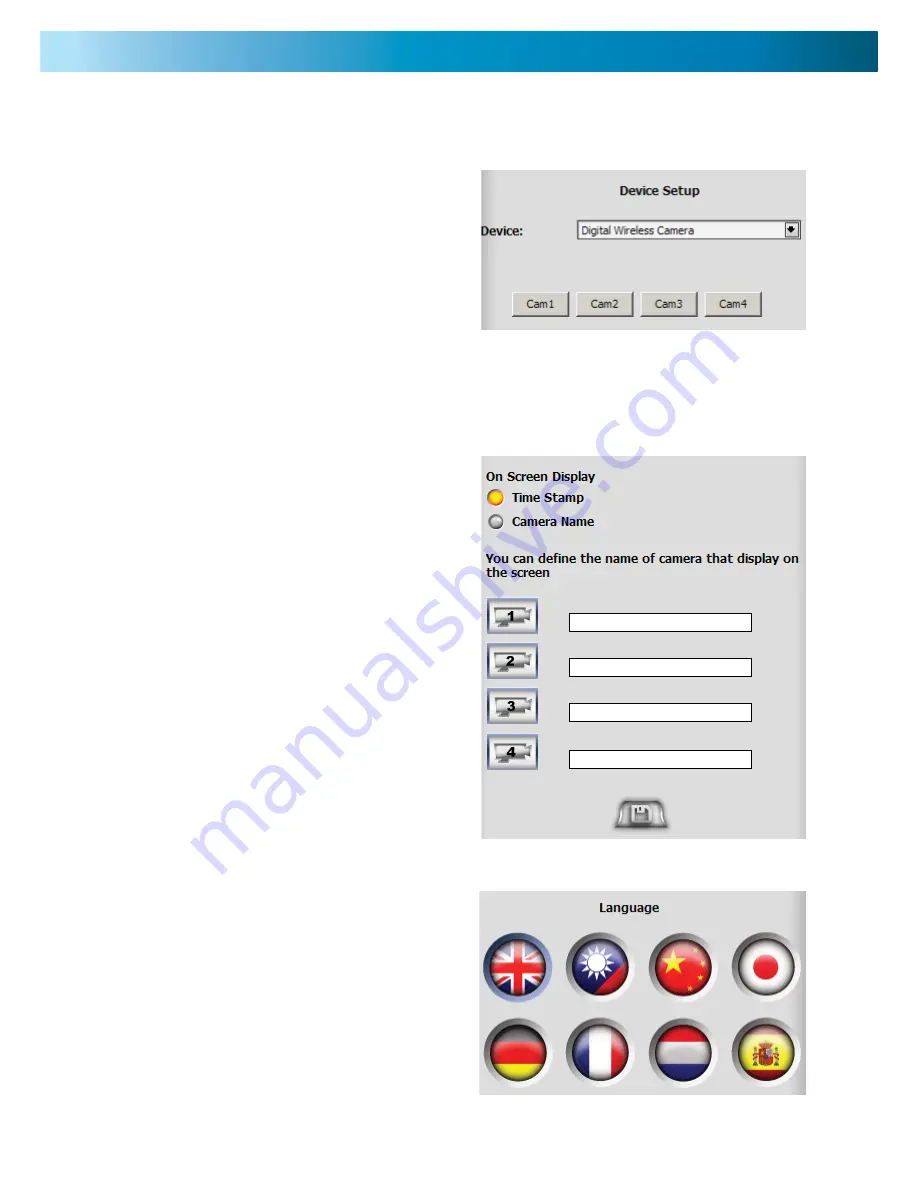
Device Setup

In the DEVICE SETUP screen you can pair your camera/s with a channel, name your cameras, 
choose to show the timestamp & camera name on the display and change language.

Pairing Cameras with a channel

1. Click on CAM1, CAM2, CAM3 or CAM4 to se-
lect channel 1, 2, 3 or 4. Then using a pin or tooth-
pick push the pairing button on the back of the 
camera you would like to pair the selected channel 
with.

Note: you will have 60 seconds until the 
receiver stops searching for the cameras 
signal.

2. Click SAVE to confi rm the changes.

Defi ning Cameras

1. Click on the TIME STAMP & CAMERA NAME 
buttons to show these on all the displays. To 
switch these off, click on the button again so that 
it turns grey again.

2. Type the name of the cameras in each of the 
cameras blank fi eld.

1. Select your language by clicking on the fl ag of 
your chosen language.

3. Click the SAVE button to confi rm the changes.

Содержание ADW-300

Страница 1: ...1 www swannsecurity com SR233 ADW 10006 290709 Advanced Digital Wireless Camera Receiver Operating Instructions Advanced security made easy ADW 300 SW233 ADW ...

Страница 2: ...tween the equipment and the receiver Connect the equipment into an outlet on a circuit different from that to which the receiver is connected Consult the dealer or an experienced radio TV technician for help IMPORTANT NOTE Prohibition against eavesdropping Except for the operations of law enforcement officers conducted under lawful authority no person shall use either directly or indirectly a devi...

Страница 3: ...Layout 6 Menu Functions 7 Connecting to a TV VCR 8 9 Software Installation 10 11 Opening the Software 12 Software Layout Functions 13 Motion Sensor 14 Record 14 Storage 15 Video Capture 15 Photo Snapshot 16 Event List 16 Device Setup 17 Troubleshooting Guide 18 Technical Specifications 19 Help Desk 20 Warranty Information 20 ...

Страница 4: ...e on the back cover page of this guide Install cameras high enough or out of reach to avoid tampering Place Security Stickers in a visible location to alert potential thieves they are being monitored Place cameras in high traffic areas such as doorways to maximise security Use only the included Power Supply and do not modify or cut wires ADW 300 Camera with Stand Receiver A V Cable 2 X Antennas Po...

Страница 5: ...5 Camera layout Pairing button Antenna connection Remove rubber cover to reveal pairing button Pairing LED Power LED Lens Infra Red light Front Back ...

Страница 6: ...e menu screen 4 UP Press to move the view up when in zoom mode Press to select previous selection above in the menu 5 MENU Press to access menu 6 DOWN Press to move the view down when in zoom mode Press to select next selection below in the menu 7 RIGHT Press to move the view right when in zoom mode Press to increase a selection in the menu screen 8 Power Indicator LED LED turns on when receiver i...

Страница 7: ...t channel Use the RIGHT LEFT arrow keys to switch between ON OFF When a channel is switched OFF it will be skipped when scanning is activated Pair CAM 1 2 3 4 If you are unable to view a picture on your camera s display your camera may not be properly paired with a channel To pair a camera use the arrow keys to select between channel 1 2 3 4 Once you have selected the channel you want to pair the ...

Страница 8: ... the power socket attached to the camera 1 Connect the A V cable to the Input on the back of the VCR i If your VCR is not already connected to your TV connect another A V cable to the Output on the VCR ii From Receiver To TV Plug the camera s power adapter into the wall socket 2 Input Output ...

Страница 9: ...Connect the the A V cable to your TV or VCR 5 From Receiver From VCR Optional Connect the power adapter plug into the receiver s power socket 3 Connect the A V Cable to a TV Input i Connect the power adapter into the wall socket 4 ...

Страница 10: ...n it Find the file named AUTORUN EXE and double click it 2 Select the language you would like to use for the installation process 3 Click NEXT 4 Click the I accept the agreement selection button then click NEXT 5 Click NEXT or choose your pre ferred location for the program Back Next Cancel Back Next Cancel Next Cancel I accept the agreement I do not accept the agreement ...

Страница 11: ...for the program shortcuts 7 Click INSTALL 8 Click NEXT 9 Click INSTALL 10 Click FINISH 11 Tick the box if you would like to run the program straight away then click FINISH Back Next Cancel Back Install Cancel Next Cancel Back Install Cancel Finish Finish ...

Страница 12: ...ame is i SEC Guarding Recording Click on i SEC Guarding Recording in the shortcut folder i SEC Guarding Recording i SEC Guarding Recording All Programs Start 2 To use the software you must register Click the REGISTRY button If you do not wish to register click the CLOSE button Note if you do not register the program you will only be able to use it for one hour Opening the Software 2 Enter the regi...

Страница 13: ...ess DEVICE DISPLAY LANGUAGE setup 10 HELP ABOUT REGISTRATION Click to access HELP ABOUT info and REGISTRATION info You must click the ZOOM button 14 to activate the features below 11 12 13 15 11 LEFT Click to move the view left when in ZOOM mode 12 DOWN Click to move the view down when in ZOOM mode 13 RIGHT Click to move the view right when in ZOOM mode 14 ZOOM IN ZOOM OUT Click to zoom in and out...

Страница 14: ... same way as the sensitivity Click on a grey button to select between 5 10 15 20 25 30 35 40 45 seconds 3 Click on the ALARM ONLY button to have the alarm sound without any recording when motion is detected The ALARM RECORD button will sound the alarm and record when motion is detected 4 Click the SAVE button to confirm the changes Record Recording can be set to a schedule or to the motion sensor ...

Страница 15: ...n the RESERVE FILES FOR button and input the number of days you would like to keep files for Otherwise Click the NEVER DELETE FILES button to keep all your files Video Capture Video Capture allows you to manually record footage into an AVI file 1 Click the record button to begin video capture The button will turn red to indicate it is recording The word RECORDING will also be flashing in red on th...

Страница 16: ...its function A preview of the image taken will show below the list The listed pictures can be previewed here by clicking on the one you would like to view The Event List will show all the recording and images taken Note this does not include im ages taken in PHOTO SHAPSHOT Using the buttons on the right in the EVENT LIST you can sort events by CAMERA NAME TIME MODE videos images You can also DELET...

Страница 17: ... of the camera you would like to pair the selected channel with Note you will have 60 seconds until the receiver stops searching for the cameras signal 2 Click SAVE to confirm the changes Defining Cameras 1 Click on the TIME STAMP CAMERA NAME buttons to show these on all the displays To switch these off click on the button again so that it turns grey again 2 Type the name of the cameras in each of...

Страница 18: ...ly the red and or white connector s are plugged in correctly Check the volume settings on the TV Also remem ber that the range of the microphone is not the same as the range of the camera the camera will record anything in front of it that it sufficiently lit however a microphone will only record sound within a few feet unless the sound is very loud Problem The image on my TV appears to be distort...

Страница 19: ... 6mm Viewing Angle H 53 V 40 Night Vision Number of Infra Red LEDs 24 Infra Red Wavelength 850nm Night Vision Distance 26 8m General Power Supply DC 5V Operating Temperature 10 C 50 C 14 F 122 F Camera Dimensions 6 3 x 2 5 x 6 3 160x63x161mm Weight 11 6oz 330g Receiver 1 1 x 3 5 x 3 2 28mm x 88mm x 82mm Weight 4 8oz 137g PC Out USB Compatible TV Out 3 5mm jack to RCA Wireless Reception Range 165 5...

Страница 20: ... of the end user This warranty applies to the original purchaser of the product only and is not transferable to any third party Unauthorized end user or third party modifications to any component or evidence of misuse or abuse of the device will render all warranties void By law some countries do not allow limitations on certain exclusions in this warranty Where applicable by local laws regulation...

Отзывы: