


English
English
32
33
A
dv
anc
ed C
onfigur
ation
A
dv
anc
ed C
onfigur
ation
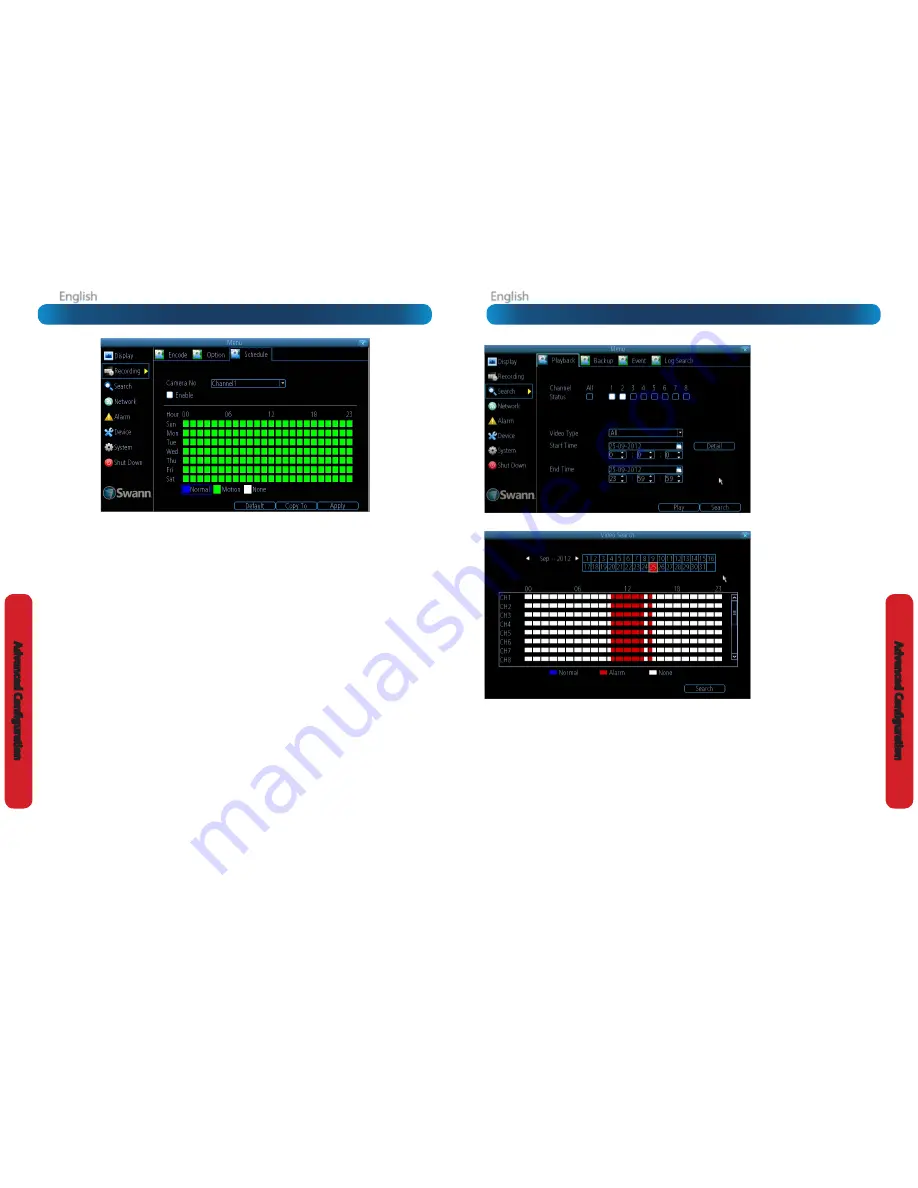
To initiate playback:
•
Select the channels you’d like to
playback.
The DVR can playback
up to 4 channels at once (4ch & 8ch
models) or one channel only (9ch &
12ch models). Displaying many video
feeds simultaneously may cause a
reduction in playback frame rate from
real-time to near-real-time.
•
From the
Video Type
menu, select
the type(s) of video you’d like to
playback. The options are
Manual
,
Schedule
,
Motion
and
All
.
•
Set your
Start Date/Time
and your
End Date/Time
.
•
If you want to see a graphical
representation of when recordings
were made and what recording
mode triggered them, choose
Details
.
•
Select
Search
.
•
Choose which
event(s)
you want to
play back, and up to eight cameras
you’d like to view the
video(s)
from.
•
To initiate playback, select
Play
.
Performance and Playback
When playing back multiple channels
at once, you may notice that they’re not
quite “in sync” and, in extreme cases, may
be displayed in near real-time (instead of
real-time).
Why?
The DVR only has so much processing
power, and we’ve configured it so that
it has more resources dedicated to
recording than to playback.
While you’re playing back footage,
the DVR continues to monitor and
record normally. Recording from up to
four/eight channels simultaneously is
so resource intensive that playback
performance may be sacrificed to
ensure ongoing reliable recording.
The Video Search Details screen.
Recordings for the selected day are shown per channel by time.
Each recording is color-coded to match the recording mode the DVR was
using at the time.
Search: Playback
Recording: Schedule
Important Guidelines
The schedule presented on-screen applies to
one channel
on
one specific day of the week
only.
Use the
Copy To
functions to quickly assign identical schedule
layouts to multiple days/channels at once.
Be careful when programming your schedule. It’s one of the
most important aspects of setting up your DVR, and if it’s
wrong in any way, it could lead to disastrous complications
later.
Copy To (Channel):
Located at the base of the screen, with
Default
on one side and
Apply
on the other. This will allow
you to copy the schedule from the channel you’re editing to
another channel or channels.
Recording Modes:
There are two types of recording to choose from.
Normal:
The DVR will constantly record for any period where
Normal
is selected. You won’t miss anything, but constant
recording will fill your hard drive very quickly. (The DVR does
record the equivalent of a DVD film every two hours on every
channel, so that’s rather a lot of data!) Typically, we suggest
Motion as a better recording mode for most users.
Motion:
The recommended recording setting for most
applications. The DVR will only record when it detects
something moving in front of a camera, and will then only
record footage from the camera(s) that do detect motion
unless you alter your Action settings “Alarm: Motion Detection
- Action” on page 36 to include other channels.
Before setting any of your schedule to Motion, ensure that
Motion Detection
is properly configured for the channel(s)
you want to associate with it. See “Alarm: Motion” on page
34 for more information about setting up and configuring
Motion Detection.
None:
As the name suggests,
the DVR will not record
anything.
This isn’t really a mode, but it’s listed here for
completeness.
Note:
You can record using
Normal
and
Motion
at the same
time. The DVR will record constantly, but tag motion events
and mark them as such in the Video Search interface.


