background image

34

SELECT CONTROLS

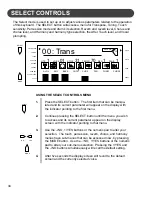
USING THE SELECT CONTROLS MENU

1.

Press the SELECT button.  The first item that can be manipu-
lated and its current parameter will appear on the display with
the indicator pointing to the first menu.

2.

Continue pressing the SELECT button until the menu you wish
to access and its current parameter appear on the display
screen, with the indicator pointing to that menu.

3.

Use the –/NO, +/YES buttons or the numeric pad to alter your
selection.  The touch, percussion, reverb, chorus, and harmony
menus have sub-menus that can be accessed now, by pressing
the MODE button.  Use the –/NO,  +/YES buttons or the numeric
pad to alter your sub-menu selection.  Pressing the +/YES and
the –/NO buttons simultaneously will recall the default setting.

4.

After five seconds the display screen will revert to the default
screen and the currently selected voice.

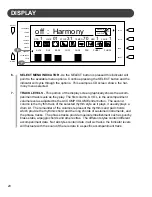
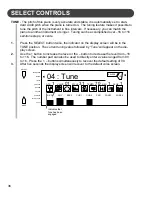
The Select mode is used to set up or to adjust various parameters related to the operation
of this keyboard.  The SELECT button will access a menu for Transpose, Tuning, Touch
sensitivity, Percussion mode and drum kit selection, Reverb and reverb level, Chorus and
chorus level, and Harmony and harmony type selection, the After Touch level, and Vocal
prompting.

REVERB

TRANSPOSE

TUNING

TOUCH

PERCUSS

REVERB

CHORUS

HARMONY

AFTER TOUCH

VOCAL

SELECT

MODE

VOICE

STYLE

SONG

RESET

00 : Trans

3D

OTS 

 1 

   VOICE  

01

    STYLE  

31 

   TEMPO  

70

    REG  

   PAGE 

 1

SELECT

NO

+

YES

MODE

A.VOL

RHY

 BASS

 CHD1

CHD2

PAD

PHRS1

PHRS2

Содержание SP-67

Страница 1: ...1 SUZUKI Pianos SP 67 PORTABLE KEYBOARD OWNER S MANUAL SUZUKI...

Страница 2: ...2...

Страница 3: ...recall settings Built in music training course with vocal prompting Large User Friendly LCD display screen You will find many more features and functions listed within this owners manual This digital...

Страница 4: ...structions in the manual accompanying the product 1 CAUTION Any changes or modifications in construction of this device which are not expressly approved by the party responsible for compliance could v...

Страница 5: ...s by gripping the plug firmly not by pulling on the cable Disconnect all cables before moving the instrument Physical shocks caused by dropping bumping or placing heavy objects on the instrument can r...

Страница 6: ...RD 28 Chord Display 29 Single 29 Fingered 30 Piano 31 Manual Bass Chord 31 Auto Harmony 31 Starting and Stopping the Auto Accompaniment 32 Variation 33 Fill In 33 SELECT CONTROLS 34 Transpose 35 Tune...

Страница 7: ...reduced as the batteries drop in voltage TO REPLACE THE BATTERIES 1 Open the battery compartment cover located on the instru ments bottom panel 2 Insert eight new batteries be careful of the polarity...

Страница 8: ...EMPO Press one of the TEMPO buttons the current tempo value will appear on the display You can use the TEMPO TEMPO buttons or the NO YES buttons to change the tempo value range from 40 to 240 bpm beat...

Страница 9: ...you release the keys To disengage press the button again There is also a sustain pedal jack on the piano back panel 8 METRO METRONOME The built in metronome is a timing device that ticks at a constant...

Страница 10: ...The rhythm style will start as soon as you play in the auto accompaniment section of the keyboard The auto accompaniment will start with the first recognized chord played in the auto accompaniment sec...

Страница 11: ...IN button the fill in pattern will repeat until the button is released then the main pattern will play from the beginning of the next measure If variation is selected the engaged rhythm style will pro...

Страница 12: ...ons or the numeric pad to select a voice the voice name and its number will be shown on the display There is a complete list of all 138 voices listed in the back of the manual and on the piano cabinet...

Страница 13: ...accompaniments based on the chord that you play with your left hand The ACCOMP button selects the auto accompaniment mode With this function engaged the keys to the left side of the split point are th...

Страница 14: ...e Please see the One Touch section of this manual for more information 24 NUMBER ONE TOUCH REGISTRATION BUTTONS These buttons are used in conjunction with the one touch and registration store and reca...

Страница 15: ...for more information 30 ACCOMP ACCOMPANIMENT The ACCOMP button is used to select the auto accompaniment track of a song for recording or playback Please see the Record section of this manual for more...

Страница 16: ...lect voice style select buttons The voice name in the voice kit is printed above the button and the style name in the style kit is beneath the button Press the VOICE STYLE button to select a kit The i...

Страница 17: ...ress the START STOP button all the training songs will playback Use the NO YES buttons to select a song Press the START STOP button again to stop the demonstration Please see the Demo section or the T...

Страница 18: ...ter a note or notes have been played on the key board roll the PITCH BEND wheel up away from you to raise the pitch or down towards you to lower the pitch of the note s played The PITCH BEND wheel doe...

Страница 19: ...lt power up settings so the indicator will not be displayed 4 CURRENT PARAMETERS This line shows the currently selected parameters for the one touch OTS the main voice VOICE the rhythm style STYLE the...

Страница 20: ...ally shows the accom paniment track levels as they play The first column A VOL is the accompaniment volume level as adjusted be the ACCOMP VOLUME slider button The second column is the rhythm track of...

Страница 21: ...button again to stop Please note there are 100 songs for the musical training course that can also be played back for demonstration Please see the Training section of this manual for more information...

Страница 22: ...E 138 VOICES 1 If necessary press the VOICE button to engage the voice selec tion mode the display will show the currently selected voice 2 Use the numeric pad or the YES NO buttons to select a voice...

Страница 23: ...d to select the desired voice while the dual voice is displayed The display will show the dual voice number and name then after five seconds the display will revert to the selected main voice 3 Press...

Страница 24: ...play After five seconds the display will revert to the voice display screen and the quick select buttons will revert to voice selection the VOICE STYLE button indicator light will turn back on RHYTHM...

Страница 25: ...es 2 Press and hold one of the USER buttons USER 1 USER 2 or USER 3 The currently selected voice will be assigned to this button to be available for quick selection This information is nonvolatile and...

Страница 26: ...auto accompaniment section of the key board You may add an introduction by pressing the INTRO ENDING button after pressing the SYNCH START button Press the START STOP or the SYNCH START buttons to sto...

Страница 27: ...METRONOME SETTING The built in metronome is a timing device that ticks at a constant tempo to be used as a timing reference to aid with practice or performance The metronome will tick with the beat of...

Страница 28: ...want 2 Press the START STOP or the SYNCH START buttons to start the rhythm style or press the INTRO ENDING button to start with an introduction Depending on the mode you can play chords in the auto ac...

Страница 29: ...keyboard are used to produce major seventh minor and minor seventh chords The auto accom paniment will start with the percussive rhythm as soon as a recognized chord is played The accompaniment produc...

Страница 30: ...er inversions are interpreted as m7b5 4 With aug and dim7 chords the lowest note played is assumed to be the root 5 With 7 11 chords the lowest note played is assumed to be the root or b7 FINGERING GU...

Страница 31: ...oice mode with the right hand playing the main voice AUTO HARMONY With the harmony feature engaged a single note on the right hand section of the keyboard will sound with additional auto harmony notes...

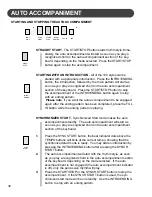
Страница 32: ...nchronized Start mode makes the auto accompaniment standby The auto accompaniment will start as soon as you play a recognized chord in the auto accompaniment section of the keyboard 1 Press the SYNC S...

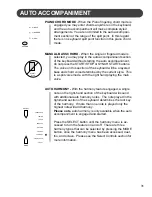
Страница 33: ...top mode off the indicator light will go out VARIATION The main pattern of the rhythm style is played in a loop There is a main pattern and a variation for each style and their introduction ending and...

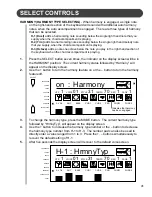
Страница 34: ...pad to alter your sub menu selection Pressing the YES and the NO buttons simultaneously will recall the default setting 4 After five seconds the display screen will revert to the default screen and th...

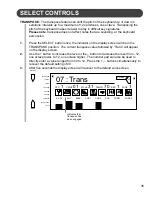
Страница 35: ...followed by Trans will appear on the display screen 2 Use the button to increase the level or the button to decrease the level from 12 one octave lower to 12 one octave higher The number pad can also...

Страница 36: ...ll be in the TUNE position The current tuning value followed by Tune will appear on the dis play screen 2 Use the button to increase the level or the button to decrease the level from 16 to 16 The num...

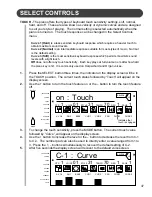
Страница 37: ...indicator on the display screen will be in the TOUCH position The current touch status followed by Touch will appear on the display screen 2 Use the button to turn the touch feature on or the button...

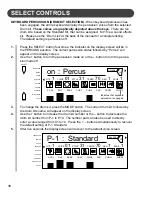
Страница 38: ...sion mode off 3 To change the drum kit press the MODE button The current drum kit followed by the drum kits name will appear on the display screen 4 Use the button to increase the drum kit number or t...

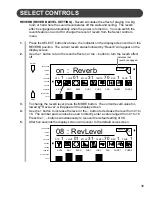
Страница 39: ...b level press the MODE button The current reverb value fol lowed by RevLevel will appear on the display screen 4 Use the button to increase the level or the button to decrease the level from 01 to 16...

Страница 40: ...rus value followed by ChoLevel will appear on the display screen 4 Use the button to increase the level or the button to decrease the level from 01 to 16 The number pad can also be used to directly en...

Страница 41: ...will appear on the display screen 2 Use the button to turn the harmony feature on or the button to turn the harmony feature off 3 To change the harmony type press the MODE button The current harmony...

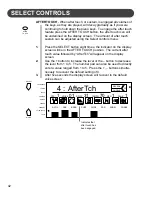
Страница 42: ...the AFTER TOUCH position The current after touch value followed by AfterTch will appear on the display screen 2 Use the button to increase the level or the button to decrease the level from 1 to 5 The...

Страница 43: ...s the indicator on the display screen will be in the VOCAL position The current vocal status followed by Vocal will appear on the display screen 2 Use the button to turn the feature on or the button t...

Страница 44: ...to enter a style number directly Please see the Rhythm section of the manual for more informa tion about choosing a rhythm style there is a complete list of all the rhythm styles in the back of this m...

Страница 45: ...u continue to press it The display screen will show the bank number followed by Page 2 Set the voice rhythm tempo accompaniment reverb effect and any other parameters that you wish to save 3 If necess...

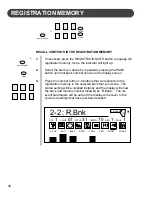
Страница 46: ...er button 1 6 buttons that corresponds to the registration memory in the selected bank that you desire The stored setting will be recalled instantly and the display will show the bank and memory numbe...

Страница 47: ...s available for recording the melody these are assigned by press ing the MELODY 1 or the MELODY 2 button Auto Accompaniment will record the chord changes style tempo variation introduction fill in and...

Страница 48: ...lease note notes played on the Melody section of the keyboard will not be recorded in the auto accompaniment track If the auto accompaniment is off only the percussive rhythm will be re corded An unre...

Страница 49: ...n to turn that track off 3 Press the PLAY STOP button to play the recorded track s The dots of the beat indicator will flash with the recorded tempo You can change the tempo by pressing the TEMPO butt...

Страница 50: ...or the num ber pads to select a song The song number will appear on the display Please note the chord display and the fingered accompaniment mode will be selected automatically when in the Song mode...

Страница 51: ...GHT and LEFT buttons simultaneously then press the START STOP button after the metronome sound you should play the entire section with both hands following the percussive rhythm 6 Check you progress A...

Страница 52: ...ceives MIDI data from an external MIDI device 2 MIDI Out This terminal transmits data from this instrument to other MIDI devices The transmitted data includes the note and touch velocity produced whil...

Страница 53: ...l of an external device keyboard synthesizer or sound module and the external device will respond to your playing In this way you can play two instruments at the same time or play on your piano to the...

Страница 54: ...tamento value 7 10 Volume Pan 11 X Expression 64 66 67 Sustain Sostenuto Soft Pedal 65 X X Portamento yes no 80 81 Reverb Chorus program 91 Reverb Chorus send level 98 99 X X NRPNL NRPHH 100 101 X X R...

Страница 55: ...21 Guitar Fret Noise 122 Breath Noise 123 Seashore 124 Bird Tweet 125 Telephone Ring 126 Helicopter 127 Applause 128 Gunshot ASIAN FOLK 129 Yangqin 130 Sanxian 131 Zheng 132 Erhu 133 Banhu 134 Suona 1...

Страница 56: ...1 16Beat 1 42 16Beat 2 43 16Beat 3 ROCK 44 Rock 1 45 Rock 2 46 Rock 3 47 Rock 4 48 Rock 5 49 Rock 6 50 Rock 7 51 Rock 8 52 Rock 9 53 Slow Rock 1 54 Slow Rock 2 55 Slow Rock 3 56 Slow Rock 4 No STYLE J...

Страница 57: ...tronome Bell Kick Drum 2 Power Kick Drum Side Stick Power Snare Drum 2 Hand Clap Power Snare Drum 1 Low Floor Tom 2 Close Hi hat Low Floor Tom 1 Pedal Hi hat Low Tom Open Hi hat Low mid Tom Hi mid Tom...

Страница 58: ...gle Open Triangle Cabasa Shaker Belltree Castanets Mute Surdo Open Surdo Orchestra 48 P 8 Orchestra High Q Slap Scratch Push Scratch Pull Stick Square Click Metronome Click Metronome Bell Orche Bass D...

Страница 59: ...to the key on the keyboard A blank space in the table mean there is no sound there Keys from A0 to D1 sound as timpani except for in Kit 10 the effects kit Keys from E6 to C8 sound the same as the D...

Страница 60: ...d all piano keys played will decay gradually as if you were continuing to hold down those piano keys If desired plug the sustain pedal into this connector 4 HEADPHONES STEREO LINE OUT You can play in...

Страница 61: ...Level Harmony After Touch Vocal prompt Training evaluation On Off Metronome On Off Chord Display Tempo Pitch Bend Wheel AUTO BASS CHORD MODE Single Fingered Piano Off AUTO ACCOMPANIMENT STYLE 100 Auto...

Страница 62: ...epair the product or return it to the Suzuki distribution center in San Diego California for repairs Upon completion of the repair the unit will be returned to the dealer freight prepaid This warranty...

Страница 63: ...63...
Страница 64: ...SUZUKI DIGITAL PIANOS SUZUKI OWNER S MANUAL SP 67 P O BOX 261030 SAN DIEGO CALIFORNIA 92196 858 566 9710 Visit us on the web at www suzukimusic com Copyright 2003 Suzuki Musical Instrument Corporatio...

Отзывы: