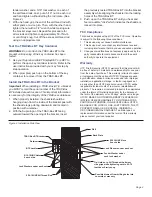

fender washer, and a 5/16" lock washer on each of
the all-thread rods. Last, put a 5/16" nut on each rod
and hand tighten without letting the rod rotate. (See
Figure 2.)
7. With one hand, grip the end of the all-thread rod with
either pliers or a vice grip. Then, with the other hand,
tighten the nut with a 1/2" wrench while making sure
the bracket stays level. Repeat this procedure for
all six rods and tighten to approximately 50-75in-lb
or until firmly snug. Cut off the excess all-thread rod
using an appropriate tool.
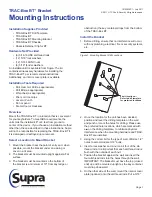
Test the TRAC-Box BT Key Container
WARNING:
Do not attach the TRAC-Box BT to the
bracket until opening of the key container has been
tested.
1. Use your Supra ActiveKEY, DisplayKEY, or eKEY to
perform the open key container function. Refer to the
user instructions provided with your key for step by
step operation.
2. When prompted, push up on the bottom of the key
container to remove it from the TRAC-Box BT.
Install the TRAC-Box BT in the Bracket
Important:
When installing a TRAC-Box BT in a bracket
you MUST record the serial number of the TRAC-Box
BT installed at each location. This important information
is necessary for the integrity of the TRACcess database.
1. When properly installed, the shackle should be
hanging down from the inside of the bracket post with
the shackle legs pointing downward and located in
position with a retainer.
2. With the Supra logo of the TRAC-Box BT facing
outward toward the opening of the bracket, insert
the previously tested TRAC-Box BT into the bracket
assembly while aligning the shackle into the locking
holes of the TRAC-Box BT.
3. Push up on the TRAC-Box BT until you hear and
feel an audible "click" which indicates the shackle is
locked into place.
FCC Compliance
This device complies with part 15 of the FCC rules. Operation
is subject to the following three conditions:
1. This device may not cause harmful interference.
2. This device must not accept any interference received,
including interference that may cause undesired operation.
3. Changes or modifications not expressly approved by the
party responsible for compliance could void the user's
authority to operate the equipment.
Warranty
UTC Fire & Security (UTCFS) warrants that this product will
be free of defects in material and workmanship for one year
from the date of purchase. This warranty is limited to repair
or replacement at the option of UTCFS. Damages caused
by modification, abuse or misuse, wear and tear, improper
installation, application, storage, or fault or negligence of
a party other than UTCFS are not covered. UTCFS will be
responsible for labor costs of removal or reinstallation of
products. The repaired or replaced product is then warranted
under the terms of this limited warranty for the balance of
the term of the warranty or for 90 days, whichever is longer.
UTCFS MAKES NO OTHER WARRANTY, EXPRESS OR
IMPLIED, OF MERCHANTABILITY OR FITNESS FOR A
PARTICULAR PURPOSE. IN NO EVENT SHALL UTCFS
BE LIABLE FOR LOSS OF USE; LOST PROFITS; THEFT;
PROPERTY DAMAGE; OR SPECIAL, INCIDENTAL,
OR CONSEQUENTIAL DAMAGES. To obtain repair or
replacement information under the terms of this warranty,
please contact your local supplier.
Figure 2. Installation Side View
Page 2
Wall
Back Plate
5/16-18UNC Nuts
6 each side
Lock Washers under each nut
Tip: Hold on to All Thread with pliers or
vide grips while tightening nuts to 50-75
foot-lbs or firmly snug
Possible blowout from drilling holes into
concrete or masonry
Fender Washer under
each lock washer
TRAC-Box BT Bracket
Retainer
BT Shackle
5/16-18UNC All Thread Rod
Lock Washers under each nut
5/16-18UNC Nuts
6 each side


