background image


Car Body 

Tail Pipe 

14 

Steering Bolt 

Washer 

Rear Spoiler 

15 

Rearview Mirrors 

Bushing 

10 

Seat 

16 

Front Windshield 

Wheel 

11 

Seat Screw   

17 

Hood Ornament 

Seat 

12 

Steering Wheel 


Tire Quick Connect 

13 

Steering Screw 


ASSEMBLY INSTRUCTIONS: 


1.


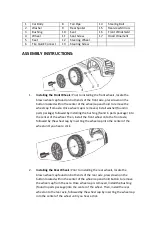
Installing the Front Wheels:

 Prior to installing the front wheels, locate the 

brown wheel cap found on both ends of the front axle, press down on the 
button located within the center of the wheel cap and hold to remove the 
wheel cap from axle. Once wheel cap is removed, install washer (found in 
parts package) followed by installing the bushing (found in parts package) into 
the center of the wheel. Then, install the front wheel onto the front axle, 
followed by the wheel cap by inserting the wheel cap into the center of the 
wheel until you hear a click.  


2.


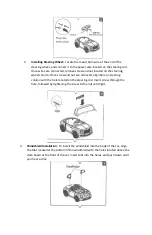
Installing the Rear Wheels:

 Prior to installing the rear wheels, locate the 

brown wheel cap found on both ends of the rear axle, press down on the 
button located within the center of the wheel cap and hold button to remove 
the wheel cap from the axle. Once wheel cap is removed, install the bushing 
(found in parts package) into the center of the wheel. Then, install the rear 
wheel onto the rear axle, followed by the wheel cap by inserting the wheel cap 
into the center of the wheel until you hear a click. 


Содержание Rolls Royce Style

Страница 1: ...ation and Operation Instructions Please read this instruction manual carefully It is important to read and follow all of the steps during assembly to ensure proper operation and safety of the child Pl...

Страница 2: ...Scan this QR Code to view the Rolls Royce Assembly Video...

Страница 3: ...r to avoid damage to the battery Keep all plastic bags out of the reach of young children Please check the product regularly for any loose parts or wires to ensure proper operation Please retain instr...

Страница 4: ...ckage followed by installing the bushing found in parts package into the center of the wheel Then install the front wheel onto the front axle followed by the wheel cap by inserting the wheel cap into...

Страница 5: ...and nut are removed align hole on steering column with the hole located on the steering rod Insert screw through the hole followed by tightening the screw to the nut until tight 4 Windshield Installa...

Страница 6: ...he wire to any of the 4 white slots located on the white power board Once connected place spoiler tabs into the open slots at the rear of the car and push until you hear a click 7 Installing Seat Inse...

Страница 7: ...e charger into wall outlet BATTERY MUST BE CHARGED FOR A MINIMUM OF 12 HOURS BEFORE INITIAL USE TO AVOID DAMAGE TO THE BATTERY REMOTE CONTROL BATTERY INSTALLATION Open battery cover on the back of the...

Страница 8: ...6 Motor is damaged Charge the battery Re tighten screws on wheels Re connect the battery connector to the car electrical connector Replace battery Replace motor The battery will not charge 1 Battery...

Страница 9: ...ease turn off power switch If not using for an extended period of time please disconnect the battery CHARGING and BATTERY MAINTENANCE IMPORTANT Battery must be charged for a minimum of 12 hours prior...

Отзывы: