Superrollo GW240 Скачать руководство пользователя страница 45

45

EN

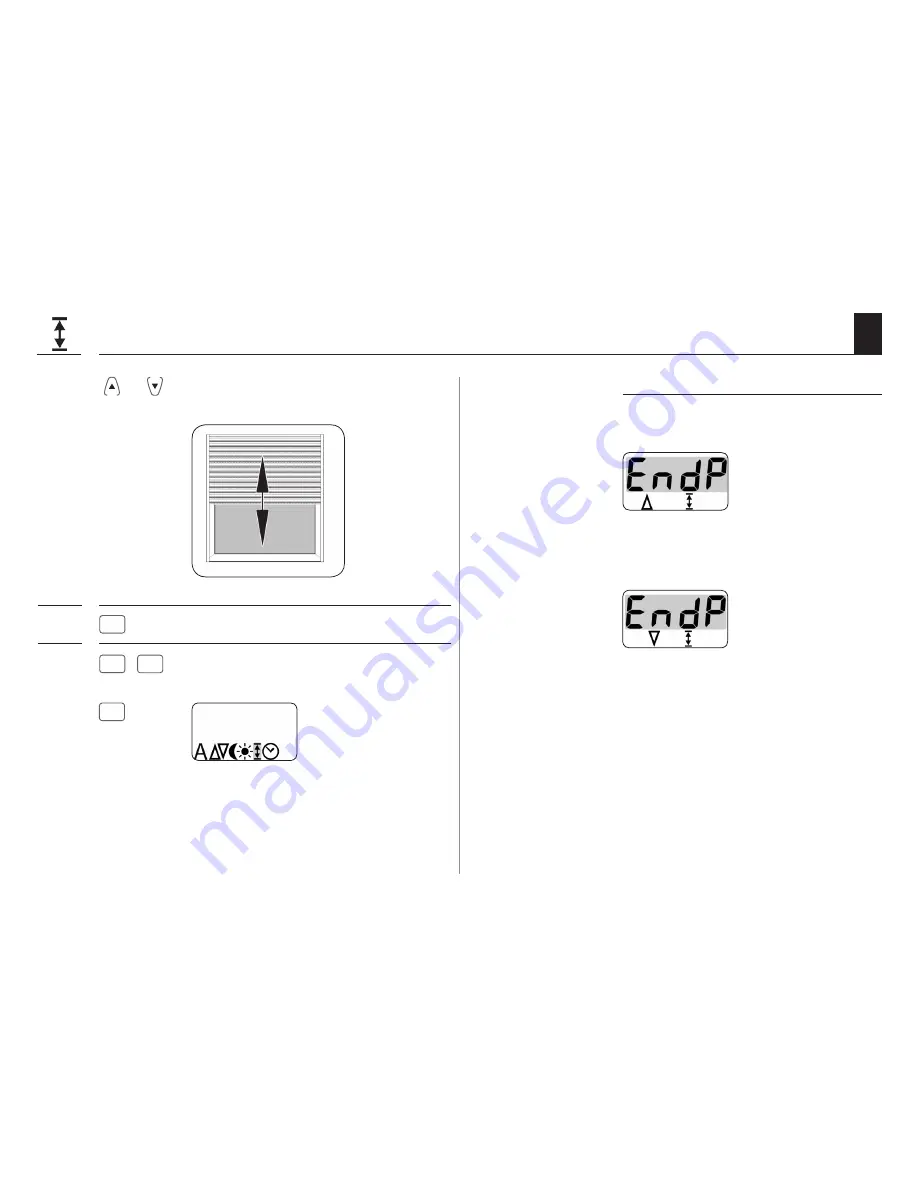
16.5  Setting the end points

OK

1. 

 or 


First move the roller shutters to the  


centre position.

2. 

M


Open the main menu.

3. 

+

 / 

-


Select the end point and open  


the menu.

Setting order

Set the upper end point,  

see page 33.

Set the lower end point,  

see page 34.

Содержание GW240

Страница 1: ...0240 2 02 16 Item No superrollo GW240 SR10240 superrollo GW245 SR10245 Mini belt Electronic Roller Shutter Belt Winder superrollo GW240 GW245 Translation of the Original Operating and Assembly Manual...

Страница 2: ...EN With your purchase of a roller shutter belt winder superrollo GW240 GW245 you have chosen a quality product manufactured by superrollo Thank you for the trust you have placed in us Dear Customer i...

Страница 3: ...lation 22 10 Mounting the wall bracket 24 11 Drawing in and fastening the belt 26 12 Mounting the superrollo GW240 GW245 28 13 Introduction to opening and setting the functions 30 14 Initial commissio...

Страница 4: ...manual is a component of the product Please store it in an easily accessible place When passing the superrollo GW240 GW245 on to a third party this manual must be passed on as well Damage resulting f...

Страница 5: ...result in minor or moderate injury if not avoided ATTENTION This hazard may lead to property damage 2 2 Symbols and depictions used Depiction Description 1 Steps to be taken 2 Itemisation 1 or a List...

Страница 6: ...hutters hit an obstacle in the DOWN t direction the superrollo GW240 GW245 is switched off see page 13 Overload cut off If the drive jams in the UP direction for exam ple due to ice the superrollo GW2...

Страница 7: ...mm f 1 x Disengaging bracket g 1 x Connecting cable with Euro plug h 1 x Reel compartment cover i 1 x Cover plate j 1 x Instruction manual not illustrated 3 Included in delivery After unpacking pleas...

Страница 8: ...ing hook Disengaging bracket 4 Overview of the superrollo GW240 GW245 Mounting Reel compartment cover i Reel Type plate Mains connection Drive release Assembly locking device Setting buttons Display C...

Страница 9: ...The roller shutter stops 3 M Menu button Call up the main menu Back to previous menu or standard display 4 5 Plus button minus button Selecting a menu in the main menu Setting of parameters more less...

Страница 10: ...etting parameters 2 A Switching automatic mode on off 3 Direction of travel up down Switching times opening closing time 4 Automatic dusk function 5 Automatic solar function 6 Setting the end points 7...

Страница 11: ...y possible from the standard display The main menu Enables display and selection of the individual functions and menus The selected menu flashes e g the switching times i Manual operation is not possi...

Страница 12: ...g Features and control options Operational demonstrator Manual operation Switching automatic mode on off Four switching times with a separate switching time for UP and DOWN t for Monday to Friday Satu...

Страница 13: ...ginal direction again Overload cut off The superrollo GW240 GW245 is equipped with an overload cut off system If the drive jams in the UP direction for example duetoice thesuperrolloGW240 GW245isswitc...

Страница 14: ...n wizard is active Time and date after a power failure The date and time stop with a power failure and need to be reset with the installation wizard see page 32 Data retention following a power failur...

Страница 15: ...End tractive force 13 kg Operating conditions Transient operation KB 4 minutes maximum running time Protection class II Protection type IP20 only for use in dry rooms Setting ranges Automatic solar fu...

Страница 16: ...16 EN 172 155 185 37 199 OBEN i 6 1 Dimensions All dimensions in mm superrollo GW240 GW245 Item no SR10240 SR10245...

Страница 17: ...ss Maximum belt length 15 mm Mini belt 1 0 mm 5 m 23 mm Standard belt 1 0 mm 5 m 1 3 mm 4 m 1 5 mm 3 4 m Table 2 Permissible shutter surface area m2 Roller shutter type Weight m2 Permissible shutter s...

Страница 18: ...he device safely and if they understand what dangers may resulted from this Childrenmustnotplaywiththedevice Cleaningand usermaintenancemaynotbecarriedoutbychildren without supervision Watch the movin...

Страница 19: ...g period the superrollo GW240 GW245 may not be used and the temperature is displayed for as long as is necessary Full operational availability is re established after approx one hour Onlyusethesuperro...

Страница 20: ...ible 230 V 50 Hz mains socket must be available at the installation site The roller shutters must run up and down smoothly and should not stick The mounting surface for the superrollo GW240 GW245 must...

Страница 21: ...the device in order to avoid unnecessary friction and wear Screwdriver cross recessed head Scissors Carpenter s gauge or measuring tape Pen A drilling machine and a 6 mm masonry drill if new mounting...

Страница 22: ...em 2 1 Let the roller shutter move fully down until the slats are completely closed 2 2 Remove the old belt winder and unreel the belt CAUTION There is a risk of injury from the pre tensioned springs...

Страница 23: ...ox This helps to prevent unnecessary friction and wear to the belt Accessories see page 57 3 Prepare the belt 3 1 Cut the belt off approx 20 cm under the mounting position 3 2 Fold the end of the belt...

Страница 24: ...toawindowframemade of synthetic materials 1 Use the provided mounting holes Two mounting holes are required to fasten the belt winder Generally it is possible to use the existing mounting holes of the...

Страница 25: ...w depending on the mounting surface see the included in delivery section on page 7 Wall mounting 4 x 40 mm Mounting onto window frame 4 2 x 19 mm 4 Screw on the wall bracket with the screws provided a...

Страница 26: ...plug again from the socket i 2 Press the Up button until the Fastening hook are easily accessible in the reel compartment i As no end points have been set yet the drive will stop as soon as you relea...

Страница 27: ...ess the up button until the belt has fully wound once around the reel 7 Pull the belt tight when winding so that the deflection roller turns at the same time 8 Remove the mains plug again from the soc...

Страница 28: ...GW240 GW245 onto the wall bracket from below until it engages Otherwise the superrollo GW240 GW245 may fall off again WARNING A damaged connecting cable may cause a short circuit Ensure that the conne...

Страница 29: ...sunlight 3 Re insert the mains plug into the 230 V 50 Hz socket i Leave the bottom cover plate of the setting buttons open until all settings have been carried out i 12 Mounting the superrollo GW240 G...

Страница 30: ...o open 2 Select the desired menu The selected menu is indicated by a flashing icon 3 OK Open the menu by pressing the OK button see example OFF flashes 4 Select the desired setting e g On 5 OK Byconfi...

Страница 31: ...d by pressing the menu button Readiness for operation The superrollo GW240 GW245 is ready for use as soon as the installation wizard has finished In the main menu you can change your settings at any t...

Страница 32: ...plug is plugged into the socket All icons and digits in the display will flash 3 Set the current time hours minutes and confirm each entry 4 Set the current date day month and confirm each entry 5 Se...

Страница 33: ...pper end point The roller shutter stops 6 4 If necessary the upper end point can be corrected once more 6 5 OK Save the upper end point ATTENTION Setting the wrong upper end point may lead to overload...

Страница 34: ...e desired position for the lower end point The roller shutter stops 7 3 If necessary the lower end point can be corrected once more 7 4 OK Save the lower end point i After a period of time it may be n...

Страница 35: ...rammed automatic functions 1 Open the roller shutters By briefly pressing the button the roller shutters will move to the upper end point 2 or Stop the shutters in the interim 3 Close the roller shutt...

Страница 36: ...n menu No automatic switching com mands will be executed dur ing the configuration process If nothing is entered within 60 seconds the display changes back to the standard display Functions in the mai...

Страница 37: ...Automatic mode OFF All previously entered automatic mode functions are deactivated All automatic icons are switched off in the standard display 1 M Open the main menu 2 Select automatic mode and open...

Страница 38: ...x closing time t For Saturday and Sunday 1 x opening time 1 x closing time t i The different switching times automatically appear one after the other By setting the switching times the automatic mode...

Страница 39: ...ing time hours minutes and confirm each entry 4 Set the closing time t for Monday to Friday 4 1 Set the desired closing time hours minutes and confirm each entry 5 Set the opening and closing time t f...

Страница 40: ...once the config ured opening time is reached orintheeventofamanualUp command The required twilight limit is configurable i The automatic dusk function is only executed once per day By setting the auto...

Страница 41: ...Set the desired limit ACTUAL value Currently measured brightness e g 10 too bright SET value Configurable set limit 01 very dark approx 2 Lux 15 less dark approx 50 Lux Ifthesetlimitvalueisnotmetdueto...

Страница 42: ...hutter end posi tion can be freely selected by changing the light sensor position i Please note the state of the sun icon on the standard display During the activated automatic solar function the corr...

Страница 43: ...atic clearing After approx 20 minutes the roller shutter is automatically raised a small amount to uncover the sensor If the sun continues to shine then the roller shutter remains in this position If...

Страница 44: ...tic solar function on and confirm the entry On Automatic solar function on OFF Automatic solar function off 4 Setting the solar limit value 4 1 Set the desired limit ACTUAL value Currently measured br...

Страница 45: ...end points OK 1 or First move the roller shutters to the centre position 2 M Open the main menu 3 Select the end point and open the menu Setting order Set the upper end point see page 33 Set the lower...

Страница 46: ...16 6 Set time and date OK 1 M Open the main menu 2 Select the time and date and open the menu Setting order Set the time hours minutes see page 32 Set the date day month see page 32 Set the year see p...

Страница 47: ...the setting buttons i 2 M OK Simultaneously press and hold the four buttons for 4 seconds 3 This displays the software version for the superrollo GW240 GW245 4 After four seconds all icons on the disp...

Страница 48: ...roller shutters 4 Continue to press and hold the down button 5 In doing so pull out the belt as far as possible from the top of the superrollo GW240 GW245 6 Remove the mains plug from the socket and...

Страница 49: ...Removing the superrollo GW240 GW245 e g in the event of a move i CAUTION There is a risk of injury from the reel Never reach into the reel compartment when the motor is running Always remove the main...

Страница 50: ...olled manner Get a second person to help you unlatch the unit i 4 Maintain pressure on the disengaging bracket and pull the belt out of the superrollo GW240 GW245 as far as possible 1 Remove the mains...

Страница 51: ...ust the end points see page 45 the roller shutters stop as soon as the operating button is released During initial installation or after a reset the will be no end points set In this case you will nee...

Страница 52: ...ny stiff areas with gliding wax d The roller shutters are too light Increase the weight of the roller shutters by for example adding a piece of flat steel to the bottom slat the temperature display ap...

Страница 53: ...oller shutter system Please check the superrollo GW240 GW245 and all of your roller shutter components regularly for damage Regularly check the superrollo GW240 GW245 for correct functioning The blind...

Страница 54: ...54 EN 22 Tractive force diagram Lifting weight Kg 2 Belt thickness 1 0 mm 3 Belt thickness 1 3 mm 4 Belt thickness 1 5 mm 5 Belt length m i 5 2 3 4 Belt length m Lifting weight kg...

Страница 55: ...ng time On 3 Opening times Monday to Friday 7 am 4 Closing times Monday to Friday 8 pm 5 Opening times Saturday and Sunday 8 am 6 Closing times Saturday and Sunday 10 pm 7 Automatic dusk function OFF...

Страница 56: ...omplies with the requirements of the current European and national directives 2006 42 EC Machinery Directive 2014 30 EU EMC Directive i Theconformityhasbeenverifiedandthecorresponding declarations and...

Страница 57: ...57 EN 25 Accessories Sunlight darkness sensor ZB30 Inaddition youcanequipthesuperrolloGW240 GW245 with a sunlight darkness sensor Item no SR70030 i...

Страница 58: ...occur within the warranty period free of charge either by repair or by replacement of the affected parts or by supply of a new replacement unit or one of the same value There is no general ex tension...

Страница 59: ...59 EN i...

Страница 60: ...perrollo online de Service Hotline 01807 001 655 Subject to technical modifications misprints and errors excepted Illustrations not binding 30 seconds free of charge subsequently 14 cents minute from...

Отзывы: