Chapter 6: Advanced Chassis Setup
6-19
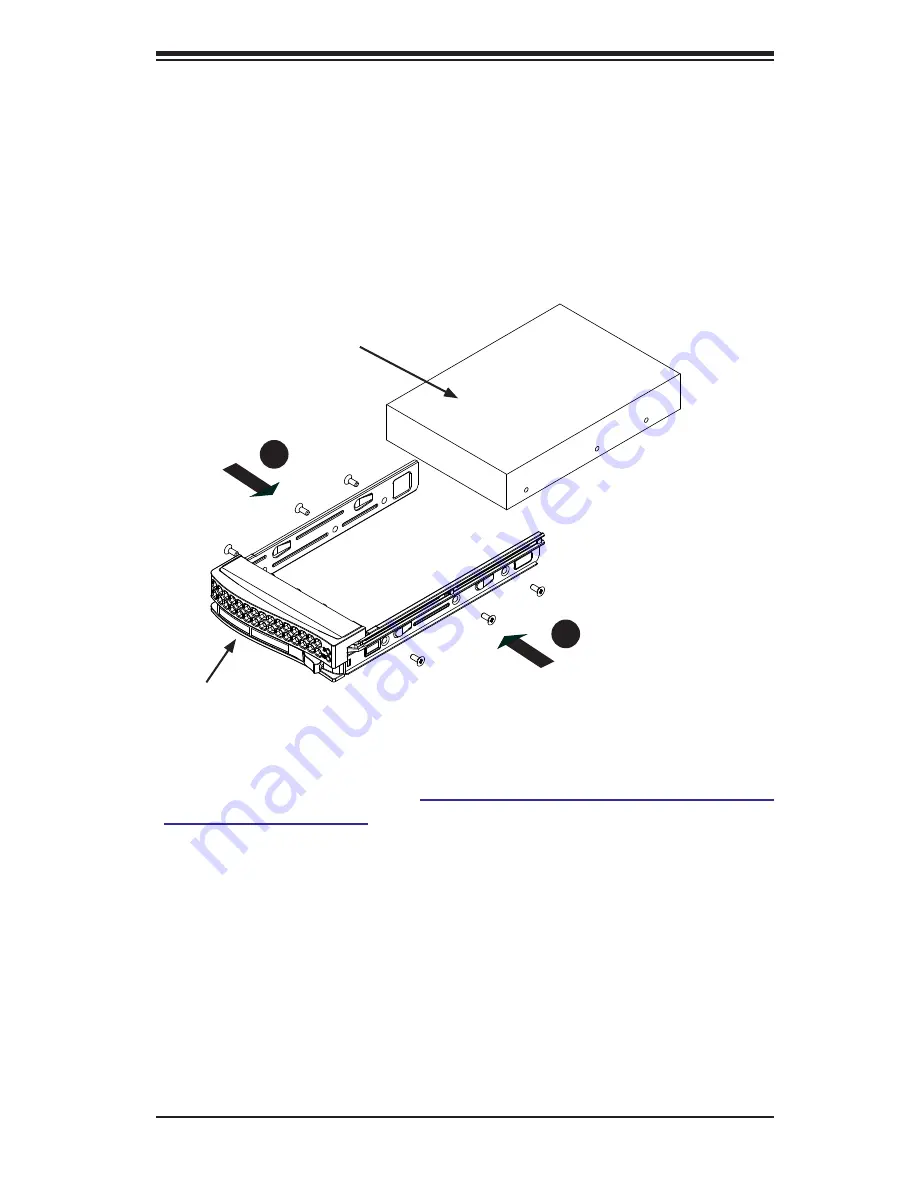
Installing the Hard Drive (Figure 6-18)
1. Install a new drive into the carrier with the printed circuit board side facing
down so that the mounting holes align with those in the carrier.
2. Secure the hard drive by tightening all six (6) screws.
3. Use the open handle to replace the drive tray into the chassis. Make sure the
close the drive tray handle.
Figure 6-18. Installing the Hard Drive
Drive Tray
SAS/SATA Hard Drive
1
2
2
2
Caution! Enterprise level hard disk drives are recommended for use in
Supermicro chassis and servers. For information on recommended HDDs,
visit the Supermicro Web site at
http://www.supermicro.com/products/nfo/files/
storage/SAS-CompList.pdf
Содержание SUPERSERVER 6027TR-H70RF+
Страница 1: ... SUPER SUPERSERVER Revision 1 0 SUPERSERVER 6027TR HTRF 6027TR H70RF 6027TR H71RF ...
Страница 5: ...v Notes Preface ...
Страница 10: ...x Notes SUPERSERVER 6027TR HTRF H70RF H71RF User s Manual ...
Страница 28: ...2 10 SUPERSERVER 6027TR HTRF H70RF H71RF User s Manual Notes ...
Страница 32: ...SUPERSERVER 6027TR HTRF H70RF H71RF User s Manual 3 4 Notes ...
Страница 52: ...4 20 SUPERSERVER 6027TR HTRF H70RF H71RF User s Manual Notes ...
Страница 80: ...5 28 SUPERSERVER 6027TR HTRF H70RF H71RF User s Manual Notes ...
Страница 87: ...Chapter 6 Advanced Chassis Setup 6 7 Figure 6 5 Replacing a System Fan in the Fan Housing ...
Страница 93: ...Chapter 6 Advanced Chassis Setup 6 13 Figure 6 12 Installing the Motherboard in the Motherboard Node Drawer ...
Страница 101: ...Chapter 6 Advanced Chassis Setup 6 21 Release Tab Figure 6 19 Changing the Power Supply ...
Страница 102: ...6 22 SUPERSERVER 6027TR HTRF H70RF H71RF User s Manual Notes ...
Страница 136: ...7 34 SUPERSERVER 6027TR HTRF H70RF H71RF User s Manual Notes ...
Страница 138: ...A 2 SUPERSERVER 6027TR HTRF H70RF H71RF User s Manual Notes ...
Страница 141: ...B 3 Appendix B System Specifications Notes ...

