Chapter 5: Advanced Motherboard Setup
5-17
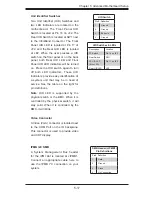
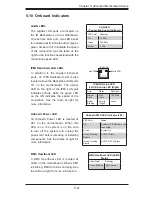
Unit Identifi er Switches
Two Unit Identifi er (UID) Switches and
two LED Indicators are located on the
motherboard. The Front Panel UID
Switch is located at Pin 16 on JF2. The
Rear UID Switch is located at SW1 next
to the Infi niBand Connector. The Front
Panel UID LED is located at Pin 17 of
JF2, and the Rear UID LED is located
at LE2. When the user presses a UID
switch on the front panel or on the back
panel, both Rear UID LED and Front
Panel UID LED Indicators will be turned
on. Press the UID switch again to turn
off both LED Indicators. These UID
Indicators provide easy identifi cation of
a system unit that may be in need of
service. See the table on the right for
pin defi nitions.
Note
: UID LED is supported by the
physical switch or the BMC. When it is
controlled by the physical switch, it will
stay solid. When it is controlled by the
BMC, it will blink.
UID Switch
Pin# Defi nition
1
Ground
2
Ground
3
Button In
4
Ground
UID Switches & LEDs
Description
Location
FP Switch
Pin 16 on JF2
Rear Switch
SW1
FP UID LED
(Blue LED)
Pin 17 on JF2
Rear UID LED
LE2
Video Connector
A Video (VGA) connector is located next
to the COM Port on the IO backplane.
This connector is used to provide video
and CRT display.
IPMB I2C SMB
A System Management Bus header
for the IPMI slot is located at JIPMB1.
Connect an appropriate cable here to
use the IPMB I
2
C connection on your
system.
SMB Header (JIPMB1)
Pin Defi nitions
Pin# Defi nition
1
Data
2
Ground
3
Clock
4
No Connection
Содержание SUPERSERVER 6027TR-H70RF+
Страница 1: ... SUPER SUPERSERVER Revision 1 0 SUPERSERVER 6027TR HTRF 6027TR H70RF 6027TR H71RF ...
Страница 5: ...v Notes Preface ...
Страница 10: ...x Notes SUPERSERVER 6027TR HTRF H70RF H71RF User s Manual ...
Страница 28: ...2 10 SUPERSERVER 6027TR HTRF H70RF H71RF User s Manual Notes ...
Страница 32: ...SUPERSERVER 6027TR HTRF H70RF H71RF User s Manual 3 4 Notes ...
Страница 52: ...4 20 SUPERSERVER 6027TR HTRF H70RF H71RF User s Manual Notes ...
Страница 80: ...5 28 SUPERSERVER 6027TR HTRF H70RF H71RF User s Manual Notes ...
Страница 87: ...Chapter 6 Advanced Chassis Setup 6 7 Figure 6 5 Replacing a System Fan in the Fan Housing ...
Страница 93: ...Chapter 6 Advanced Chassis Setup 6 13 Figure 6 12 Installing the Motherboard in the Motherboard Node Drawer ...
Страница 101: ...Chapter 6 Advanced Chassis Setup 6 21 Release Tab Figure 6 19 Changing the Power Supply ...
Страница 102: ...6 22 SUPERSERVER 6027TR HTRF H70RF H71RF User s Manual Notes ...
Страница 136: ...7 34 SUPERSERVER 6027TR HTRF H70RF H71RF User s Manual Notes ...
Страница 138: ...A 2 SUPERSERVER 6027TR HTRF H70RF H71RF User s Manual Notes ...
Страница 141: ...B 3 Appendix B System Specifications Notes ...


