background image

S

UPER P4STA


User's Manual

4-24

BIOS

4-8

Security Setup

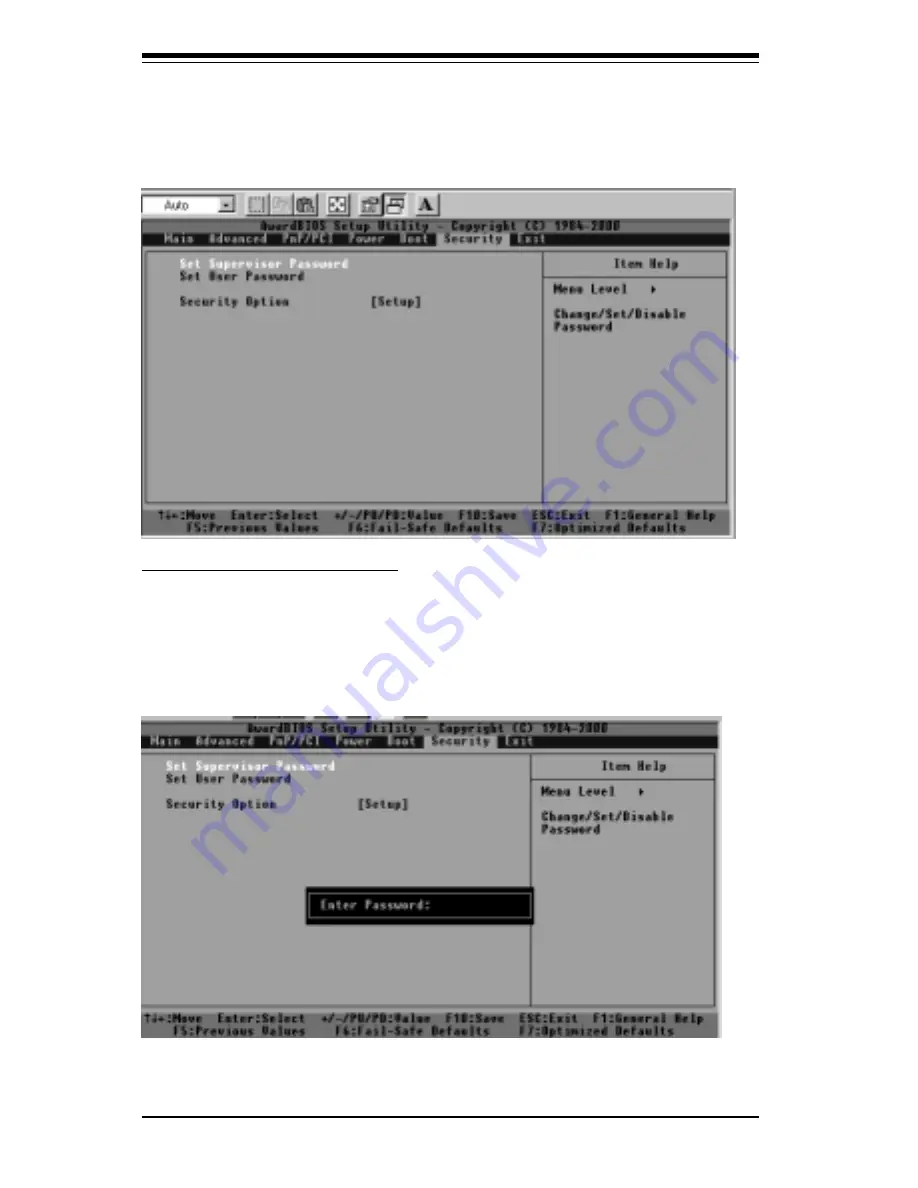
When the Item "Security" is highlighted on the main menu bar, hit
the <Enter> key to activate the following screen:

[Set  Supervisor's Password]

When the item "Set Supervisor Password" is highlighted on the
above screen, hit the <Enter> key to activate the following screen.
When prompted,  type in Supervisor's password in the dialogue box
to set or to change Supervisor's Password.

Содержание SUPER P4STA

Страница 1: ... SUPER P4STA Pentium 4 1 5GHz 1 3GHz Processors and Intel 850 Chipset Supported USER S MANUAL Revision 1 0 SUPER ...

Страница 2: ...BILITY TO USE THIS PRODUCT OR DOCUMENTATION EVEN IF ADVISED OF THE POSSIBILITY OF SUCH DAMAGES IN PARTICULAR THE VENDOR SHALL NOT HAVE LIABILITY FOR ANY HARDWARE SOFTWARE OR DATA STORED OR USED WITH THE PRODUCT INCLUDING THE COSTS OF REPAIRING REPLACING INTEGRATING INSTALLING OR RECOVERING SUCH HARDWARE SOFTWARE OR DATA Any disputes arising between manufacturer and customer shall be governed by th...

Страница 3: ... on handling static sensitive devices Read this chapter when you want to install the processor and RIMM memory mod ules and when mounting the mainboard in the chassis Also refer to this chapter to connect the floppy and hard disk drives the IDE interfaces the parallel and serial ports and the twisted wires for the power supply the reset button the keylock power LED the speaker and the keyboard If ...

Страница 4: ...iv SUPER P4STA User s Manual Notes ...

Страница 5: ...C 99 Features 1 12 1 6 Power Supply 1 14 1 7 Super I O 1 14 Chapter 2 Installation 2 1 Static Sensitive Devices 2 1 2 2 Processor Installation 2 2 2 3 Mounting the Motherboard in the Chassis 2 4 2 4 Installing RIMMs 2 5 2 5 Port Front Control Panel Connector Locations 2 6 7 2 6 Connecting Cables 2 8 Power Supply Connector 2 8 Infrared Connector 2 8 PWR_ON 2 9 Reset 2 9 Hard Drive LED 2 9 Keylock P...

Страница 6: ...ing Software Drivers 2 17 Chapter 3 Troubleshooting 3 1 Troubleshooting Procedures 3 1 Before Power On 3 1 No Power 3 1 No Video 3 1 Memory Errors 3 2 Losing the System s Setup Configuration 3 2 3 2 Technical Support Procedures 3 2 3 3 Frequently Asked Questions 3 3 3 4 Returning Merchandise for Service 3 6 Chapter 4 Award BIOS 4 1 Introduction 4 1 4 2 Running Setup 4 2 4 3 Main BIOS Setup 4 2 4 4...

Страница 7: ...Table of Contents Appendix B Award BIOS POST Codes B 1 vii Appendix C Award BIOS POST Codes C 1 ...

Страница 8: ...Notes SUPER P4STA User s Manual viii ...

Страница 9: ...n quality and performance Please check that the following items have all been included with your motherboard If anything listed here is damaged or missing contact your retailer One 1 Supermicro Mainboard Two 2 ATA66 100 ribbon cable for IDE devices One 1 floppy ribbon cable for 1 5 25 inch floppy and 2 3 5 inch floppy drives One 1 Supermicro CD or diskettes containing drivers and utilities One 1 U...

Страница 10: ...supermicro com Technical Support Web site www supermicro com European Office Address Super Micro Computer B V Het Sterrenbeeld 28 5215 ML s Hertogenbosch The Netherlands Tel 31 0 73 6400390 Fax 31 0 73 6416525 E mail sales supermicro nl General Information support supermicro nl Technical Support rma supermicro nl Customer Support Asia Pacific Tel 886 2 8221 1690 ext 102 Fax 886 2 82212790 E mail s...

Страница 11: ...Chapter 1 Introduction 1 3 SUPER P4STA Figure 1 1 SUPER P4STA Image ...

Страница 12: ...ackage COM2 GAME PORT AC 97 Audio CODEC chip JL1 JOH PCI 4 PCI 5 AGP 4X PRO 1 5V only CNR USB3 J12 J14 CD2 CD1 SUPER I O 1 J19 J18 J22 Clock 12V PWR CONN Parallel Port J17 J15 J16 J27 AUDG J15 J15 J15 J1 J9 J11 1 JP4 1 JWOR 1 JF1 JF2 1 JP20 Chassis FAN1 Chassis FAN2 JP2A1 JP2 1 1 1 JP5 CHA BANK0 CHB BANK0 CHA BANK1 CHB BANK1 J3 J4 J2 J5 1 J21 Overheat Fan 1 Note The Power Supply meets the spec of ...

Страница 13: ...nnector J21 J24 See Notes ATX 12V Power Connector 1 24 pin 1 4pin J17 PS 2 Keyboard Mouse J18 J19 J20 Universal Serial Bus Ports J15 Parallel Printer Port JF1 JF2 Front Control Panel JL1 Chassis Intrusion Header JOH Overheat LED JWOR Wake On Ring Header LINE IN Audio In Connector LINE OUT Audio Out Speaker Connector MIC Microphone Input USB3 Universal Serial Bus Port 3 WOL Wake on LAN Header JP2 J...

Страница 14: ...12345678901234567890121234567890123456 123456789012345678901234567890121234567890123456 PCI 1 Figure 1 5 850 Chipset System Block Diagram NOTE This is a general block diagram and may not exactly represent the features on your motherboard See the following pages for the actual specifications of each motherboard LEDs 4XAGP PGA423 CPU 82850 MCH 82801 ICH2 82802 FWH USB0 1 USB2 3 RIMM Bank0 RIMM Bank1...

Страница 15: ...ser Card slot BIOS 4 Mb Firmware Hub Award BIOS Flash BIOS APM 1 2 DMI 2 3 PCI 2 2 ACPI 1 0 Plug and Play PnP PC Health Monitoring Seven onboard voltage monitors for CPU core chipset voltage 3 3V 5V and 12V Three fan status monitor with firmware software on off control Environmental temperature monitoring and control CPU fan auto off in sleep mode Power up mode control for recovery from AC power l...

Страница 16: ...t UART 16550A compatible serial ports 1 EPP Enhanced Parallel Port and ECP Extended Capabilities Port supported parallel port PS 2 mouse and PS 2 keyboard ports 1 infrared port 4 USB Universal Serial Bus ports Other Internal external modem ring on Recovery from AC power loss control Wake on LAN WOL Multiple CPU clock frequency ratio selections set in BIOS CD Utilities BIOS flash upgrade utility Dr...

Страница 17: ...STA which inte grates many of the Input Output functions of the 850 chipset including a two channel ATA 33 66 100 Bus Master IDE controller It also provides the interface to the PCI Bus and communicates with the MCH over a dedicated hub interface bus the AHA The P4STA has the more powerful ICH2 which includes a dual channel IDE controller and two USB controllers that offer 24 Mbps of bandwidth acr...

Страница 18: ... cards and provides interfaces that support multichannel audio V 90 analog modems home net working through a telephone line 10 100 Ethernet based networking and future technologies Separating sound and communications systems from the motherboard makes them less sensitive to noise 1 4 PC Health Monitoring This section describes the PC health monitoring features of the SUPER P4STA Both have an onboa...

Страница 19: ...ny overheat damage to the CPU The onboard chassis thermal circuitry can monitor the overall system temperature and alert users when the chassis temperature is too high CPU Fan Auto Off in Sleep Mode The CPU fan activates when the power is turned on It can be turned off when the CPU is in sleep mode When in sleep mode the CPU will not run at full power thereby generating less heat CPU Overheat LED ...

Страница 20: ...nd off peripherals such as CD ROMs network cards hard disk drives and printers This also includes consumer devices connected to the PC such as VCRs TVs tele phones and stereos In addition to enabling operating system directed power management ACPI provides a generic system event mechanism for Plug and Play and an oper ating system independent interface for configuration control ACPI lever ages the...

Страница 21: ...ermined time Main Switch Override Mechanism When an ATX power supply is used the power button can function as a system suspend button When the user depresses the power button the system will enter a SoftOff state The monitor will be suspended and the hard drive will spin down Depressing the power button again will cause the whole system to wake up During the SoftOff state the ATX power supply prov...

Страница 22: ...hat daily LAN traffic is kept to a minimum and users are not interrupted The motherboards have a 3 pin header WOL to connect to the 3 pin header on a Network Interface Card NIC that has WOL capability Wake On LAN must be enabled in BIOS Note that Wake On Lan can only be used with an ATX 2 01 or above compliant power supply 1 6 Power Supply As with all computer products a stable power source is nec...

Страница 23: ...d rate of up to 115 2 Kbps as well as an advanced speed with baud rates of 250 K 500 K or 1 Mb s which support higher speed modems The Super I O provides functions that comply with ACPI Advanced Con figuration and Power Interface which includes support of legacy and ACPI power management through an SMI or SCI function pin It also features auto power management to reduce power consumption The IRQs ...

Страница 24: ...SUPER P4STA User s Manual 1 16 Introduction Notes ...

Страница 25: ...r gold contacts When handling chips or modules avoid touching their pins Put the motherboard and peripherals back into their antistatic bags when not in use For grounding purposes make sure your computer chassis provides ex cellent conductivity between the power supply the case the mounting fasteners and the motherboard Unpacking The motherboard is shipped in antistatic packaging to avoid static d...

Страница 26: ...etentions 2 Clips 2 Screws 4 Note below Note These screws are to be used for mounting the motherboard on the back panel of the chassis that has 4 mounting holes White pegs flexible 4 2 Insert white pegs into the holes of black pegs Do not push the white pegs all the way into the holes of black pegs Only 1 3 of white pegs should be inside the holes of black pegs 3 Place a retention in its position ...

Страница 27: ...ck position until you hear a click sound Socket Lever in its lock position 4 Secure another reten tion into its position by repeating Step 3 8 Apply the proper amount of thermal glue on the CPU die 9 Place the heat sink on the top of the CPU Heat sink CPU 10 Secure the heat sink in its proper position by locking the retention clips into the proper position 11 Connect the cord of CPU Fan to the CPU...

Страница 28: ...ude a variety of mounting fasteners made of metal or plastic Although a chassis may have both types metal fasteners are the most highly recommended because they ground the motherboard to the chassis For this reason it is best to use as many metal fasteners as possible Lever Processor installed Figure 2 1 PGA 423 Pin Socket Empty and with Processor Installed Pin 1 Pin 1 ...

Страница 29: ...memory 2 Insert each RDRAM module vertically into its slot Pay attention to the two notches along the bottom of the module to prevent inserting the RDRAM incorrectly 3 Gently press down on the RDRAMs module until it snaps into place 4 The P4STA will support two 2 or four 4 600 MHz or 800 MHz modules of 184 pin RDRAM with a total up to 2GB MB of system memory Both ECC Error Checking Correction and ...

Страница 30: ...ations and Definitions COM2 Port Turquoise Figure 2 3 RIMM Installation Line Out Line In Mic Lime Light blue Pink Note Notches should align with their receptive points on the slot RIMM Slot Side View of RIMM Installation into Slot RIMM Tab Notch Tab Notch Tab Tab To Install With the tabs pulled outward insert the RIMM module vertically and press down straight down until it snaps into place Pay att...

Страница 31: ...igure 2 4 for the pin definitions of the speaker keyboard lock hard drive LED infrared connector and power on and reset button headers which are all located on JF1 and JF2 Refer to pages 2 7 to 2 8 for details Figure 2 4 Front Control Panel Connectors JF2 JF1 Power On 1 1 IR Connector X Reset X Speaker Keylock Power LED HDD LED ...

Страница 32: ...iented Make sure that pin 1 of the PS connec tor is seated on pin 1 of the header of J21 If a 24 pin con nector is used please refer to Table 2 1a for pin definitions Also see Figure A below for con nector orientation If a 20 pin connector is used please refer to Table 2 1b for pin definitions Also see Figure B below for con nector orientation Refer to Table 2 1c for J24 12V connctor T able2 1b AT...

Страница 33: ...connec tion Table 2 7 Speaker Connector Pin Definitions JF2 Pin Number 10 11 12 13 Function Key Definition Red wire Speaker data No connection Key Speaker data Reset Connector The reset connector is located on pins 12 and 13 of JF1 This con nector attaches to the hardware reset switch on the computer case See Table 2 4 for pin Pin Number 12 13 Definition Ground Reset Table 2 4 Reset Pin Definition...

Страница 34: ...ave a USB port Table 2 9 Universal Serial Bus Pin Definitions Pin Definition 1 5V 2 P0 3 P0 4 Ground Pin Definition 1 5V 2 P0 3 P0 4 Ground J18 J19 Serial Ports Two connectors for the COM1 and COM2 serial ports are provided on your board See Table 2 10 for pin definitions Table 2 10 Serial Port Pin Definitions Pin Number Definition 1 DCD 2 DSR 3 Serial In 4 RTS 5 Serial Out Pin Number Definition 6...

Страница 35: ...ve Table 2 15 Overheat LED Pin Definitions JOH Chassis Intrusion The Chassis Intrusion header is lo cated on JL1 See the board layouts in Chapter 1 for its location See Table 2 14 for pin definitions Pin Number 1 2 Definition Intrusion Input Ground Table 2 14 Chassis Intrusion Pin Definitions JL1 Table 2 13 Fan Header Pin Definitions CPU FAN CH FAN 1 2 OH FAN Pin Number 1 2 3 Definition Ground bla...

Страница 36: ...nd JP2A1 Table 2 16 displays the settings for these two jump ers The CPU speed can also be changed by software control in BIOS see CPU Speed setting The CPU Speed setting will show you the actual CPU speed for each FSB speed option selected Note If the system does not reboot after changing the CPU speed 1 clear CMOS and reboot as described on the next page and then set the correct CPU speed with t...

Страница 37: ...aring CMOS Note For an ATX power supply you must completely shut down the system remove the AC power cord then use JBT1 to clear CMOS Replace JBT1 back to the pin 1 2 position be fore powering up the system again Do not use the PW_ON connector to clear CMOS Table 2 17 CMOS Clear Jumper Settings JBT1 Jumper Position 1 2 2 3 Definition Normal CMOS Clear Position 1 2 Position 2 3 Normal CMOS Clear Wa...

Страница 38: ...o support two drives This special cable should be used to take advantage of the speed this new technology offers The blue connector connects to the onboard IDE connector inter face and the other connector s to your hard drive s Consult the docu mentation that came with your disk drive for details on actual jumper locations and settings for the hard disk drive Keyboard Wake Up The JPWAKE jumper is ...

Страница 39: ...15 Pin Number Function 1 GND 3 GND 5 Key 7 GND 9 GND 11 GND 13 GND 15 GND 17 GND 19 GND 21 GND 23 GND 25 GND 27 GND 29 GND 31 GND 33 GND Pin Number Function 2 FDHDIN 4 Reserved 6 FDEDIN 8 Index 10 Motor Enable 12 Drive Select B 14 Drive Select A 16 Motor Enable 18 DIR 20 STEP 22 Write Data 24 Write Gate 26 Track 00 28 Write Protect 30 Read Data 32 Side 1 Select 34 Diskette Table 2 22 Floppy Connec...

Страница 40: ...can damage your motherboard For AGP Pro cards you should remove the orange sticker covering one end of the slot For other cards leave this sticker in place and make sure your card does not plug into the section it covers A general rule of thumb is to make sure your card fills the center section of pins first then the end toward the edge of the motherboard if there are more If the I O shield of you...

Страница 41: ...n Display Screen Click the icons showing a hand writing on paper to view the readme files for each item Click the tabs to the right of these in order from top to bottom to install each item one at a time After installing each item you must reboot the system before moving on to the next item on the list You should install everything here except for the SUPER Doctor utility which is optional The Sec...

Страница 42: ...2 18 SUPER P4STA User s Manual NOTES ...

Страница 43: ...those for the keyboard and mouse 3 Remove all add on cards 4 Install a CPU making sure it is fully seated and connect the chassis speaker and the power LED to the motherboard Check all jumper settings as well No Power 1 Make sure no short circuits exist between the motherboard and the chassis 2 Verify that all jumpers are set to their default positions 3 Check that the 115V 230V switch on the powe...

Страница 44: ...ase take the following steps Also note that as a motherboard manufacturer Supermicro does not sell directly to end users so it is best to first check with your distributor or reseller for troubleshooting services They should know of any possible problem s with the specific system configuration that was sold to you NOTE If you are a system integrator VAR or OEM a POST diagnos tics card is recommend...

Страница 45: ...account number ready when placing a call to our technical support department We can be reached by e mail at support supermicro com or by fax at 408 895 2012 3 3 Frequently Asked Questions Question What are the various types of memory that the P4STA motherboard can support Answer The P4STA has four 184 pin RIMM slots that support up to 2 GB MB ECC memory and Parity Checking are supported The 600 80...

Страница 46: ...o please use the following BIOS Recov ery Procedure First make sure the JPWAKE jumper is disabled Then turn your system off and place the floppy disk with the saved BIOS image file see above FAQ in drive A Press and hold CTRL and Home at the same time then turn on the power with these keys pressed until your floppy drive starts reading Your screen will remain blank until the BIOS program is done I...

Страница 47: ... mance penalties These devices are designed to work correctly while shar ing IRQs See Table 3 1 below for details on shared IRQs Table 3 1 Shared IRQs P4STA PCI 1 shares an IRQ with PCI 5 and the AGP Pro slot PCI 2 shares an IRQ with onboard audio and SM bus PCI 3 has a dedicated IRQ does not share PCI 4 shares one IRQ with USB Question I installed my microphone correctly but I can t record any so...

Страница 48: ...te This warranty only covers normal consumer use and does not cover dam ages incurred in shipping or from failure due to the alteration misuse abuse or improper maintenance of products During the warranty period contact your distributor first for any product problems Question How do I connect the ATA66 100 cable to my IDE device s Answer The 80 wire 40 pin ATA66 100 IDE cable that came with your s...

Страница 49: ...the computer is turned off a back up battery provides power to the BIOS Flash chip enabling it to retain the system parameters Each time the computer is pow ered on the computer is then configured with the values stored in the BIOS ROM by the system BIOS which gains control when the computer is pow ered on How To Change the Configuration Data The CMOS information that determines the system paramet...

Страница 50: ...exit theCMOS Setup Menu and use the Left Right arrow keys to enter the the other categories of BIOS settings The next section is described in detail to illustrate how to navigate through the menus when you first power on the computer the AwardBIOS is immediately activated While the BIOS is in control the Setup program can be activated in one of two ways 1 By pressing Del immediately after turning ...

Страница 51: ...2 88M 3 5in Swap Floppy Drive These options allow the user to swap the names of floppy disk drives installed in the system if there are two floppy disk drives installed on the main board The settings are Disabled and Enabled The default setting is Disabled IDE Primary Master IDE Primary Slave IDE Secondary Master IDE Secondary Slave These options allow the user to set the parameters of the IDE Pri...

Страница 52: ...he default setting is Auto IDE Primary Master UDMA This option is available only when your IDE hard drive supports Ultra DMA 33 and the operating environment also includes a DMA drive Windows 95 OSR2 or a third party IDE bus master driver If your IDE hard drive and your system software both support Ultra DMA 33 select Auto to enable BIOS support The settings are Auto and Disabled The default setti...

Страница 53: ...ure displays the amount of conventional memory detected during boot up The default setting for this option is NA Extended Memory This feature displays the amount of extended memory detected during boot up The default setting for this option is NA Total Memory This feature displays the amount of total memory available in the system The default setting for this option is NA Video This option allows ...

Страница 54: ...ain menu with the Left Right arrow keys You should see the following display Select one of the items in the left frame of the screen to go to the sub screen for that item Advanced BIOS Setup options are displayed by highlighting the option using the arrow keys All Advanced BIOS Setup options are described in this section ...

Страница 55: ...are Enabled and Disabled If disabled the process of POST will remain in the normal speed The default setting is Disabled This option allows the user to determine which device will be first displayed when the sytem boots up the device installed in the PCI slot or the device intalled in the AGP slot The settings are PCI slot and AGP The default setting is AGP Gate A20 Option This option allows the u...

Страница 56: ...er to function properly The settings are OS2 and Non OS2 The default setting is Non OS2 Power On after Power Fail This option allows the user to determine if the system s power will be automatically turned on or remains off after a power failure The settings are On Off and Former Status The default setting is Off Typematic Rate Setting Key strokes repeat at a rate pre determined by the keyboard co...

Страница 57: ... the system It is not recommended for the user to alter the default settings This section is provided as an emergency measure for the user to restore the functions of the system when the critical data stored in the BIOS is lost When the item of Advanced Chipset Features is highlighted hit the Enter key to activate the screen below DRAM Data Integrity Mode This item regulates CPU s access to the da...

Страница 58: ...tten and temporarily stored in the cacheable memory section of the CPU to allow the CPU to have faster access to the information The settings are Enabled and Disabled The default setting is Enabled Memory Hole at 15M 16M To improve the performance of the sytem a certain section of the memory will be reserved for the use of the devices installed in the PCI slots This section of memory must be mappe...

Страница 59: ...y chip will be written and temporarily stored in the cacheable memory section of the CPU so the CPU has faster access to the information The settings are Enabled or Disabled The default setting is Enabled 4 4 3 Integrated Peripherals When the item Integrated Peripherals is highlighted hit the Enter key to activate the following sub menu screen ...

Страница 60: ...ort for the AC97 Modem The settings are Auto and Disabled The default setting is Auto On Chip Primary PCI IDE The Intel 850 Chip contains a PCI IDE controller which supports two IDE channels Set this option to Enabled to activate the Primary PCI IDE interface The settings are Enabled and Disabled The default setting is Enabled On Chip Secondary PCI IDE The Intel 850 Chip contains a PCI IDE control...

Страница 61: ...d Parallel port The settings are Disabled 378 IRQ7 278 IRQ5 and 3BC IRQ7 The default setting for the Parallel Port1 is 378 IRQ7 Onboard Serial Port 1 Port 2 This option allows the user to set the address and the corresponding IRQ for the Serial Port1 and Serial Port 2 The settings are Disabled 3F8 IRQ4 2F8 IRQ3 3E8 IRQ4 2E8 IRQ3 and Auto The default setting for Serial Port1 is 3F8 IRQ4 and the def...

Страница 62: ... option set the mode for the onboard Parallel port The settings are SPP EPP ECP and ECP EPP The default setting is ECP Game Port Address This option allows the user to set the Game Port address The settings are Disabled 201 and 209 The default setting is 201 Midi Port Address This option allows the user to set the Midi Port address The settings are Disabled 330 300 and 290 The default setting is 3...

Страница 63: ...b menu screen is listed bellow CPU Warning Temperatures This item allows the user to set the CPU temperature threshold When the CPU temperature reaches the threshold temperature set by the user the alarm will be set off and a warning message will be displayed on the screen The settings are Disabled 500 C 1220 F 600 C 1400 F 650 C 1510 F and 700 C 1580 F The default setting is 700 C 1580 F ...

Страница 64: ...nter key to activate the sub menu of Processor Features listed below CPU L1 L2 Cache Set this option to Enable to activate the function of CPU L1 and L2 cache The settings are Disabled and Enabled The default setting is Enabled Compitable FPU OPCODE The settings are Disabled and Enabled The default setting is Disabled ...

Страница 65: ...ption to Enable to activate the function of CPU Fast String The settings are Disabled and Enabled The default setting is Enabled CPU Clock Ratio This option allows the user to set the CPU Clock Ratio The settings are x8 x9 x10 to x23 The default setting is x8 ...

Страница 66: ...the system The settings are Enabled and Disabled The default setting is Disabled Resources Controlled By The Award BIOS can automatically configure all the boot devices and all Plug and Play compatible devices However if this item is set to Auto ESCD the user is not able to set the IRQ DMA and memory address since the Award BIOS will automatically assign the values to these fields The settings are...

Страница 67: ...etting is S1 POS Power Management This option sets the degree of power saving for the system especially for HDD Power Down Doze Mode and Suspesnd Mode The settings are User Define Min Saving and Max Saving The default setting is Min Saving Video Off Method This item determines the manner in which the monitor is turned off The settings are Blank Screen V H SYNC Blank and DPMS Select the V H SYNC Bl...

Страница 68: ...fault setting Yes Suspend Type This item sets the system suspend type The settings are Stop Grant and PwrOn Suspend The default setting is Stop Grant Modem Use IRQ This item allows the user to determine the IRQ that the modem will use The settings are NA 3 4 5 7 9 10 and 11 The default setting is 3 Soft off by PWR BTTN This item determines the system s Soft off mode when the user presses the power...

Страница 69: ...allows the user to determine the method by which the system activates the power on function The settings are Password Hot Key Mouse Left Mouth Right Any key Button Only and Keyboard 98 The default setting is Button Only KB Power On Password This item allows the user to set the password to activate the power on function through keyboard Press the Enter key to enter the password Hot Key Power On Thi...

Страница 70: ... setting is Floppy Second Boot Device This item allows the user to set the device as the second boot up device The settings are Floppy LS120 HDD SCSI CDROM ZIP100 LAN and Disabled The default setting is CDROM Third Boot Device This item allows the user to set the device as the third boot up device The settings are Floppy LS120 HDD SCSI CDROM ZIP100 LAN and Disabled The default setting is HDD Boot ...

Страница 71: ...one attempts to write data into this area then the BIOS will display a warning message and the alarm will be set off The settings are Enabled and Disabled The default setting is Disabled Boot Up Floppy Seek Set this option to Enabled to allow the BIOS to test floppy drives to determine whether they have 40 tracks or 80 tracks The settings are Enabled or Disabled The default setting is Enabled ...

Страница 72: ... bar hit the Enter key to activate the following screen Set Supervisor s Password When the item Set Supervisor Password is highlighted on the above screen hit the Enter key to activate the following screen When prompted type in Supervisor s password in the dialogue box to set or to change Supervisor s Password ...

Страница 73: ...dialogue box to set or to change the User s Password Security Option When the item Security Option is highlighted on the Security Main Menu hit the Enter key to activate the following screen This option allows the user to determine if the password is required every time when the system boots up or if the password is required only when you enter the CMOS setup The settings are System and Setup The ...

Страница 74: ...tup If you highlight the letter Y and press Enter when the above screen ap pears you will save the changes you ve made in the BIOS program CMOS and exit Your system should then continue with the boot up procedure The options are Y and N The default setting is N When the item Save Exit is highlighted hit the Enter key to activate the following sub screen ...

Страница 75: ...e you exit the CMOS Setup Your system should then continue with the boot up procedure When the item Load Fail Safe Defaults is highlighted hit the Enter key to activate the following screen When the dialogue box appears in the above screen press the key Y to load the BIOS Fail Safe default values for the most stable system operation The settings are Yes and No The default setting is No Load Fail S...

Страница 76: ...Manual 4 28 BIOS When the dialogue box appears in the above screen press the key Y to load the default values for the optimal system performance The settings are Yes and No The default setting is No Load Optimal Defaults ...

Страница 77: ... the video screen to display any additional information This beep code consists of a single long beep followed by two short beeps The other code indicates that your Rambus error has occurred This beep code consists of a single long beep repeatedly Error Messages One or more of the following messages may be displayed if the BIOS detects an errorduringthePOST ThislistincludesmessagesforboththeISAand...

Страница 78: ...r This indicatestheswitch issettoadifferentsettingthanindicatedinSetup Determine which setting is correct and then either turn off the system and change the jumper or enter Setup and change the VIDEO selection DISPLAYTYPEHASCHANGEDSINCELASTBOOT Since last powering off the system the display adapter has been changed You must configure the system for the new display type EISAConfigurationChecksumErr...

Страница 79: ...re the Diskette Drive selection in Setup is set to NONE Invalid EISA Configuration PLEASERUNEISACONFIGURATIONUTILITY The non volatile memory containing EISA configuration information was pro grammed incorrectly or has become corrupt Re run EISA configuration utility to correctly program the memory NOTE Whenthiserrorappears thesystemwillbootinISAmode whichallows you to run the EISA Configuration Ut...

Страница 80: ...onfiguration InISAmodeenter Setup and enter the new memory size in the memory fields Memory Verify Error at Indicates an error verifying a value already written to memory Use the location along with your system s memory map to locate the bad chip OFFENDINGADDRESSNOTFOUND ThismessageisusedinconjunctionwiththeI OCHANNELCHECKandRAM PARITY ERROR messages when the segment that has caused the problem ca...

Страница 81: ... PLEASERUNEISACONFIGURATIONUTILITY A valid board ID was found in a slot that was configured as having no board ID NOTE Whenthiserrorappears thesystemwillbootinISAmode whichallows you to run the EISA Configuration Utility Should Have EISA Board But Not Found PLEASERUNEISACONFIGURATIONUTILITY The board installed is not responding to the ID request or no board ID has been found in the indicated slot ...

Страница 82: ...OTE Whenthiserrorappears thesystemwillbootinISAmode whichallows you to run the EISA Configuration Utility FLOPPY DISK S fail 80 Unable to reset floppy subsystem FLOPPY DISK S fail 40 Floppy Type dismatch Hard Disk s fail 80 HDD reset failed Hard Disk s fail 40 HDD controller diagnostics failed Hard Disk s fail 20 HDD initialization error Hard Disk s fail 10 Unable to recalibrate fixed disk Hard Di...

Страница 83: ...o keys are being pressed during the boot Manufacturing POST loop SystemwillrepeatPOSTprocedureinfinitelywhiletheP15ofkeyboardcontroller is pull low This is also used for M B burn in test BIOS ROM checksum error System halted The checksum of ROM address F0000H FFFFFH is bad Memory test fail BIOS reports the memory test fail if the onboard memory is tested error ...

Страница 84: ...SUPER P4STA User s Manual A 8 APPENDIX A Notes ...

Страница 85: ...h InitialSuperio_Early_Initswitch 04h Reserved 05h 1 Blankoutscreen 2 ClearCMOSerrorflag 06h Reserved 07h 1 Clear8042interface 2 Initialize8042self test 08h 1 TestspecialkeyboardcontrollerforWinbond977seriesSuper I Ochips 2 Enablekeyboardinterface 09h Reserved 0Ah 1 DisablePS 2mouseinterface optional 2 Autodetectportsforkeyboard mousefollowedbyaport interfaceswap optional 3 ResetkeyboardforWinbond...

Страница 86: ... 1Eh Reserved 1Fh Load keyboard matrix notebook platform 20h Reserved 21h HPM initialization notebook platform 22h Reserved 23h 1 Check validity of RTC value e g a value of 5Ah is an invalid value for RTC minute 2 Load CMOS settings into BIOS stack If CMOS checksum fails use default value instead 3 Prepare BIOS resource map for PCI PnP use If ESCD is valid take into consideration of the ESCD s leg...

Страница 87: ...ved 46h Reserved 47h Initialize EISA slot 48h Reserved 49h 1 Calculate total memory by testing the last double word of each 64K page 2 Program writes allocation for AMD K5 CPU 4Ah Reserved 4Bh Reserved 4Ch Reserved 4Dh Reserved 4Eh 1 Program MTRR of M1 CPU 2 Initialize L2 cache for P6 class CPU program CPU with proper cacheable range 3 Initialize the APIC for P6 class CPU 4 On MP platform adjust t...

Страница 88: ...egisters according to items described in Setup Auto configuration table 6Ch Reserved 6Dh 1 Assign resources to all ISA PnP devices 2 Auto assign ports to onboard COM ports if the corresponding item in Setup is set to AUTO 6Eh Reserved 6Fh 1 Initialize floppy controller 2 Set up floppy related fields in 40 hardware 70h Reserved 71h Reserved 72h Reserved 73h Optional Feature Enter AWDFLASH EXE if AW...

Страница 89: ...Ms 6 Assign IRQs to PCI devices 7 Initialize APM 8 Clear noise of IRQs 86h Reserved 87h Reserved 88h Reserved 89h Reserved 90h Reserved 91h Reserved 92h Reserved 93h Read HDD boot sector information for Trend Anti Virus code 94h 1 Enable L2 cache 2 Program boot up speed 3 Chipset final initialization 4 Power management final initialization 5 Clear screen display summary table 6 Program K6 write al...

Страница 90: ...SUPER P4STA User s Manual B 6 APPENDIX A NOTES ...

Страница 91: ...ep System boot 2 short beeps Incorrect CMOS setting 1 long 1 short DRAMerror 1 long 2 short VGAerror 1 long 3 short Keyboard error 1 long 9 short ROMerror Long beeps Memorymoduleerror High beeps Powererror Appendix C Award BIOS Error Beep Codes This section lists the Award BIOS Error Beep Codes ...

Страница 92: ...SUPER P4STA User s Manual C 2 APPENDIX A ...

Отзывы: