background image

Chapter 7: BIOS

7-9


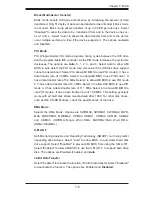
Advanced Chipset Control


NorthBridge Confi guration


Memory Confi guration 

Memclock Mode

This setting determines how the memory clock is set. 

Auto

 has the memory 

clock by code and Limit allows the user to set a standard value.

MCT Timing Mode

Sets the timing mode for memory. Options are 

Auto

 and Manual.

Bank Interleaving

Select Auto to automatically enable interleaving-memory scheme when this func-

tion is supported by the processor. The options are 

Auto

 and Disabled.

Enable Clock to All Dimms

Use this setting to enable unused clocks to all DIMMSs, even if some DIMM 

slots are unpopulated. Options are Enabled and 

Disabled

.

Mem Clk Tristate C3/ALTVID

Use this setting to Enable or 

Disable

 memory clock tristate during C3 and ALT 

VID. 

CS Sparing Enable

Use this setting to Enable or 

Disable

 CS Sparing. 

Memory Hole Remapping

When "Enabled", this feature enables hardware memory remapping around the 

memory hole. Options are 

Enabled

 and Disabled.


ECC Confi guration 

DRAM ECC Enable

DRAM ECC allows hardware to report and correct memory errors automatically.  

Options are 

Enabled

 and Disabled.

4-Bit ECC Mode

Allows the user to enabled 4-bit ECC mode (also known as ECC Chipkill). Op-

tions are Enabled and 

Disabled

.

Содержание 4021A-T2

Страница 1: ...A Workstation 4021A T2 SUPER USER S MANUAL 1 0...

Страница 2: ...OR DATA Any disputes arising between manufacturer and customer shall be governed by the laws of Santa Clara County in the State of California USA The State of California County of Santa Clara shall b...

Страница 3: ...he main features of the H8DAE 2 serverboard and the SC743T 645 chassis which comprise the 4021A T2 Chapter 2 Installation This chapter describes the steps necessary to install the system into a rack a...

Страница 4: ...this chapter when installing removing or recon gur ing Serial ATA or peripheral drives and when replacing system power supply units and cooling fans Chapter 7 BIOS The BIOS chapter includes an introdu...

Страница 5: ...v Preface Notes...

Страница 6: ...ing Supermicro 1 5 Chapter 2 Server Installation 2 1 Overview 2 1 2 2 Unpacking the System 2 1 2 3 Preparing for Setup 2 1 Choosing a Setup Location 2 2 Rack Precautions 2 2 Server Precautions 2 2 Rac...

Страница 7: ...ions 4 3 4 4 Operating Precautions 4 4 Chapter 5 Advanced Serverboard Setup 5 1 Handling the Serverboard 5 1 Precautions 5 1 Unpacking 5 1 5 2 Mounting the Serverboard into a Chassis 5 2 5 3 Processor...

Страница 8: ...autions 6 1 Unpacking 6 1 6 2 Front Control Panel 6 3 6 3 System Fans 6 4 Fan Failure 6 4 6 4 Drive Bay Installation 6 6 Serial ATA Drives 6 6 SATA Backplane 6 7 Installing Components in the 5 25 Driv...

Страница 9: ...components have been included with the 4021A T2 as listed below Four 4 8 cm hot swap chassis fans FAN 0074 Two 2 5 25 dummy drive trays CSE PT41 B One 1 front control panel cable CBL 0087 Two 2 IEEE...

Страница 10: ...er is integrated into the nVidia MCP55 Pro chipset to provide a six port Serial ATA subsystem which is RAID 0 1 0 1 and 5 supported The Serial ATA drives are hot swappable units Note The operating sys...

Страница 11: ...t provides power and control Note The operating system you use must have RAID support to enable the hot swap capability of the Serial ATA drives Front Control Panel The chassis control panel provides...

Страница 12: ...ECC DDR2 667 533 400 DDR2 667 533 400 Slot 5 PCI E x4 Slot 3 PCI E x16 SATA Ports 6 IDE ATA133 USB Ports 8 S I O BIOS Floppy Kybd Mouse Serial Ports 2 AMD OpteronTM Processor CPU1 128 bit data 16 bit...

Страница 13: ...s Super Micro Computer B V Het Sterrenbeeld 28 5215 ML s Hertogenbosch The Netherlands Tel 31 0 73 6400390 Fax 31 0 73 6416525 Email sales supermicro nl General Information support supermicro nl Techn...

Страница 14: ...1 6 A Workstation 4021A T2 User s Manual Notes...

Страница 15: ...d then skip ahead to Section 2 5 2 2 Unpacking the System You should inspect the box the system was shipped in and note if it was damaged in any way If the workstation itself shows damage you should l...

Страница 16: ...of the rack are fully extended to the oor with the full weight of the rack resting on them In single rack installation stabilizers should be attached to the rack In multiple rack installations the ra...

Страница 17: ...ow required for safe operation is not compromised Mechanical Loading Equipment should be mounted into a rack so that a hazardous condition does not arise due to uneven mechanical loading Circuit Over...

Страница 18: ...t came with the rack unit you are using Identifying the Sections of the Rack Rails The optional rackmount kit CSE PT26 or CSE PT26B black includes two rack rail assemblies Each of these assemblies con...

Страница 19: ...sis rail sections you just removed along the side of the chassis making sure the screw holes line up Note that these two rails are left right speci c Screw the rail securely to the side of the chassis...

Страница 20: ...ack rail sliding rail guide assemblies at the desired location in the rack keeping the sliding rail guide facing the inside of the rack Screw the assembly securely to the rack using the brackets provi...

Страница 21: ...st keeping in mind that they are left right speci c marked with L and R Then line up the rear of the chassis rails with the front of the rack rails Slide the chassis rails into the rack rails keeping...

Страница 22: ...ne or two processors already installed into the serverboard Each processor should have its own heatsink attached See Chapter 5 for instructions on processor installation Your system may have come with...

Страница 23: ...y disk drive to the system Depending upon your system s con guration there may be one or more drives already installed If you need to install SATA drives please refer to Chapter 6 Checking the Air ow...

Страница 24: ...e input power to the system Plug the power cord from the power supply unit into a high quality power strip that of fers protection from electrical noise and power surges It is recommended that you use...

Страница 25: ...nd the activity and health of speci c components 3 2 Control Panel Buttons There are two push buttons located on the front of the chassis These are in order from left to right a power on off button an...

Страница 26: ...to take 1 2 Power Indicates power is being supplied to the system s power supply This LED should normally be on when the system is operating HDD Indicates IDE channel activity On the SC743T 645 this...

Страница 27: ...as the indicated condition exists Power Fail not used This LED indicates a power supply module has failed in a redundant power supply system The 4021A T2 only has a single power supply so this LED is...

Страница 28: ...3 4 A Workstation 4021A T2 User s Manual Notes...
Страница 29: ...er you should rst power down the system with the operating system rst and then unplug the power cords of all the power supply units in the system When working around exposed electrical circuits anothe...

Страница 30: ...the one replaced Contact technical support for details and support 4 2 General Safety Precautions Follow these rules to ensure general safety Keep the area around the 4021A T2 clean and free of clutt...

Страница 31: ...ipment from ESD Use a grounded wrist strap designed to prevent static discharge Keep all components and printed circuit boards PCBs in their antistatic bags until ready for use Touch a grounded metal...

Страница 32: ...that the chassis cover is in place when the 4021A T2 is operating to ensure proper cooling Out of warranty damage to the 4021A T2 system can occur if this practice is not strictly followed Figure 4 1...

Страница 33: ...t the size and weight of the serverboard can cause it to bend if handled improperly which may result in damage To prevent the serverboard from bending keep one hand under the center of the board to su...

Страница 34: ...Extended ATX boards of 12 x 13 05 in size such as the SC743T 645 Make sure that the I O ports on the serverboard align with their respective holes in the I O shield at the rear of the chassis Mounting...

Страница 35: ...he CPU against the socket or against any pins of the socket which may damage the CPU and or the socket 4 With the CPU inserted into the socket inspect the four corners of the CPU to make sure that it...

Страница 36: ...ce installed these are used to help attach the heatsinks to the CPUs To install align the module with the standoffs of the preinstalled CPU backplate and with the four feet on the module contacting th...

Страница 37: ...ystem keep the air ow in mind when routing the cables The following data cables with their serverboard connector locations noted should be connected See the serverboard layout diagram in this chapter...

Страница 38: ...are on opposite sides of each header All JF1 wires have been bundled into single keyed ribbon cable to simplify their connection The red wire in the ribbon cable plugs into pin 1 of JF1 Connect the ot...

Страница 39: ...ertically into its slot paying attention to the notch along the bottom of the module to prevent inserting the module incor rectly see Figure 5 4 See support information below Gently press down on the...

Страница 40: ...owing page Optimizing memory performance If two processors are installed it is better to stagger pairs of DIMMs across both sets of CPU DIMM slots e g rst populate CPU1 slots 1A and 1B then CPU2 slots...

Страница 41: ...ard to additional slots Populating Memory Banks for 128 bit Operation CPU1 DIMM1A CPU1 DIMM1B CPU1 DIMM2A CPU1 DIMM2B CPU2 DIMM1A CPU2 DIMM1B CPU2 DIMM2A CPU2 DIMM2B X X X X X X X X X X X X X X X X X...

Страница 42: ...MMB 2A DIMMB 2B DIMMB 1A DIMMB 1B SIM LP Slot 5 x4 PCI Express Slot 6 x16 PCI Express Slot 4 x8 PCI Express Slot 3 x16 PCI Express Slot 2 PCI X 133 MHz Slot 1 PCI X 100 MHz ZCR BIOS IDE 1 JFDD1 IO 55...

Страница 43: ...M1 COM2 COM1 COM2 Serial Ports FAN 1 8 Chassis CPU Fan Headers IDE 1 IDE HDD Connector J32 4 pin Auxiliary Power Connector JAR Power Fail Alarm Reset Header J137 Audio Ports JD1 Onboard Speaker Keyloc...

Страница 44: ...4 COM 12 3 3V Processor Power Connector In addition to the primary ATX power connector above the 12v 8 pin processor power connector at JPW2 must also be connected to your power supply This connection...

Страница 45: ...ontrol ler LED connection is located on pins 9 and 10 of JF1 Attach the NIC2 LED cable to display network activity Refer to the table on the right for pin de nitions OH Fan Fail LED Pin De nitions JF1...

Страница 46: ...ns 1 and 2 of JF1 Mo mentarily contacting both pins will power on off the system This button can also be con gured to function as a suspend button see the Power Button Mode setting in BIOS To turn off...

Страница 47: ...ed beside the COM2 port These Ether net ports accept RJ45 type cables Note NC indicates no connection Serial Port Pin De nitions COM1 COM2 Pin De nition Pin De nition 1 DCD 6 DSR 2 RXD 7 RTS 3 TXD 8 C...

Страница 48: ...aker On JD1 pins 1 2 and 3 are for the power LED and pins 4 through 7 are for the speaker See the tables on the right for pin de nitions Note The speaker connector pins are for use with an external sp...

Страница 49: ...must have a Wake On Ring card and cable to use this feature Wake On Ring Pin De nitions JWOR Pin De nition 1 Ground Black 2 Wake up Wake On LAN Pin De nitions JWOL Pin De nition 1 5V Standby 2 Ground...

Страница 50: ...your chassis if available or to a microswitch to allow you to turn off the alarm that sounds when a power supply module fails See the table on the right for pin de nitions Alarm Reset Header Pin De ni...

Страница 51: ...rewire HeadersPin De nitions 1394_1 1394_2 Pin De nition Pin De nition 1 TPA 6 TPA 2 Ground 7 Ground 3 TPB 8 TPB 4 VP 9 VP 5 Key 10 S Ground SGPIO SGPIO1 and SGPIO2 Serial General Purpose Input Output...

Страница 52: ...udio Refer to the diagrams below for the port de nitions when employing 5 1 or 7 1 sound on your system Green jack Line Out Pink jack Mic Blue jack Line In Audio Jacks 5 1 Sound Black jack Front L R G...

Страница 53: ...he jumper is off the pins CMOS Clear JBT1 is used to clear CMOS and will also clear any passwords Instead of pins this jumper consists of contact pads to prevent accidentally clearing the contents of...

Страница 54: ...ing De nition Open Disabled Closed Enabled Note When enabled the user needs to write their own application software in or der to disable the Watch Dog timer Watch Dog JWD controls Watch Dog a system m...

Страница 55: ...Speed Jumper Settings JPX1A JPX2A Jumper Setting De nition Open Auto Pins 1 2 PCI X 66 MHz Pins 2 3 PCI 66 MHz Note JPX1A controls the speed for PCI X slot 1 and JPX1B controls the speed for PCI X slo...

Страница 56: ...sociated with the connection speed LED JLAN LED Connection Speed Indicator LED Color De nition Off 10 100 MHz Amber 1 GHz 3 3V Standby LED DP4 is an Onboard Power LED When this LED is lit it means pow...

Страница 57: ...able should be used to take advantage of the speed this new technology offers The blue connector connects to the onboard IDE connector interface and the other connector s to your hard drive s Consult...

Страница 58: ...Data 7 4 Host Data 8 5 Host Data 6 6 Host Data 9 7 Host Data 5 8 Host Data 10 9 Host Data 4 10 Host Data 11 11 Host Data 3 12 Host Data 12 13 Host Data 2 14 Host Data 13 15 Host Data 1 16 Host Data 14...

Страница 59: ...nd 5 RXN 6 RXP 7 Ground Parallel Port The parallel printer port is designated Printer See the table on the right for pin de nitions Parallel Port Connector Pin De nitions Printer Pin De nition Pin De...

Страница 60: ...the driver during the OS installation Note the SATA RAID driver is supported by Windows 2000 and XP only Building a Driver Diskette You must rst build a driver diskette from the CD ROM that was includ...

Страница 61: ...all drives that are to become part of the RAID array Once you have nished selecting the drives and type of RAID you wish to use for your RAID array press the F7 key You will be prompted to verify you...

Страница 62: ...5 30 A Workstation 4021A T2 User s Manual Figure 5 6 SATA RAID Utility Main Screen Figure 5 7 SATA RAID Utility Array List...

Страница 63: ...tant to handle them very carefully The following measures are generally suf cient to protect your equipment from static discharge Precautions Use a grounded wrist strap designed to prevent static disc...

Страница 64: ...2 A Workstation 4021A T2 User s Manual 8 Serial ATA Drive Bays behind locking bezel Figure 6 1 Chassis Front View System Reset Main Power System LEDs Floppy Drive optional 5 25 Drive Bays 2 USB Ports...

Страница 65: ...ard Pull all excess cabling over to the control panel side of the chassis The LEDs on the control panel inform you of system status see Figure 6 2 for details See Chapter 5 for details on JF1 Figure 6...

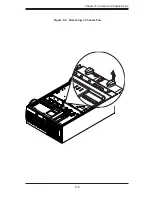
Страница 66: ...all run continuously The four chassis fans are hot swap pable and can be replaced without powering down the system Replacing Chassis Cooling Fans Begin by removing the top left chassis cover see Chapt...

Страница 67: ...Chapter 6 Advanced Chassis Setup 6 5 Figure 6 3 Removing a Chassis Fan...

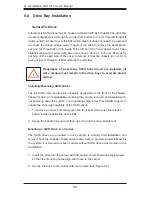
Страница 68: ...kstation Insert the drive into the carrier with the printed circuit board side facing down so that the mounting holes align with those in the carrier Secure the drive to the carrier with four screws s...

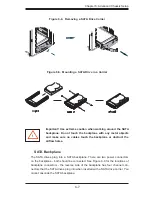
Страница 69: ...ckplane or obstruct the air ow holes Figure 6 4 Removing a SATA Drive Carrier SATA Backplane The SATA drives plug into a SATA backplane There are two power connectors on the backplane both should be c...

Страница 70: ...and secure it to the chassis with the drive carrier screws you rst removed Attach the power and data cables to the drive Replace the top left chassis cover before restoring power to the system Adding...

Страница 71: ...he 4021A T2 the workstation must be powered down before removing and or replacing the power supply for whatever reason Replacing the Power Supply Power down the workstation and unplug the power cord f...

Страница 72: ...6 10 A Workstation 4021A T2 User s Manual Notes...
Страница 73: ...F2 etc Each main BIOS menu option is described in this manual The Main BIOS screen has two main frames The left frame displays all the options that can be con gured Grayed out options cannot be con g...

Страница 74: ...ove between elds The date must be entered in DAY MM DD YYYY format The time is entered in HH MM SS format Please note that time is in a 24 hour format For example 5 30 A M appears as 05 30 00 and 5 30...

Страница 75: ...DT pointer list The available options are Enabled and Disabled Headless Mode Use this setting to Enable or Disable headless operation mode through ACPI Power Button Mode Allows the user to change the...

Страница 76: ...ow many Options are Disabled Device 0 Device 0 1 and Device 0 1 2 nVidia RAID Setup nVidia RAID Function This setting is used to Enable or Disable the nVidia ROM If Enabled the set ting below will app...

Страница 77: ...O mode 1 It has a data transfer rate of 5 2 MBs Select 2 to allow AMI BIOS to use PIO mode 2 It has a data transfer rate of 8 3 MBs Select 3 to allow AMI BIOS to use PIO mode 3 It has a data transfer...

Страница 78: ...e increases the cycle time decreases The options are Auto 0 1 2 3 and 4 Select Auto to allow AMI BIOS to auto detect the PIO mode Use this value if the IDE disk drive support cannot be determined Sele...

Страница 79: ...e for detecting ATA ATAPI de vices installed in the system Options are 0 sec 5 10 15 20 25 30 and 35 ATA PI 80Pin Cable Detection This setting allows AMI BIOS to auto detect the 80 Pin ATA PI cable Th...

Страница 80: ...192 224 and 248 Allocate IRQ to PCI VGA Set this value to allow or restrict the system from giving the VGA adapter card an interrupt address The options are Yes and No Palette Snooping Select Enabled...

Страница 81: ...ms Use this setting to enable unused clocks to all DIMMSs even if some DIMM slots are unpopulated Options are Enabled and Disabled Mem Clk Tristate C3 ALTVID Use this setting to Enable or Disable memo...

Страница 82: ...when idle Options are Disabled and various times in nanoseconds and microseconds Power Down Control Allows DIMMs to enter power down mode by deasserting the clock enable signal when DIMMs are not in u...

Страница 83: ...ing is used to Enable or Disable the AMD Power Now feature I O Device Con guration Serial Port1 Address This option speci es the base I O port address and Interrupt Request address of serial port 1 Se...

Страница 84: ...terrupt request for the parallel port The options are IRQ5 and IRQ7 DMI Event Logging View Event Log Highlight this item and press Enter to view the contents of the event log Mark All Events as Read H...

Страница 85: ...on after BIOS POST Boot Loader redirection during POST and during boot loader and Always redirection always active Note that some OS s may not work with this set to Always Terminal Type Selects the ty...

Страница 86: ...l control the speed of the onboard fans Select Workstation if your system is used as a Workstation Select Server if your system is used as a Server Select Disable to disable the fan speed control func...

Страница 87: ...ct the parameter The MAC address and cur rent MAC address in the BMC are shown Subnet Address Use the and keys to select the parameter The subnet address and current subnet address in the BMC are show...

Страница 88: ...e devices to set are 1st Boot Device 2nd Boot Device 3rd Boot Device 4th Boot Device Hard Disk Drives This feature allows the user to specify the boot sequence from available hard disk drives 1st Driv...

Страница 89: ...virus issues a Disk Format command or attempts to write to the boot sector of the hard disk drive The options are Enabled and Disabled 7 6 Exit Menu Select the Exit tab from AMI BIOS Setup Utility sc...

Страница 90: ...automatically load the Optimal Defaults as the BIOS Settings The Optimal settings are designed for maximum system performance but may not work best for all computer applications Load Fail Safe Default...

Страница 91: ...errors are usually communicated through a series of audible beeps The numbers on the fatal error list on the following page correspond to the number of beeps for the corresponding error All errors li...

Страница 92: ...A 2 A Workstation 4021A T2 User s Manual Notes...
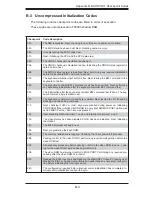
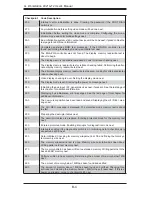
Страница 93: ...s are listed in order of execution Checkpoint Code Description D0h The NMI is disabled Power on delay is starting Next the initialization code check sum will be veri ed D1h Initializing the DMA contro...

Страница 94: ...ror occurred while reading the oppy drive in drive A F0h Next searching for the AMIBOOT ROM le in the root directory F1h The AMIBOOT ROM le is not in the root directory F2h Next reading and analyzing...

Страница 95: ...d during power on Initializing CMOS RAM if the Initialize CMOS RAM in every boot AMIBIOS POST option was set in AMIBCP or the End key was pressed 12h Next disabling DMA controllers 1 and 2 and interru...

Страница 96: ...ut IPL general devices next if present See the last page of this chapter for additional information 39h Displaying bus initialization error messages See the last page of this chapter for additional in...

Страница 97: ...was adjusted for relocation and shadowing Clearing the Hit DEL message next 59h The Hit DEL message is cleared The WAIT message is displayed Starting the DMA and interrupt controller test next 60h The...

Страница 98: ...ad control and has now returned control to BIOS POST Perform ing any required processing after the option ROM returned control 99h Any initialization required after the option ROM test has completed C...

Страница 99: ...option ROM had control next Aah Initialization after E000 option ROM control has completed Displaying the system con guration next Abh Uncompressing the DMI data and executing DMI POST initialization...

Страница 100: ...B 8 A Workstation 4021A T2 User s Manual Notes...

Страница 101: ...ECC DDR2 667 533 400 SDRAM Note Both interleaved and non interleaved memory supported Memory capacity is halved when using a single processor See the memory section in Chapter 5 for details Serial AT...

Страница 102: ...ed Input Frequency 50 to 60 Hz PFC Power Supply Rated Output Power 645W Model SP645 PS Part PWS 0060 Rated Output Voltages 3 3V 30A 5V 30A 12V 46A 5Vsb 4A 12V 0 6A Operating Environment Operating Temp...

Страница 103: ...Certi ed Germany CE Marking Europe California Best Management Practices Regulations for Perchlorate Materials This Perchlorate warning applies only to products containing CR Manganese Dioxide Lithium...

Страница 104: ...C 4 A Workstation 4021A T2 User s Manual Notes...

Отзывы: