background image

34

Chapter 3: Motherboard Connections

3.4 Jumpers

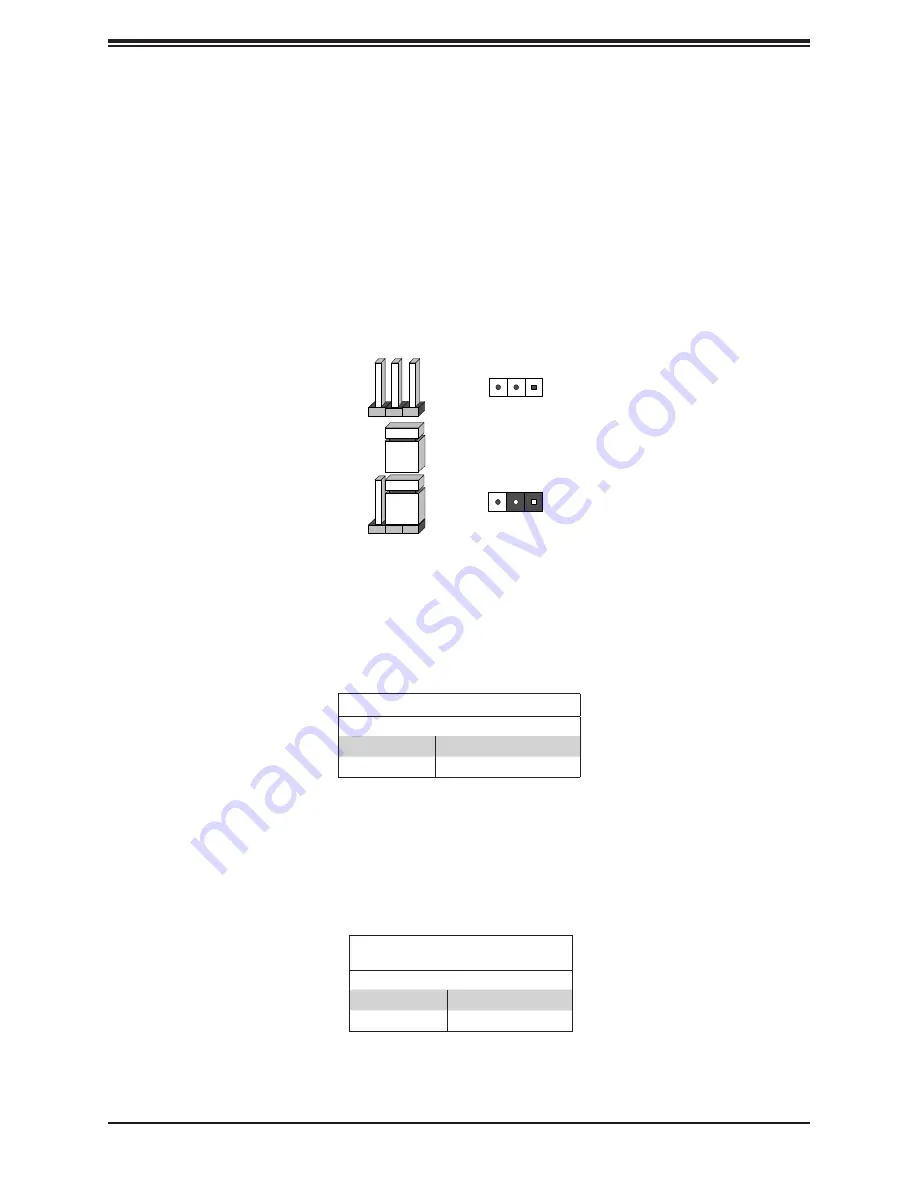
Explanation of Jumpers

To modify the operation of the motherboard, jumpers are used to choose between optional 

settings. Jumpers create shorts between two pins to change the function associated with it. 

Pin 1 is identified with a square solder pad on the printed circuit board. See the motherboard 
layout page for jumper locations.

Note:

 On a two-pin jumper, "Closed" means the jumper is on both pins and "Open" indicates 

the jumper is either on only one pin or has been completely removed.

Connector

Pins

Jumper

Setting

3      2      1

3      2      1

JLCDPWR1

Use  this  jumper  to  select  the  power  voltage  for  the  LVDS  panel.  Make  sure  that  the 
specifications of the cable are compatible with the panel to prevent damage. 

LVDS Panel Power Source Selection

Jumper Settings

Jumper Setting

Definition

Pins 1-3

3.3V (Default)

Pins 3-5

5V

SIM Detection

This jumper is for wireless WAN module detection. Since each wireless WAN module vendor 
has a different condition of detection, check with the vendor for the correct detection type and 
set the JSIM1_OPT jumper before installing the module.

SIM Detection Jumper Settings

Jumper Setting

Definition

Pins 2-4

High Activity (Default)

Pins 3-4

Low Activity

Содержание SuperServer SYS-E100-12T-C

Страница 1: ...USER S MANUAL Revision 1 0a SuperServer SYS E100 12T H E L C...

Страница 2: ...Class A device or in residential environment for Class B device This equipment generates uses and can radiate radio frequency energy and if not installed and used in accordance with the manufacturer s...

Страница 3: ...rivers and utilities https www supermicro com wdl Product safety info http www supermicro com about policies safety_information cfm If you have any questions please contact our support team at support...

Страница 4: ...14 2 2 Accessing the System 15 2 3 Motherboard Components 16 Processor 16 Memory Support 16 Installing Memory 17 Solid State Storage 19 2 4 Battery Removal and Installation 20 Battery Removal 20 Prope...

Страница 5: ...rocedures 46 General Technique 46 No Power 46 No Video 47 System Boot Failure 47 Memory Errors 47 Losing the System Setup Configuration 47 When the System Becomes Unstable 47 6 3 CMOS Clear 49 6 4 Whe...

Страница 6: ...erver SYS E100 12T H E L C User s Manual Appendix C UEFI BIOS Recovery C 1 Overview 75 C 2 Recovering the UEFI BIOS Image 75 C 3 Recovering the BIOS Block with a USB Device 76 Appendix D System Specif...

Страница 7: ...V Het Sterrenbeeld 28 5215 ML s Hertogenbosch The Netherlands Tel 31 0 73 6400390 Fax 31 0 73 6416525 Email sales supermicro nl General Information support supermicro nl Technical Support rma supermic...

Страница 8: ...can be found on the SYS E100 12T H E L C product pages Note The following safety agency or regulatory models associated with the SYS E100 12T H E L C have been certified as compliant with UL or CSA E1...

Страница 9: ...scription Antenna WiFi antenna LAN Ports 2 5GbE LAN ports Intel I225 IT HDMI Ports Left port HDMI 2 0b 4K60Hz Right port HDMI 1 4b USB Ports USB 3 2 ports lower left port is USB C port Power Button Sy...

Страница 10: ...r system GPIO Port General Purpose Digital Input Output port COM Ports COM1 and COM2 RS232 422 485 serial ports COM3 and COM4 RS232 serial ports USB Ports USB 2 0 ports Mic In Microphone jack optional...

Страница 11: ...ut Top Layout CPU JHDMI1 BT1 MH4 USB0 1 USB2 3 MH2 JSPKR1 AUDIO FP I SATA0 JPH1 JCOM2 JCOM1 LVDS1 MH3 JLCDPWR1 JPW1 FAN1 MH1 JHDMI2 JGP1 JF1 LAN1 LAN2 LED1 USB4 5 3 1 USB6 7 3 1 JSIM1_OPT JHDMI1 JHDMI...

Страница 12: ...JCOM2 COM3 COM4 COM Header two RS232 ports JF1 Front Control Panel Header Power HDD LED Reset Power button JGP1 8 bit General Purpose I O Header JHDMI1 Back Panel HDMI 2 0b Port JHDMI2 Back Panel HDMI...

Страница 13: ...2 SLOT M KEY PCIe SSD NVME PCIe Gen4 x 4 16 0GT s per lane USB2 0 7 USB2 0 8 480Mb s 480Mb s USB2 0 Header USB 7 USB2 0 Header USB 6 UIM DIMMB B SATA 6Gb s SATA0 USB3 1 3 Rear USB3 1 connector USB 3...

Страница 14: ...or part numbers given Installation or replacement of most components require that power first be removed from the system Please follow the procedures given in each section 2 1 Removing Power Use the f...

Страница 15: ...he Bottom Cover 1 Remove power from the system as described in Section 2 1 2 Remove the eight screws that hold the cover in place 3 Lift the cover up and off the chassis Caution Except for short perio...

Страница 16: ...RE processor SYS E100 12T E 11th Generation Intel Core i5 1145GRE processor SYS E100 12T L 11th Generation Intel Core i3 1115GRE processor SYS E100 12T C 11th Generation Intel Celeron 6305E processor...

Страница 17: ...se extreme care when installing or removing DIMM modules to prevent damage SO DIMM Installation 1 Remove the bottom cover as described in the previous section 2 Position the SO DIMM module s bottom ke...

Страница 18: ...at the end of the slot to release the SO DIMM module 2 Pull the SO DIMM module up to remove it from the slot Figure 2 2 SO DIMM Labels on Bottom of the Motherboard JPME2 JMD1 JMD2 JMD3 JSIM1 SRW3 JSMB...

Страница 19: ...te storage cards by means of three M 2 slots When an M 2 NVMe storage card is installed an accompanying heatsink optional must also be installed to prevent the card from overheating See Chapter 6 for...

Страница 20: ...card a used battery in the garbage or a public landfill Please comply with the regulations set up by your local hazardous waste management agency to dispose of your used battery properly Battery Insta...

Страница 21: ...kets 1 Turn the chassis over to the bottom side 2 Decide whether the bracket mounting holes will face outwards or inwards 3 The mounting bracket supports two screw alignments Decide which screw holes...

Страница 22: ...3 1 Power Connections JPW1 is the 12 24V DC power connector that provides power to the motherboard JPH1 is a 4 pin HDD power connector that provides power to the hard disk drives 8 pin 12 24V Power P...

Страница 23: ...at https www supermicro com support manuals M 2 Slot M 2 slots formerly known as Next Generation Form Factor or NGFF are located at JMD1 JMD3 on the bottom side of the motherboard The M 2 slots are de...

Страница 24: ...2 PU TO P1V8SB only 27 GND 28 N C 29 USB3 0 Rx 30 UIM RESET 31 USB3 0 Rx 32 UIM CLK 33 GND 34 UIM DATA 35 USB3 0 Tx 36 UIM PWR 37 USB3 0 Tx 38 N C 39 GND 40 N C 41 PERN0 SATA B 42 N C 43 PERP0 SATA B...

Страница 25: ...CNV_BRI_RSP 23 CNV_WR_CLK_DP 24 KEY E 25 KEY E 26 KEY E 27 KEY E 28 KEY E 29 KEY E 30 KEY E 31 KEY E 32 CNV_RGI_DT 33 GND 34 CNV_RGI_RSP 35 PETp0 36 CNV_BRI_DT 37 PETn0 38 CLINK_RST_N 39 GND 40 CLINK_...

Страница 26: ...20 N C 21 GND 22 N C 23 PETn2 24 N C 25 PETp2 26 N C 27 GND 28 N C 29 PERn1 30 N C 31 PERp1 32 N C 33 GND 34 N C 35 PETn1 36 N C 37 PETp1 38 N C 39 GND 40 N C 41 PERn0 42 N C 43 PERp0 44 N C 45 GND 46...

Страница 27: ...B_CLK 2 SMB_DATA 3 GND 4 P5V Nano SIM Slot The JSIM1 slot supports a Nano SIM card Audio Header A 10 pin header located on the motherboard allows you to use the onboard sound for audio playback Connec...

Страница 28: ...HDMI 1 4b port on the front I O panel These connectors are used to display both high definition video and digital sound through an HDMI capable display using a single HDMI cable not included HDMI 2 0...

Страница 29: ...ables for rear panel support are included with the motherboard USB 3 1 cables are optional USB 3 1 Headers 0 1 and 2 3 Pin Definitions Pin Definition Pin Definition 1 P5V_DUAL_F 2 P5V_DUAL_F 3 USBCON_...

Страница 30: ...3 2 JF1 Header Pins Power Button The Power Button connection is located on pins 1 and 2 of JF1 Momentarily contacting both pins will power on off the system This button can also be configured to funct...

Страница 31: ...ns HDD LED The HDD LED connection is located on pins 5 and 6 of JF1 Attach a cable here to indicate the status of HDD related activities including SATA activities Refer to the table below for pin defi...

Страница 32: ...peaker Output JSPKR1 is used to amplify low power electronic audio signals to a level that is high enough for current driving of loudspeakers or headphones Audio Speaker Output JSPKR1 Pin Definitions...

Страница 33: ...Definitions JCOM1 Pin RS 232 RS 422 485 Full Duplex RS 485 Half Duplex 1 SP_DCD1 TX 1 Data 1 2 SP_DSR1 3 SP_RXD1 TX 1 Data 1 4 SP_DTR1 5 SP_TXD1 RX 1 6 SP_CTS1 7 SP_DTR1 RX 1 8 SP_RI1 9 GND 10 NC 11 S...

Страница 34: ...been completely removed Connector Pins Jumper Setting 3 2 1 3 2 1 JLCDPWR1 Use this jumper to select the power voltage for the LVDS panel Make sure that the specifications of the cable are compatible...

Страница 35: ...g Mode Jumper Settings Jumper Setting Definition Pins 4 6 Normal Default Pins 2 4 Manufacturing Mode Pins 1 3 Normal Default Pins 3 5 CMOS Clear TPM Enable Force Power On Use JPT1 to enable or disable...

Страница 36: ...he speed of the connection LAN1 2 LED Connection Speed Indicator LED Color Definition Off 100 Mb s or below Green 2 5 Gb s Amber 1 Gb s Onboard Power LED LED1 is the onboard Power LED When this LED is...

Страница 37: ...are designed for internal mounting devices The X12STN H E L C WOHS motherboard contains One M 2 B Key 3042 2242 2280 PCIe or SATA USB3 USB2 with a nano SIM holder One M 2 M Key 2242 2280 PCIe x4 The...

Страница 38: ...w supermicro com support manuals Installing the OS 1 Create a method to access the MS Windows installation ISO file That might be a DVD perhaps using an external USB SATA DVD drive or a USB flash driv...

Страница 39: ...iver browse the USB flash drive for the proper driver files For RAID choose the SATA sSATA RAID driver indicated then choose the storage drive on which you want to install it For non RAID choose the S...

Страница 40: ...other option is to go to the Supermicro website at http www supermicro com products Find the product page for your motherboard and Download the Latest Drivers and Utilities Insert the flash drive or d...

Страница 41: ...provides alerts via email or Simple Network Management Protocol SNMP SuperDoctor 5 comes in local and remote management versions and can be used with Nagios to maximize your system monitoring needs Wi...

Страница 42: ...m cover 3 Stick one of the included thermal pads on each of the installed M 2 NVMe cards one between the motherboard PCB and DIMMB1 and one each on the DIMMA1 and DIMMB1 memory modules as follows Remo...

Страница 43: ...Components Figure 5 1 Installing the Bottom Cover Assembly and Location of Thermal Pads Fin Cover Short Screw x4 M 2 M Key Pad M 2 B Key Pad DIMMA1 Pad Long Screw with Rubber Feet x4 DIMMB1 Pad Pad b...

Страница 44: ...n offers downloads manuals BIOS drivers etc FAQs RMA warranty and other service extensions Direct Links for the SYS E100 12T H E L C System Server specifications pages SYS E100 12T H SYS E100 12T E SY...

Страница 45: ...M User Guide General Memory Configuration Guide X12 SuperDoctor5 Large Deployment Guide For validated memory use our Product Resources page Product Matrices page for links to tables summarizing specs...

Страница 46: ...cedures or Returning Merchandise for Service sections in this chapter Power down the system before changing any non hot swap hardware components General Technique If you experience unstable operation...

Страница 47: ...s by swapping modules between slots and noting the results Losing the System Setup Configuration Always replace power supplies with the exact same model that came with the system A poor quality power...

Страница 48: ...on check the following Source of installation Make sure that the devices used for installation are working properly including boot devices Cable connection Check to make sure that all cables are conne...

Страница 49: ...n the system completely 2 Remove the cover of the chassis to access the motherboard 3 Remove the onboard battery from the motherboard 4 Short the CMOS pads with a metal object such as a small screwdri...

Страница 50: ...boot block code 3 If you still cannot resolve the problem include the following information when contacting us for technical support System motherboard and chassis model numbers and PCB revision numbe...

Страница 51: ...lure due to the alteration misuse abuse or improper maintenance of products During the warranty period contact your distributor first for any product problems Vendor Support Filing System For issues r...

Страница 52: ...m Europe Address Super Micro Computer B V Het Sterrenbeeld 28 5215 ML s Hertogenbosch The Netherlands Tel 31 0 73 6400390 Fax 31 0 73 6416525 Email sales supermicro nl General Information support supe...

Страница 53: ...e If a fatal error occurs consult with your system manufacturer for possible repairs A 2 Additional BIOS POST Codes The AMI BIOS supplies additional checkpoint codes which are documented online at htt...

Страница 54: ...nt for assistance Only certified technicians should attempt to install or configure components Read this appendix in its entirety before installing or configuring components in the Supermicro chassis...

Страница 55: ...o considere los riesgos de la corriente el ctrica y familiar cese con los procedimientos est ndar de prevenci n de accidentes Al final de cada advertencia encontrar el n mero que le ayudar a encontrar...

Страница 56: ...erken dient u zich bewust te zijn van de bij een elektrische installatie betrokken risico s en dient u op de hoogte te zijn van de standaard procedures om ongelukken te voorkomen Gebruik de nummers aa...

Страница 57: ...mentaci n Attention Avant de brancher le syst me sur la source d alimentation consulter les directives d installation Circuit Breaker Waarschuwing Raadpleeg de installatie instructies voordat u het sy...

Страница 58: ...ntes del edificio Aseg rese de que el dispositivo de protecci n no sea superior a 60VDC 20A Attention Pour ce qui est de la protection contre les courts circuits surtension ce produit d pend de l inst...

Страница 59: ...e energ a y del cable el ctrico quitado de los m dulos de fuente de alimentaci n antes de tener acceso el interior del chasis para instalar o para quitar componentes de sistema Attention Le syst me do...

Страница 60: ...mkabels aangesloten op de voeding en van de behuizing te verwijderen Equipment Installation Warning Only trained and qualified personnel should be allowed to install replace or service this equipment...

Страница 61: ...tention Il est vivement recommand de confier l installation le remplacement et la maintenance de ces quipements des personnels qualifi s et exp riment s Warning This unit is intended for installation...

Страница 62: ...so a una de estas reas mediante la utilizaci n de una herramienta especial cerradura con llave u otro medio de seguridad Attention Cet appareil doit tre install e dans des zones d acc s r serv s L acc...

Страница 63: ...mblable ou quivalent recommand e par le fabricant Jeter les piles usag es conform ment aux instructions du fabricant Advertencia Existe peligro de explosi n si la bater a se reemplaza de manera incorr...

Страница 64: ...t aanbevolen wordt Gebruikte batterijen dienen overeenkomstig fabrieksvoorschriften afgevoerd te worden Redundant Power Supplies Warning This unit might have more than one power supply connection All...

Страница 65: ...mloos te maken Advertencia Puede que esta unidad tenga m s de una conexi n para fuentes de alimentaci n Para cortar por completo el suministro de energ a deben desconectarse todas las conexiones Atten...

Страница 66: ...Advertencia Cuando el sistema est en funcionamiento el voltaje del plano trasero es peligroso Tenga cuidado cuando lo revise Attention Lorsque le syst me est en fonctionnement des tensions lectriques...

Страница 67: ...umplir con las normas de electricidad locales y nacionales Backplane Waarschuwing Een gevaarlijke spanning of energie is aanwezig op de backplane wanneer het systeem in gebruik is Voorzichtigheid is g...

Страница 68: ...onale elektriciteitsvoorschriften Warnung Die Entsorgung dieses Produkts sollte gem allen Bestimmungen und Gesetzen des Landes erfolgen Warning Ultimate disposal of this product should be handled acco...

Страница 69: ...ing van dit product dient te geschieden in overeenstemming met alle nationale wetten en reglementen Attention La mise au rebut ou le recyclage de ce produit sont g n ralement soumis des lois et ou dir...

Страница 70: ...ueltas hacia arriba Estos terminales deber n ser del tama o apropiado para los cables que se utilicen y tendr n que sujetar tanto el aislante como el conductor Attention Quand des fils torsad s sont n...

Страница 71: ...ingspunten zoals het gesloten lus type of het grijperschop type waarbij de aansluitpunten omhoog wijzen Deze aansluitpunten dienen de juiste maat voor de draden te hebben en dienen zowel de isolatie a...

Страница 72: ...F Attention Avant de pratiquer l une quelconque des proc dures ci dessous v rifier que le circuit en courant continu n est plus sous tension Waarshuwing Wanneer geslagen bedrading vereist is dient u b...

Страница 73: ...trieb sind Stellen Sie bei Benutzung der Abdeckung sicher dass alle nicht isolierten stromf hrenden Kabel abgedeckt sind Advertencia Puede haber energ a o voltaje peligrosos en los terminales el ctric...

Страница 74: ...DC aansluitingspunten kunnen zich gevaarlijke voltages of energie n voordoen Plaats altijd de afsluiting wanneer de aansluitingspunten niet worden gebruikt Zorg ervoor dat blootliggende contactpunten...

Страница 75: ...er stored in an add on card to boot the system The UEFI offers clean hands off management to a computer during system boot C 2 Recovering the UEFI BIOS Image A UEFI BIOS flash chip consists of a recov...

Страница 76: ...arge due to the huge volumes of folders and files stored in the device To perform UEFI BIOS recovery using a USB attached device follow the instructions below 1 Using a different machine copy the Supe...

Страница 77: ...ant to start the BIOS recovery If you decide to proceed with BIOS recovery follow the procedures below 4 When the screen as shown above displays use the arrow keys to select the item Proceed with flas...

Страница 78: ...o enter the BIOS Setup utility From the top of the tool bar select Boot to enter the submenu From the submenu list select Boot Option 1 as shown below Then set Boot Option 1 to UEFI AP UEFI Built in E...

Страница 79: ...OSname at the prompt to start the BIOS update process 9 The screen above indicates that the BIOS update process is complete When you see the screen above unplug the AC power cable from the power suppl...

Страница 80: ...o header for mic in line out Serial Four serial COM ports USB Three USB 3 2 Gen 1 ports and one USB C 3 2 port front and four USB 2 0 ports rear Motherboard SYS E100 12T H X12STN H WOHS SYS E100 12T E...

Страница 81: ...1000 4 5 EN BS 61000 4 6 EN BS 61000 4 8 EN BS 61000 4 11 Product Safety 2014 35 EU LVD Directive UL CSA 62368 1 USA and Canada Electrical Equipment Safety Regulations 2016 IEC EN BS 62368 1 Environme...

Отзывы: