background image

3-9

Chapter 3: Installation

3-6  Configuring EFI Mode from System Setup

During  the  host  boot  process,  EFI  mode  configuration  can  be  modified  through 

BIOS setup.

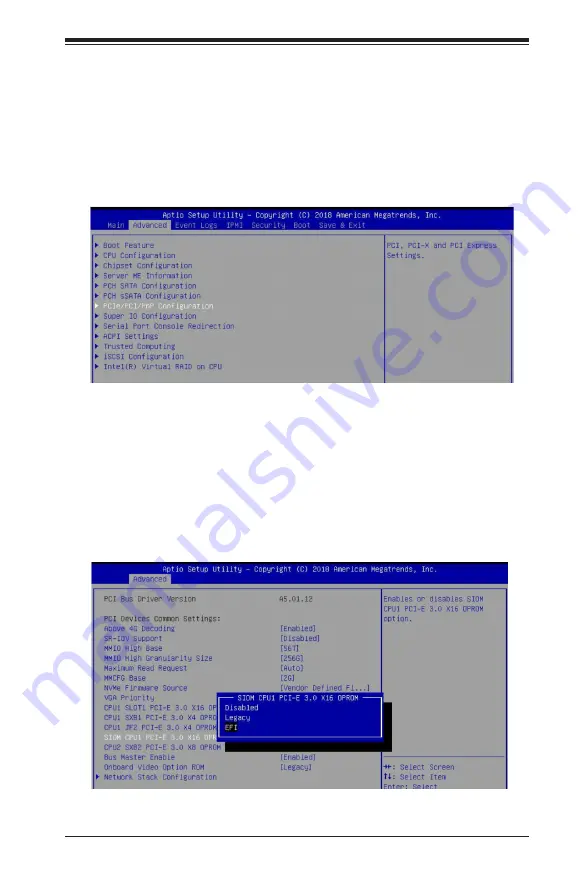
1.  From the top of the tool bar, select Advanced to enter the submenu. Choose 

PCIe/PCI/PnP Configuration and press <Enter> to see the contents of PCI 

devices settings.

2.  When the screen as shown below displays, use the arrow keys to select 

SIOM CPU1 PCI-E 3.0 x16 OPROM and press <Enter>. Use this feature to 
select which firmware type to be loaded for the add-on card in this slot. The 

options are Disabled, 

Legacy

, and EFI. Select EFI and press <Enter>. To 

save the setting, select Save Changes and Reset from the Save & Exit menu 

and press <Enter>.

Содержание AOC-M25G-i2S

Страница 1: ...User s Guide Revision 1 0a AOC M25G i2S AOC M25G i2SM...

Страница 2: ...ia USA The State of California County of Santa Clara shall be the exclusive venue for the resolution of any such disputes Supermicro s total liability for all claims will not exceed the price paid for...

Страница 3: ...this user s guide are based upon the latest PCB revision available at the time of publishing The card you have received may or may not look exactly the same as the graphics shown in this user s guide...

Страница 4: ...ions to prevent damage to the system or injury to yourself Warning Important information given to ensure proper system installation or to prevent damage to the components or injury to yourself Note Ad...

Страница 5: ...v Preface...

Страница 6: ...t Sterrenbeeld 28 5215 ML s Hertogenbosch The Netherlands Tel 31 0 73 6400390 Fax 31 0 73 6416525 Email sales supermicro nl General Information support supermicro nl Technical Support rma supermicro n...

Страница 7: ...ents 2 1 Add On Card Image and Layout 2 1 2 2 Major Components 2 3 2 3 SFP28 Ethernet Connections 2 4 Chapter 3 Installation 3 1 Static Sensitive Devices 3 1 3 2 Before Installation 3 2 3 3 Installing...

Страница 8: ...please refer to our website at http www supermicro com products nfo networking cfm adapter 1 2 Key Features The key features of this add on card include Supermicro Super I O Module SIOM Form Factor In...

Страница 9: ...Director Intel XXV710 25GbE controller MSI X support Multiple queues 1 536 Tx and Rx queues per port Tx Rx IP SCTP TCP and UDP checksum offloading IPv4 IPv6 capabilities Virtualization Features Next...

Страница 10: ...ow control support IEEE 802 1p Receive Side Scaling Operation System Support Windows Server 2008 R2 2012 2012 R2 2016 Linux Stable Kernel version 2 6 4 x Linux RHEL 6 9 7 3 Linux SLES 11 SP4 12 SP1 Fr...

Страница 11: ...nsions 92mm 3 62in x 87 1mm 3 43in W x D Supported Platforms Supermicro motherboards with Super I O Module slot built in Supermicro server systems with Super I O Module slot built in see SIOM Compatib...

Страница 12: ...5M 0 5m 25GbE SFP28 to SFP28 Passive SFP28 Copper Cable CBL NTWK 0944 MS28C10M 1m 25GbE SFP28 to SFP28 Passive SFP28 Copper Cable CBL NTWK 0944 MS28C15M 1 5m 25GbE SFP28 to SFP28 Passive SFP28 Copper...

Страница 13: ...Chapter 2 Hardware Components 2 1 Chapter 2 Hardware Components 2 1 Add On Card Image and Layout AOC M25G i2S M View...

Страница 14: ...2 2 Super AOC M25G i2S M Add on Card User s Guide 25G_LED2 25G_LED1 J2 REV 1 01 AOC M25G i2S M DESIGNED IN USA J1 JZSFP1 SFP2 SFP1 LED3 AOC M25G i2S M Layout 1 4 1 8 1 3 1 2 1 1 1 7 1 5 1 6...

Страница 15: ...e AOC M25G i2S M AOC M25G i2S M Major Components No Component Name Definition 1 J2 PCIE 3 0 x16 2 Intel XXV710 25GbE Ethernet controller 3 Connector Cage Connector Cage 4 SFP1 SFP28 Port1 5 SFP2 SFP28...

Страница 16: ...pluggable SFP28 optical transceiver connectors SFP1 and SFP2 are located on the add on card These SFP28 ports provide Ethernet connections of up to 25GbE See the layout next page for the locations 25G...

Страница 17: ...Activity Link LED indicators are located at LED1 and LED2 on the add on card LED1 is used for the SFP28 Port1 connector and LED2 for the SFP28 Port2 connector The SIOM LED1 and LED2 are dual bi level...

Страница 18: ...bag Handle the add on card by its edges only do not touch its components Put the add on card back into the antistatic bags when not in use For grounding purposes make sure that your system chassis pr...

Страница 19: ...wn the system 2 Unplug the power cord 3 Use industry standard anti static equipment such as gloves or a wrist strap and follow the precautions on previous page to avoid damage caused by ESD 4 Familiar...

Страница 20: ...and gently push in both sides of the card until it slides into the slot 4 Secure the add on card to the chassis reusing the screws that you previously removed as needed SIOM card with the bracket inst...

Страница 21: ...he add on card into the swappable bracket 2 Position the add on card in front of the SIOM slot and gently push in both sides of the card until it slides into the slot 3 Once the card is in the slot pu...

Страница 22: ...as illustrated above be completed by a system integrator or the manufacturer 1 3 1 2 1 1 1 4 Follow this step to install the add on card if your system does not support a swap pable bracket Insert the...

Страница 23: ...E WIZARD screen displays on your system click CANCEL 3 Click on INSTALL DRIVERS AND SOFTWARE 4 Follow the prompts to complete the installation 3 4 Installing Windows Drivers for Intel Fortville 25 XXV...

Страница 24: ...system If you have just recompiled the kernel reboot the system at this time 3 Move the base driver tar file to the directory of your choice For example home username i40e or usr local src i40e 4 Unta...

Страница 25: ...ore loading the new module To do this use rmmod i40e modprobe i40e 8 Assign an IP address to the interface by entering the following command where x at the end of ethx is the interface number ifconfig...

Страница 26: ...P Configuration and press Enter to see the contents of PCI devices settings 2 When the screen as shown below displays use the arrow keys to select SIOM CPU1 PCI E 3 0 x16 OPROM and press Enter Use thi...

Страница 27: ...er the submenu When the following screen appears use the arrow keys to select UEFI NETWORK Drive BBS Priorities and press Enter 4 To examine the details of each boot option select the corresponding nu...

Страница 28: ...em configuration is completed select Save Changes and Reset from the Save Exit menu and press Enter to save the changes made Note All screenshots shown are for illustration purpose only and may not ma...

Страница 29: ...expected to result in significant injury or loss of life or catastrophic property damage Accordingly Supermicro disclaims any and all liability and should buyer use or sell such products for use in su...

Отзывы: