background image

SuperiorFireplaces.us.com

127017-01_H

18

GLASS DOOR INSTALLATION 

IMPORTANT: Install glass door frame before installing glass 

door.

INSTALLING DOOR FRAMES

1.  Remove screws from smoke shelf (see Figure 36).
2.  Mount top door frame and secure with screws removed in step 1.
3.  Remove center ash refractory by pulling ring handle (see Figure 37).
4.  Remove ash box.
5.  Remove three screws located at front of firebox (see Figure 37).
6.  Align bottom rail mounting holes with holes at front of firebox 

and secure with screws removed in step 5.

7.  Place ash box in place. Replace center ash refractory.

Figure 36 - Installing Top Door Frame

Top Door 

Frame

Smoke 

Shelf

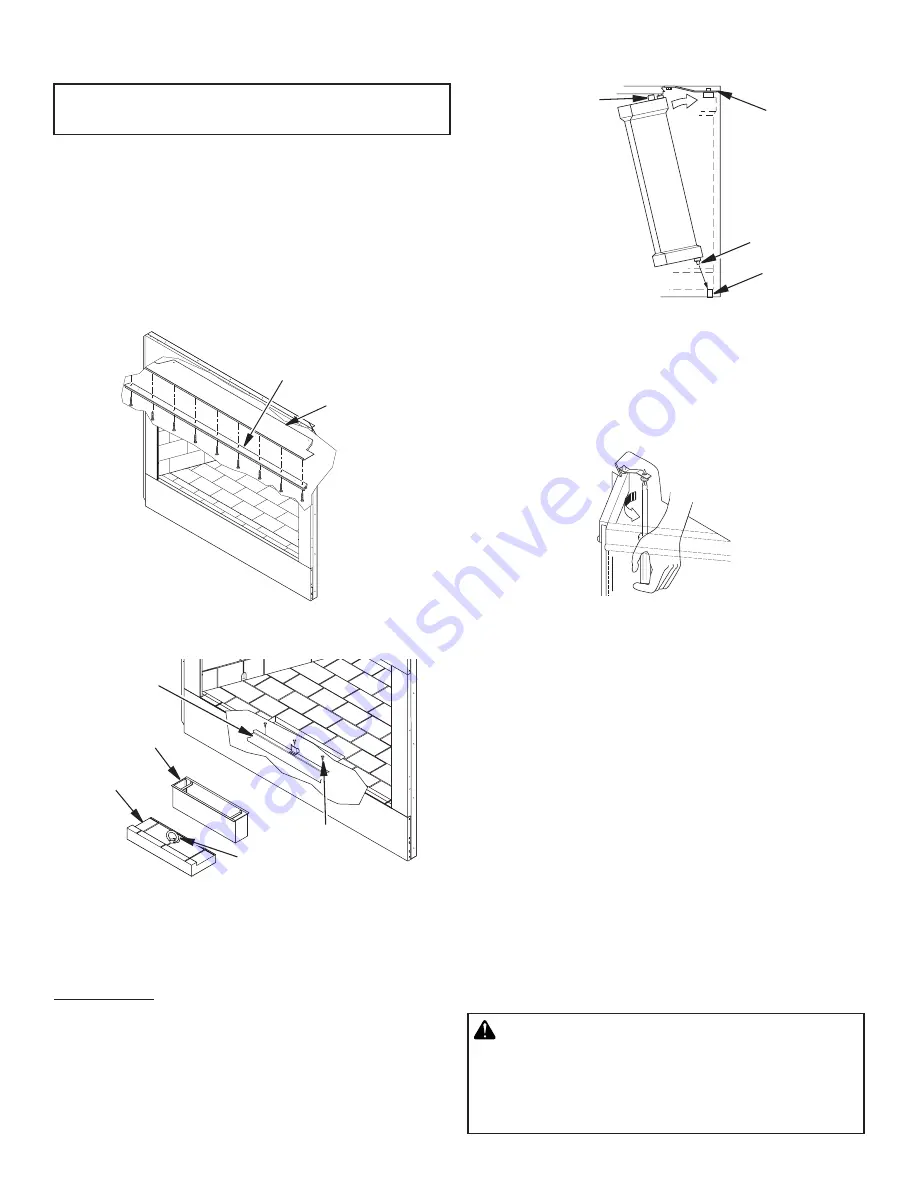
INSTALLING GLASS DOORS

Spring clips have been installed but some adjustments may be 

needed. If doors do not close properly or do not appear straight, see 

Door Adjustment.
1.  With bi-fold doors completely folded, insert bottom pivot pin into 

pivot hole located near bottom corner of front face opening and 

swing door to vertical position making sure top pins slide into door 

track. Door is installed when top door pin snaps into spring clip.

2.  Repeat step 1 for remaining door.
If you find doors do not close properly or do not appear level or 

straight, proceed with section on door adjustment,

Figure 37 - Installing Bottom Door Frame

Bottom Door 

Rail

Ash Box

Center 

Brick

Ring 

Handle

Screws

Figure 38 - Installing Bi-Fold Doors

Spring Clip

Insert Pin into 

Spring Clip

Pivot Hole

Insert Bottom 

Pivot Pin into Hole

Fold Door and Slide 

Top Pins Into Track

Figure 39 - Adjusting Bi-Fold Doors

GLASS DOORS

Glass doors are optional with the fireplace. When fireplace is in operation, 

doors must be fully opened or fully closed position only or a fire hazard 

may be created (see Figure 40, page 19).
A fireplace equipped with glass doors operates much differently than a 

fireplace with an open front. A fireplace with glass doors has a limited 

amount of air for combustion.
Excessive heat within the fireplace can result if too large a fire is built or 

if combustion air gate is not completely open. The following tips should 

be followed to assure that both the fireplace and glass door retain their 

beauty and function properly. Both the flue damper and glass doors must 

be fully opened before starting fire. This will provide sufficient combustion 

air and maintain safe temperatures in firebox.

IMPORTANT:

 The glass must be allowed to warm slowly and evenly. 

The tempered glass will withstand a gradual temperature rise to 550° F, 

which is more than a normal fire will generate. Such materials as pitch/

wax laden logs, very dry mill end lumber and large amounts of paper or 

cardboard boxes can create an excessively hot fire and should not be 

burned in this fireplace. Always keep the fire well back from the doors 

and never allow flames to contact the glass.

 WARNING: Fireplaces equipped with glass doors 

should be operated only with doors fully opened or 

doors fully closed. Doors, if left partly open, may draw 

gas and flame out of the fireplace opening creating 

risks of both fire and smoke.

DOOR ADJUSTMENT

Remove doors and slightly loosen lower pivot clips and upper spring 

clips. Replace doors and fully close them. Use 1/8" shims (any mate-

rial) to level doors. Once proper setting is achieved, carefully open 

doors enough so that you can access spring clips with a Phillips 

screwdriver. Tighten screws. See Figure 39.

Содержание WRE4536WH

Страница 1: ...NADA The authority having jurisdiction such as the municipal building department fire department etc should be contacted before installation to determine the need to obtain a permit POUR LE CANADA L autorité compétente comme le service municipal du bâtiment les pompiers etc doit être contacté avant l installation afin de déterminer la nécessité d obtenir un permis This installation manual will ena...

Страница 2: ...rt specifically state this fireplace has been tested for use with this insert FOR YOUR SAFETY Do not store or use gasoline or any other flammable vapors or liquids in the vicinity of this or any other appliance Due to high temperatures the appliance should be located out of traffic and away from furniture and draperies Do not place clothing or other flammable materials on or near the appliance Nev...

Страница 3: ...ing causes and troubleshooting WARNING BURNINGIMPROPERFUEL I E CHAR COAL CAN RESULT IN CARBON MONOXIDE POISON ING WHICH MAY LEAD TO DEATH Carbon Monoxide Poisoning Early signs of carbon monoxidepoisoningresemblethefluwithheadaches dizziness or nausea If you have these signs get fresh air at once Have the appliance inspected by a qualifiedservicetechnician Somepeoplearemoreaf fectedbycarbonmonoxide...

Страница 4: ...S 12 305 mm EACH SIDE MINIMUM 12 305 mm TOPERPENDICULAR SIDEWALL COMBUSTIBLE WALL BOARD NO COMBUSTIBLE MATERIAL ON FACE HEARTH EXTENSION 60 X 20 1524 mm x 508 mm OUTSIDE AIR 29 737 mm 22 1 2 572 mm 14 1 2 369 mm 4 1 2 115 mm 26 5 8 677 mm 15 5 8 397 mm 30 762 mm 49 1245 mm 67 1702 mm 11 280 mm 7 178 mm 61 1550 mm 1 26 mm 58 1474 mm 1 26 mm 4 1 2 115 mm 45 1 8 1159 mm 36 915 mm 10 1 2 267 mm 9 1 2 ...

Страница 5: ...EACH SIDE MINIMUM 18 458 mm TOPERPENDICULAR SIDEWALL COMBUSTIBLE WALL BOARD NO COMBUSTIBLE MATERIAL ON FACE HEARTH EXTENSION 66 X 20 1677 mm x 508 mm OUTSIDE AIR 22 3 4 578 mm 30 1 2 775 mm 15 3 4 400 mm 4 3 8 112 mm 29 737 mm 17 5 8 448 mm 5 8 16 mm 25 1 8 639 mm 42 1067 mm 23 1 2 597 mm 58 1474 mm 4 1 2 115 mm 51 1 8 1299 mm 42 1067 mm 30 762 mm 49 1245 mm 67 1702 mm 11 280 mm 7 178 mm 61 1550 m...

Страница 6: ...ULAR SIDEWALL COMBUSTIBLE WALL BOARD NO COMBUSTIBLE MATERIAL ON FACE HEARTH EXTENSION 74 X 20 1880 mm x 508 mm OUTSIDE AIR 50 HEARTH 33 1 8 842 mm 23 1 4 591 mm 50 1270 mm 38 1 2 978 mm 28 1 2 724 mm 17 5 8 448 mm 4 3 8 112 mm 19 1 4 489 mm 24 610 mm 1 26 mm 7 178 mm 58 1474 mm GAS LINE ACCESS OUTSIDE AIR ACCESS 3 1 2 89 mm 9 1 2 242 mm 10 1 2 267 mm 13 331 mm 8 1 2 216 mm 17 432 mm 11 280 mm 67 1...

Страница 7: ...imum of 4 feet of chimney pipe sections required for outdoor installation FRAMING 1 Frame opening for fireplace using dimensions shown in Figures 4 and 5 2 If fireplace is to be installed directly on carpeting tile or any combustible material other than wood flooring fireplace must be installed upon a metal or wood panel extending full width and depth of fireplace 3 Set fireplace directly in front...

Страница 8: ...r Protector Fireplace Front Raised Hearth Fireplace Front Elevated Ember Protector Ember Protector Seal Gap Hearth Extension MANTELS A mantel may be installed if desired see Figure 7 Woodwork such as wood trims mantels or any other combustible material projecting from front face must not be placed within 12 36 Models or 18 42 50 Models of fireplace opening Combustible materials above 12 36 Models ...

Страница 9: ...2HT Pipe Section 34 5 8 48 12DM 48 12HT Pipe Section 46 5 8 RLT 12D RLT 12HT Round Termina tion 7 3 4 STL 12D Square Chase Top with Slip Section 7 to 15 The lineal gain for the terminations is measured to the flue gas outlet height Hemmed End 12 3 8 Stainless Inner Pipe 15 Galvanized Outer Pipe ASSEMBLY AND INSTALLATION OF DOUBLE WALL CHIMNEY SYSTEM Each double wall chimney section consists of a g...

Страница 10: ... outer pipe only see Figure 10 Do not penetrate the inner stainless Figure 11 Ceiling Support Pipe 12S 12DM Straps Straps Straps Straps Detail A Return Elbow Detail B Angle Firestop See Detail A See Detail B CAUTION THE STRUCTURAL INTEGRITY OF THE MANUFACTUREDHOMEFLOOR WALL ANDCEILING ROOF MUST BE MAINTAINED WARNING DO NOT INSTALL IN SLEEPING ROOM OF MOBILE HOMES B A Screws 2 51 mm Min OFFSET CHAR...

Страница 11: ...crews or Staples Min of 8 Firestop Spacer Screws or Staples Min of 8 Existing Ceiling Frame IMPORTANT NOTICE When penetrating a ceiling into an attic a firestop thimble FST10 is required to avoid intrusion by insu lation and recommended to negotiate a joist Firestop Thimble FST10 Figure 14a Firestop Thimble PENETRATING ROOF To maintain a 1 36 Models or 2 42 50 Models clearance to the pipe on a roo...

Страница 12: ...orm Collar Flashing FLASHING INSTALLATION V6F 10DM OR V12F 10DM Determine the flashing to be used with the roof opening chart Slide flashing over pipe until base is flat against roof Replace as many shingles as needed to cover exposed area and flashing base Secure in position by nailing through shingles see Figure 16 DO NOT NAIL THROUGH FLASHING CONE Installing Flashing on a Metal Roof When instal...

Страница 13: ... terminations be separated at least 24 center to center and stacked at a vertical height difference of 18 see Figure 19 Note If a decorative shroud is to be installed contact the manufac turer for specifications 10 FOOT RULE All flue gas outlet chimney terminations must extend a minimum of 3 feet in height above the highest point where it passes through the roof and must be at least 2 feet above t...

Страница 14: ...ed Steel Figure 24 Securing Termination to Chase Top Flashing with Sheet Metal Screws Figure 23 Installing Termination Cap 1 Noncombustible Spacer Note Do Not Seal Ventilation Openings 1 Space Chase Facia 1 4 Screen Chase Top Sheet Metal Screw Termination 36 915 mm Min 3 77 mm Min 2 51 mm Min 1 Spacer Note Do Not Seal Ventilation Openings Screw Termination Cap Galvanized Sleeve 19 483 mm Min 6 153...

Страница 15: ... Do Not Seal Ventilation Openings Caulk Storm Collar 1 Spacer 1 Space Chase Termination Cap Chase Top Flashing Double Wall Chimney Flashing 6 153 mm Min 3 77 mm Min X Minimum X Minimum Figure 30 Non Chase Installation Caulk Storm Collar Termination Cap Sheet Metal Screw Underlap Shingles Bottom Only Overlap Shingles Top and Sides Inner Pipe of Chimney Flashing NONCHASE INSTALLATION 1 Slip on prope...

Страница 16: ...rmine which is which match up the pattern on the rear panel with the left and right sides before installing the rear panel Make sure panel is center before continuing 5 Install the right and left refractory panels with the gas line knock outs orientated down toward the bottom refractory Align the left and right panels with the rear panel so the grout lines line up 6 Install the upper corner bracke...

Страница 17: ...LLATION Figure 34 Gas Line Access Side Firebrick Finished Side Brick with Access Hole Outside of Fireplace Gas Line Conduit Insulation Gas Conduit Cover 1 2 Dowel Remove Knockout Gas line hook up should be done by your supplier or a qualified service person Note Before you proceed make sure your gas supply is turned off Use only a 1 2 black iron pipe and appropriate fittings 1 Remove knockout inde...

Страница 18: ...ionalwiththefireplace Whenfireplaceisinoperation doors must be fully opened or fully closed position only or a fire hazard may be created see Figure 40 page 19 A fireplace equipped with glass doors operates much differently than a fireplace with an open front A fireplace with glass doors has a limited amount of air for combustion Excessive heat within the fireplace can result if too large a fire i...

Страница 19: ... fireplace may be used if installed in accordance with the instructions by its manufacturer A locally fabricated shroud may be used with IHP Shroud Leg Spacer Kit SLK in accor dance with instructions provided with the shroud NOTICE The firebox canopy hood must not be mod ified or replaced with a canopy that may be provided with the unvented decorative room heater CAUTION THE STRUCTURAL INTEGRITY O...

Страница 20: ...places us com 127017 01_H 20 PARTS 1 21 20 5 6 7 10 9 11 12 13 16 17 15 14 8 24 23 3 25 18 2 22 19 4 MODEL CATALOG NO WRE4536WS F0438 WRE4536WH F0440 WRE4542WS F0442 WRE4542WH F0444 WRE4550WS F0446 WRE4550WH F0448 ...

Страница 21: ...P ASSEMBLY 50 1 10 J6997 SPACER FIREPLACE TOP 42MC 4 11 FIREPLACE SURROUND ASSEMBLY 1 12 J4362 SPACER CLEARANCE 36 42 50 6 13 J5329 BRACKET F P HANDLE 4 14 J6900 PLATE OUTSIDE AIR COVER 36E44 6 2 15 J6934 COVER GAS CONDUIT PLATE 36E 4 16 J4368 GAS CONDUIT ONE 2 17 J4369 GAS CONDUIT TWO 2 18 HEAT SHIELD SUPPORT 1 19 J6020 ASSY ASH BOX ALPHA 1 20 INNER DOME ASSEMBLY 1 21 SMOKE SHIELD 1 22 DAMPER CON...

Страница 22: ... the fireplace is placed in a permanent location WARNING LIFTING HAZARD SINGLE PERSON LIFT COULD CAUSE INJURY USE ASSISTANCE WHEN MOVING OR LIFTING PARTS MODEL CATALOG NO WRE4536WS F0438 WRE4536WH F0440 WRE4542WS F0442 WRE4542WH F0444 WRE4550WS F0446 WRE4550WH F0448 1 7 5 4 3 6 2 7 Stacked Refractory Shown ...

Страница 23: ...Ash 42 Stk White 1 7 Retainer Assy Ref Corner 2 1 F3278 45 series White Stacked Refractory Set 50 1 2 Refractory Hearth 50 Stk White 1 3 Refractory Rt 50 Stk White 1 4 Refractory Lt 50 Stk White 1 5 Refractory Rear 50 Stk White 1 6 Refractory Ash 50 Stk White 1 7 Retainer Assy Ref Corner 2 KEY NO CAT NO DESCRIPTION WRE4536WH F0440 WRE4542WH F0444 WRE4550WH F0448 QTY 1 F3283 45 series White Herring...

Страница 24: ...supplied from the manufacturer Normally all parts should be ordered through your IHP distributor or dealer Parts will be shipped at prevailing prices at time of order When ordering repair parts always give the following information 1 The model number of the fireplace 2 The serial number of the fireplace 3 The part number 4 The description of the part 5 The quantity required 6 The installation date...

Страница 25: ...ction Hi Temp Double Wall Pipe Snap Lock F0954 18 12HT 18 Section Hi Temp Double Wall Pipe Snap Lock F0955 24 12HT 24 Section Hi Temp Double Wall Pipe Snap Lock F0956 36 12HT 36 Section Hi Temp Double Wall Pipe Snap Lock F0957 48 12HT 48 Section Hi Temp Double Wall Pipe Snap Lock 30 OFFSET AND RETURN F0937 30E 12DM 30 Degree Offset and Return F0958 30E 12HT 30 Degree Hi Temp Offset and Return OPTI...

Страница 26: ...n and combustibles must not touch pipe Consult manual for clearance requirements Ensure proper connection WARNING HOT Fire Risk Insulation and combustibles must not touch pipe Consult manual for clearance requirements Ensure proper connection WARNING HOT Fire Risk Insulation and combustibles must not touch pipe Consult manual for clearance requirements Ensure proper connection 900599 01 F2659 LABE...

Страница 27: ...onditions inadequate chimney heights adversewindconditionsand orunusualenvironmental factors or conditions beyond our control take into account all variables within the installation and install the appliance in such a manner that satisfies the draft requirements of the appliance See Chimney Guidelines to assist you in selecting the proper venting system for your installation American National Stan...

Страница 28: ...iance The best location to install your appliance is determined by consid ering the location of windows doors and the traffic flow in the room where the appliance is located allowing space in front of the unit for the hearth extension and the mantel and taking into consideration the location of the hot air ducts some models outside air kit and chimney Ifpossible youshouldchoosealocationwherethechi...

Страница 29: ...___________________________________ ______________________________________________________ ______________________________________________________ ______________________________________________________ ______________________________________________________ ______________________________________________________ ______________________________________________________ __________________________________...

Страница 30: ...___________________________________ ______________________________________________________ ______________________________________________________ ______________________________________________________ ______________________________________________________ ______________________________________________________ ______________________________________________________ __________________________________...

Страница 31: ... be subject to normal use with approved fuels listed in the Operation Manual provided with the product This includes burning such fireplace fuels as wood and natural or propane gas Fuel products with abnormal burning characteristics including but not limited to fuel such as driftwood coal or plywood and wood products using a binder may burn at excessive temperatures and may cause damage to the Pro...

Страница 32: ...P127017 01 Innovative Hearth Products reserves the right to make changes at any time without notice in design materials specifications prices and also to discontinue colors styles and products Consult your local distributor for fireplace code information Printed in U S A 2014 Innovative Hearth Products LLC P N 127017 01 Rev H 10 2019 1769 East Lawrence St Russellville AL 35654 ...

Отзывы: