background image

WN-2500 / WN-3500 / WN-4500 / WN-6000

12

OPERATING WINCH:

1.  Take time to assess situation and thoroughly plan pull.
2.  Set Free Spooling Clutch to “CLUTCH OUT” position.
3.  Pull Synthetic Rope and attach to vehicle to be winched. Wear gloves and use Hand 

Strap.

4.  Secure Clevis Hook to anchor point: Sling, chain or snatch block. Do not attach Clevis 

Hook back onto Synthetic Rope.

5.  Set Free Spooling Clutch to “IN” position.
6.  Start vehicle engine so that battery is being charged while winching.
7.  Slowly winch in Synthetic Rope just enough to take up slack.
8.  Inspect Synthetic Rope. Make sure there are minimum 5 wraps of Synthetic Rope 

around Winch Drum.

9.  To absorb energy in event of Synthetic Rope failure, place a blanket or jacket over 

Synthetic Rope approximately 5ft - 6ft from Clevis Hook. Open vehicle hood for more 

protection.

10. Clear area. Make sure all spectators are away and that no one is directly in front, 

behind vehicle, or anchor point.

11. Vehicle to be winched should be placed in neutral and emergency brake released. 

Only release brake pedal when Synthetic Rope is under full tension.

12. While standing aside and clear of tow path, use Rocker Switch or Wireless Remote 

Control to control winching. If required, wait until Motor stops before reversing 

direction.

-  Be sure Synthetic Rope is winding evenly and tightly around Winch Drum.
-  Vehicle being winched can be slowly driven to add assistance to winching.
-  Avoid shock loads; keep Synthetic Rope under tension. This can damage components 

and vehicles.

13. Winch is meant for intermittent use. Under full load with a single line rig do not power 

“in” for more than (1) minute without letting Motor cool down for a few minutes before 

resuming winching.

14. Once vehicle is on stable ground, set brakes and place vehicle in park. Winching 

operation is complete. 

15. Set Free Spooling Clutch to “OUT” to release tension on Synthetic Rope. Winch is not 

meant to hold loads for long periods of time.

16. Disconnect Synthetic Rope from vehicle or anchor.
18. Set Free Spooling Clutch to “IN” position and rewind Synthetic Rope. 

Keep hands 

clear of Winch Drum and components.

 Any material already on Winch Drum should 

be spooled tightly and neatly. Draw out and re-spool if necessary.

19. Secure Hook Strap and Clevis Hook.

- Always leave  minimum of (5) turns of Synthetic Rope on Winch 

Drum. Review “Safety Warnings” section of manual before continuing.

CAUTION

Содержание WN-2500

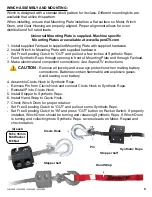
Страница 1: ...Stopper Mounting Plate 2018 SuperATV com All Rights Reserved Rev WN Winch Guide 9 17 2020 Fairlead kit contents continue on following page Solenoid Clevis Pin and Hook Hand Strap Wiring Accessory Kit Rocker Mount Winch WN 6000 shown Rocker Switch ...

Страница 2: ...s 10 000 lbs high tensile strength strap Blanket Place on Synthetic Rope to absorb energy in event of a failure Hardware Kit Stopper Hardware Blue Wire 6 long Yellow Wire kit contents continued Black Wire Red Wire 12 long CR2032 Batteries Wireless Remote loosen 3 screws on back of Wireless Remote before pulling Battery Tab on Batteries to face installer ...

Страница 3: ... Read study and follow all instructions before operating winch Failure to heed these instructions may result in personal injury death and or property damage WIRING Winch NEG Winch POS Winch WN 4500 shown User may shorten wire length with components included in Wiring Accessory Kit to Battery NEG to Battery POS to Winch POS to Rocker Switch Solenoid to Winch NEG Solenoid use 2 wrenches one on each ...

Страница 4: ...ng action Control System Winch can be controlled by using Power Cord Switch Assembly or through Remote Control Free Spooling Clutch Allows user to manually disengage CLUTCH OUT Winch Drum from Mechanical Gear System free spool Engaging clutch CLUTCH IN locks Winch into Mechanical Gear System Solenoid Power from vehicle battery flows through a weather sealed switch before being directed to Motor Ro...

Страница 5: ...or near rated capacity use a pulley block snatch block to reduce load on Synthetic Rope WARNING Don t move vehicle to pull a load towing on Synthetic Rope This can result in Synthetic Rope breakage WARNING Avoid shock loads by using control switch intermittently to take up slack in Synthetic Rope Shock loads can exceed rated capacity for Synthetic Rope and Winch Drum SAFETY PRECAUTIONS Failure to ...

Страница 6: ...nds get within 12 of Winch while re spooling Turn off Winch and repeat procedure until only a few feet of Synthetic Rope remain Disconnect Remote Control and finish spooling by hand rotate Winch Drum by hand with Clutch disengaged Keep hands clear of Fairlead and Winch Drum while Winch is under power WARNING Never connect Synthetic Rope back onto itself Side cutaway view of Winch Side Cutaway View...

Страница 7: ...07 10 43 3 18 100 2500 1134 9 45 2 88 130 3000 1361 7 87 2 40 156 3500 1588 6 87 2 1 185 Model WN 3500 12V DC Motor 1 2hp output Line Pull lbs kgs Line Speed Ft min M min Motor amps Pull by Layer layer lbs kgs 0 18 70 5 70 20 1 4500 2045 1000 454 16 07 4 90 61 2 3600 1636 2000 907 14 27 4 35 107 3 3130 1423 3000 1361 10 17 3 10 148 4 2745 1248 4000 1814 6 99 2 13 202 4500 2041 6 10 1 86 267 Model ...

Страница 8: ...unds made under various loads way Synthetic Rope spools onto Winch Drum etc by performing several test runs Inspect all components hardware and electrical connections before each use If Synthetic Rope is frayed or damaged replace immediately Use only manufacturers replacement rope Replace or remove any component that appears to be damaged worn or operating abnormally Never connect Synthetic Rope b...

Страница 9: ...ions 4 Assemble Clevis Hook to Synthetic Rope Remove Pin from Clevis Hook and connect Clevis Hook to Synthetic Rope Reinstall Pin to Clevis Hook 5 Install Stopper to Synthetic Rope 6 Install Hand Strap to Clevis Hook 7 Check Winch Drum for proper rotation Set Free Spooling Clutch to OUT and pull out some Synthetic Rope Set Free Spooling Clutch to IN and press OUT button on Rocker Switch If properl...

Страница 10: ...ocker Handlebar ROCKER MOUNTING Rocker can be mounted to Handlebar as shown below Switch can be removed and installed into Dash cutout to be size shown insulate and waterproof any exposed wiring 435 1 2 Rocker Switch Red Wire must be connected to a switched 12V source Ignition Key ...

Страница 11: ...protection Do not winch from an acute angle Synthetic Rope will pile up on one side of Winch Drum causing damage to Synthetic Rope and Winch Short pulls from an angle can be used to straighten vehicle Long pulls must be done with Synthetic Rope at a 90 angle to winch vehicle Winch incorrect angle Winch correct angle sling tree strap Locate a suitable anchor such as a strong tree trunk or boulder A...

Страница 12: ... 12 While standing aside and clear of tow path use Rocker Switch or Wireless Remote Control to control winching If required wait until Motor stops before reversing direction Be sure Synthetic Rope is winding evenly and tightly around Winch Drum Vehicle being winched can be slowly driven to add assistance to winching Avoid shock loads keep Synthetic Rope under tension This can damage components and...

Страница 13: ...Motor runs in one direction only Defective Rocker Switch Remote Control Repair or replace Rocker Switch Remote Control Loose battery cable connections Corroded and or loose battery or Motor cable connections should be cleaned and tightened Motor runs continuously on its own Defective Solenoid Wireless Receiver or Remote Control Unplug ignition power Remove negative battery cable from Solenoid SYNT...

Страница 14: ... inches B C A Model Number A B C D E WN 2500 12 20 3 08 5 91 4 75 4 6 WN 3500 12 76 WN 4500 14 52 3 12 7 64 WN 6000 14 57 2 85 7 4 4 86 4 41 WN 2500 Synthetic Rope Diameter x Length Ø3 16 x 50 Ø4 8mm x 15 2m WN 3500 Synthetic Rope Diameter x Length Ø7 32 x 50 Ø5 5mm x 15 2m WN 4500 Synthetic Rope Diameter x Length Ø1 4 x 50 Ø6 3mm x 15 2m WN 6000 Synthetic Rope Diameter x Length Ø17 64 x 50 Ø6 6mm...

Отзывы: