background image


15

1

) 

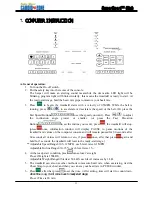
In ready-start stage, press

to enter the program. 

2

) 

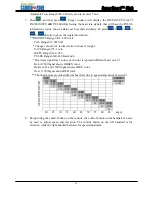
First, enter the weight. Press

to change weight value to 134LBS, then 

press

to set other values. 

3

) 

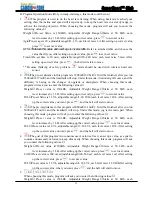
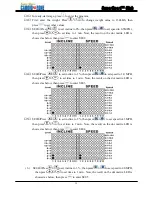
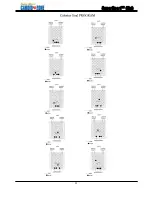
SE01

Press

  to set incline to 0%, then press

to set speed to 0.5MPH r, 

then press

to set time to 1 min. Now, the result on the dot matrix LED is 

showed as below, then press

to enter SE02. 


4

) 

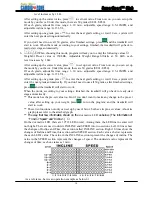
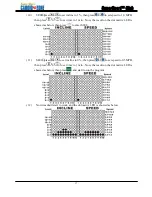
SE02

Press 

  to set incline to 1 %, then press

to set speed to 1.0 MPH, 

then press

  to set time to 1 min.. Now, the result on the dot matrix LED is 

showed as below, then press

to enter SE03. 


5

) 

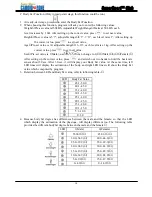
SE03

Press 

  to set incline to 2 %, then press

  to set speed to1.3MPH, 

then press

to set time to 1 min.. Now, the result on the dot matrix LED is 

showed as below, then press

to enter SE04. 


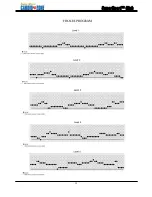
( 6 )    SE04

Press

to set incline to 3 %, then press

to set speed to 2.0MPH, 

then press

to set time to 1 min.. Now, the result on the dot matrix LED is 

showed as below, then press

to enter SE05 

Содержание SuperSport Club

Страница 1: ...SuperSport Club OWNER S MANUAL Super Gym s FitnessBlowout com 2210 S Sepulveda Blvd Los Angeles CA 90064 Phone 800 FIT 4 LESS or 800 348 4537 Fax 310 235 2008 ...

Страница 2: ...ual carefully before using your CardioZone SuperSport Club This will allow you to get a full understanding of all the features that CardioZone treadmills provide If you have any questions or concerns please contact Super Gym s FitnessBlowout com For service please visit http www fitnessblowout com service Register your warranty at http www fitnessblowout com warranty Super Gym s FitnessBlowout com...

Страница 3: ...2 ...

Страница 4: ...1 OVERVIEW DRAWING 4 2 IMPORTANT SAFETY INSTRUCTIONS 5 3 GROUNDING INSTRUCTIONS 6 4 MOTORIZED TREADMILL PRE ASSEMBLY 7 5 ASSEMBLY STEPS 8 6 MAINTENANCE 10 7 COMPUTER INSTRUCTION 11 8 EXPLODED VIEW 25 9 TROUBLESHOOTING 27 10 WARRANTY 29 ...

Страница 5: ...4 1 OVERVIEW DRAWING ...

Страница 6: ... if it is not working properly if it has been dropped or damaged or dropped into water Return the appliance to a service center for examination and repair 5 Do not carry this appliance by supply cord or use cord as a handle 6 Keep the cord away from heated surfaces 7 Never operate the appliance with the air openings blocked Keep the air openings free of lint hair and the like 8 Never drop or inser...

Страница 7: ... of the equipment grounding conductor can result in a risk of electric shock Check with a qualified electrician or serviceman if you are in doubt as to whether the product is product is properly grounded Do not modify the plug provided with the product if it will not fit the outlet have a proper outlet installed by a qualified electrician This product is for use on a nominal 110V 120V circuit and ...

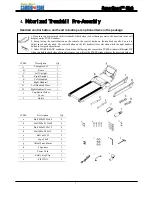
Страница 8: ... button is for speed adjustment 3 Under START READY condition if you did not hold grip pulse sensor then PULSE window will display HP when you hole the both sides of grip pulse sensor you will see the PULSE window display the heart rate values ITEM Description Qty A Computer Set 1 B Frame 1 C Left Upright 1 D Right Upright 1 E Left Handrail 1 F Right Handrail 1 G Left Handrail Cover 1 H Right Hand...

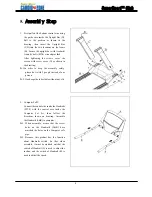
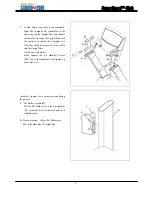
Страница 9: ...do it with 2 people instead of one person Ps 2 One keeps the tube stable without any slit 2 Computer Set Connect the control wire inside the Handrails E F with the control wire inside the Computer Set A then follow the directions shown on drawing Assemble the Handrails L R to computer Ps 1 When assemble assure that the screw holes on the Handrails L R have matched the holes on the Computer set s p...

Страница 10: ...t insert the excessive wire or cable into the Upright Bars Tighten up with bolt c Final connect the two Handrail Covers H I on to the Handrails and tighten up with screws e Assembly requires two or more persons during the process 4 Pot Holder assembly Put Tea Pot Holder J on the Upright Bar D secure the Bolt a inserted and fixed with fastening Ps Personal option the Tea Pot Holder may Put on the o...

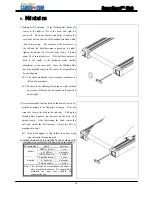
Страница 11: ...lking belt going on right without any tracks off the centers it depends on the position and weight 2 It is recommended that the deck be lubricated every 6 12 months according to the frequency of usage First use wrench to loosen the bolts in the end caps Pull up the Walking Belt dispense the lubricant on the deck and spread evenly After lubricating the deck center the belt and check the belt tensio...

Страница 12: ...l will stop press once information window will display PAUSE to pause motions of the treadmill and values on the computer console and will remain paused for 60 seconds after 60 seconds all values will return to zero if press once after that press again and hold for 3 seconds the treadmill will reset to the ready start stage Adjustable Speed Range 0 5 12MPH each level raise 0 1 MPH Adjustable Incli...

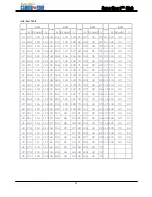
Страница 13: ...art rate signal has 3 colors each color is represent different heart rate Below 90 Signal shows GREEN color Between 91 and 130 Signal shows BLUE color Over 130 Signal shows RED color The chart below provides different heart rate due to age and amount of exercise 170 OVER 150 166 MIDDLE 120 146 162 LOW 117 143 157 114 137 153 111 135 149 108 131 145 105 128 140 102 124 136 99 120 132 96 116 HEART B...

Страница 14: ...ach level increases by 1 LB After setting up correct value press to set next value LVL Pre set Value is 1 LVL adjustable range 1 10 LVL each level raise 1 LVL After setting up the correct value you want press and the belt will start to move 3 The pre set distance in this program is5000ml 3 1mil It will be finished after you run 5000ml 3 1mil and the treadmill will stop Under this mode jog is the m...

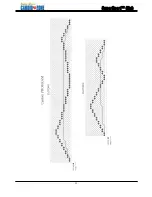
Страница 15: ...setting or wait 10 sec system will enter the next grade automatically If you don t need to use all 50 grades after finished settings press and the treadmill will start to work When the mode according to your settings finished the treadmill will go back to ready start stage automatically This mode has the pre set value too But if you don t want to make any change to the pre set value after setting ...

Страница 16: ...02 Press to set incline to 1 then press to set speed to 1 0 MPH then press to set time to 1 min Now the result on the dot matrix LED is showed as below then press to enter SE03 5 SE03 Press to set incline to 2 then press to set speed to1 3MPH then press to set time to 1 min Now the result on the dot matrix LED is showed as below then press to enter SE04 6 SE04 Press to set incline to 3 then press ...

Страница 17: ...o enter SE06 8 SE06 press to set incline to 3 then press to set speed to 2 0MPH then press to set time to 1min Now the result on the dot matrix LED is showed as below then press to enter SE07 9 SE07 press to set incline to 2 then press to set speed to 1 3MPH then press to set time to 1 min Now the result on the dot matrix LED is showed as below then press to enter SE08 ...

Страница 18: ...dot matrix LED is showed as below then press to enter SE08 11 SE09 press to set incline to 0 then press to set speed to 0 5MPH then press to set time to 1 min Now the result on the dot matrix LED is showed as below then press and start to run the program 12 Now treadmill start to work and the dot matrix LED is showed as below ...

Страница 19: ...er setting up the correct value press and stretch out two hands to hold the heart rate sensor about 30 sec After 30 sec it will display your Body Fat value At the same time left LED lines will display the estimation of the body and right LED lines will show the Body Fat value which computed by program 3 Relation between LED and Body Fat value refer to following table LED Body Fat Value 45 1 50 0 4...

Страница 20: ...19 ...

Страница 21: ...20 ...

Страница 22: ...21 ...

Страница 23: ...22 ...

Страница 24: ...23 ...

Страница 25: ... 72 23 187 118 118 49 162 103 103 75 138 90 87 101 113 90 71 24 186 118 118 50 162 102 102 76 137 90 86 102 112 90 71 25 185 117 117 51 161 101 101 77 136 90 86 103 111 90 70 26 184 116 116 52 160 101 101 78 135 90 85 104 110 90 70 27 183 116 116 53 159 100 100 79 134 90 85 105 109 90 69 28 182 115 115 54 158 100 100 80 133 90 84 106 108 90 68 29 181 115 115 55 157 99 99 81 132 90 83 107 107 90 68...

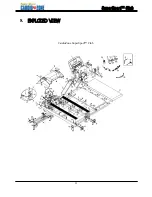
Страница 26: ...25 8 EXPLODED VIEW CardioZone SuperSport Club ...

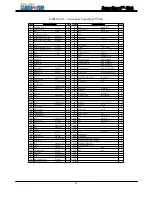
Страница 27: ...on UC 2 1 26 Incline motor 1 86 27 Bolt M10xP1 5x40 1 87 28 Nut M10xP1 5 3 88 Bolt brass M5xP0 8x8 2 29 Belt 1 89 Washer x 3x1 0t 8 30 Controller 1 90 Rubber pad 20x120x1 5t 8 31 Bolt M5xP0 8x12 3 91 T shape wrench 8mmx200mm 1 32 92 33 Bolt M10xP1 5 1 93 Rubber pad P 1155A 3 34 Bolt M8xP1 25x40 2 94 Washer x 6x1 0t 5 35 Bolt M5xP0 8x15 4 95 Foot pad P 1155 2 36 Power cord 1 96 Bolt x15 2 37 Power ...

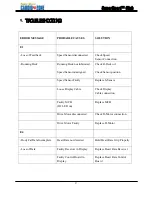
Страница 28: ...r position Speed Sensor Faulty Replace S Sensor Loose Display Cable Check Display Cable connection Faulty MCB D2 LED on Replace MCB Drive Motor disconnected Check D Motor connection Drive Motor Faulty Replace D Motor E4 Body Fat Data Incomplete Heart Rate not detected Hold Heart Rate Grip Properly Loss of Data Faulty Receiver in Display Replace Heart Rate Receiver Faulty Control Board in Display R...

Страница 29: ...tor screw binding Clean screw and lubricate Elevation Motor out of Range Check Zero Position of E Motor E Motor Potentiometer Replace Elevation Motor E7 Elevation Motor Elevation Motor out of Range Replace Elevation Motor Display Doesn t Lit Up On Off switch Check if unit is turned on Insufficient Power Source Plug unit in a dedicated 120V 20Amp Outlet Line Cord Damaged Replace Line Cord Fuse Chec...

Страница 30: ... the original owner LABOR 1 Year Super Gym s FitnessBlowout com shall cover the labor cost for the repair of the device for a period of one year from the date of original purchase so long as the device remains in the possession of the original owner EXCLUSIVE REMEDY The exclusive remedy for any of the above warranties shall be repair or replacement of defective parts or the supply of labor to cure...

Отзывы: