background image

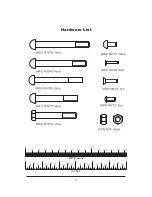
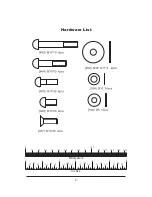
Hardware List

3

0

100

10

20

30

40

50

60

70

80

90

110 120 130 140 150

Inches

0

1

2

3

4

5

6

/

12

/

14

/

34

/

34

/

34

/

34

/

34

/

34

/

14

/

14

/

14

/

14

/

14

/

12

/

12

/

12

/

12

/

12

Millimeters

Содержание SG8022MT

Страница 1: ...SG8022MT Pec Deck Rear Delt Assembly Instructions...

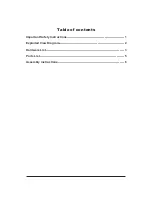
Страница 2: ...Table of contents Important Safety Instructions 1 Exploded View Diagram 2 Hardware List 3 Parts List 5 Assembly instructions 6...

Страница 3: ...t has been dropped or damaged Never drop or insert anything into any opening in the equipment Always check the unit and its cables before each use Make sure that all fasteners and cables are secure an...

Страница 4: ...Pec Deck Rear Delt Exploded View Diagram 2...

Страница 5: ...Hardware List 3 0 100 10 20 30 40 50 60 70 80 90 110 120 130 140 150 Inches 0 1 2 3 4 5 6 12 14 34 34 34 34 34 34 14 14 14 14 14 12 12 12 12 12 Millimeters...

Страница 6: ...Hardware List 4 0 100 10 20 30 40 50 60 70 80 90 110 120 130 140 150 Inches 0 1 2 3 4 5 6 12 14 34 34 34 34 34 34 14 14 14 14 14 12 12 12 12 12 Millimeters...

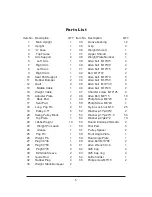
Страница 7: ...e 1 47 Chamfer screw M10 25 4 15 Adjuster Plate 2 48 Allen Bolt M8 15 10 16 Back Pad 1 49 Philip Screw M4 20 2 17 Seat Pad 1 50 Philip Screw M6 20 1 18 Long Pop Pin 2 51 Nylon Lock nut M10 25 19 Pulle...

Страница 8: ...ay be large heavy or awkward to handle alone It is important that you assemble your product in a clean clear uncluttered area This will enable you to move around the product while you are fitting comp...

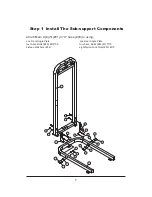
Страница 9: ...e Sub support Components Attach Main Upright 01 to U base 03 to using one Front Angle Plate one Rear Angle Plate four Bolts 40 M10 90 four Bolts 43 M10 70 sixteen Washers 53 eight Nylon Lock Nuts 51 M...

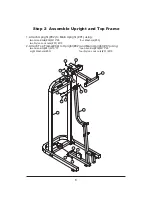
Страница 10: ...02 to Main Upright 01 using 2 Attach Top Frame 04 to Upright 02 and Main Upright 01 using two Bolts 39 M10 95 four Washers 53 two Nylon Lock nuts 51 M10 two Bolt 41 M10 75 two Bolt 39 M10 95 eight Was...

Страница 11: ...33 down onto each the Guide Rod 31 3 Carefully begin sliding the Weight Plate one by one in sequence 22 21 4 Align the both ends of Guide Rods 31 to the Main Upright and secure them using 5 Insert th...

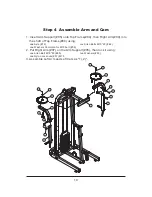
Страница 12: ...09 into the shaft of Top Frame 04 using 2 Put Right Arm 07 on the Arm Support 05 then lock it using 3 Assemble Left Arm and Left Cam as 1 2 one Axle 12 one Allen Bolts M10 20 46 one Washers 38mmdia f...

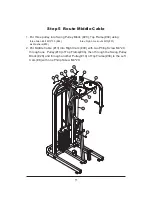
Страница 13: ...le Cable 13 into Right Cam 09 with two Philip Screw M4 20 through one Pulley 19 of Top Frame 04 then through the Swing Pulley Block 20 and through another Pulley 19 of Top Frame 04 to the Left Cam 8 w...

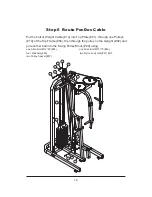
Страница 14: ...p Plate 21 through one Pulleys 19 of the Top Frame 04 then through the pulley on the Upright 02 and put another bolt into the Swing Pulley Block 20 using one Allen Bolt M10 50 44 one Allen Bolt M10 70...

Страница 15: ...wo Upper Shroud 37 to Main Upright 01 using two Allen Bolt M10 30 45 two Washers 53 four Allen Bolt M10 30 45 four Washers 53 six Allen Bolt 48 M8 15 six Washers 54 8 four Allen Bolt 48 M8 15 four Was...

Отзывы: