SunWare TX-Solar Скачать руководство пользователя страница 19

33

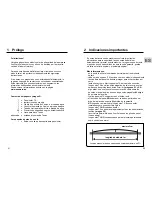
I moduli fotovoltaici TX sono cuciti in un telaio in materiale tessile.
Grazie al soffice passaggio dal modulo rigido al bordo in materiale
tessile, i moduli possono essere posati su una superficie tessile
tesa, come la cappottina, il tendalino o il telone.

Nei moduli a più ante, ogni anta funziona in modo indipendente. In
tal modo si riduce la perdita di potenza durante le ombreggiature
parziali.

Affinché il modulo possa essere rimosso facilmente per piegare la
cappottina antispruzzo, il tendalino o il telone, un connettore
impermeabile è montato in un cavo di collegamento corto Modulan
(

).

Figura 4.6

Il modulo stesso va fissato sulla copertura di tessuto con elementi
Tenax. Gli elementi di base Tenax adeguati per coperture in
materiale tessile sono forniti insieme al modulo. Il rivenditore tiene a
vostra disposizione anche altri tipi di elementi inferiori Tenax dotati,
ad esempio, di filettatura di legno o metrica.

Ulteriori metodi di fissaggio, come velcri o cerniere, possono essere
cuciti sul nastro di fissaggio. Il vostro fabbricante di vele e teloni può
eseguire tale lavoro rapidamente.
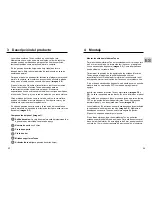
Il cavo di collegamento per i moduli a più ante va condotto senza
tensione attraverso l'articolazione in materiale tessile per evitare la
rottura del cavo (

).

Figura 5.3

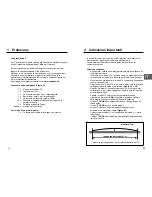
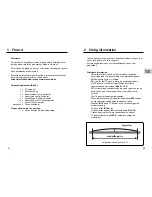
Componenti del modulo (Figura 1):

Uscita del cavo:

la scatola di giunzione è sigillata in modo da

essere impermeabile all'acqua salata ed è imbullonata alla
piastra di supporto.

Numero di serie

di 6 cifre

Nastro di fissaggio

Nastro per bordatura

Elementi superiori Tenax

Articolazione in materiale tessile

(nei moduli a più ante)

3    Descrizione del prodotto

5

6

34

IT

4    Montaggio

Montaggio degli elementi inferiori Tenax

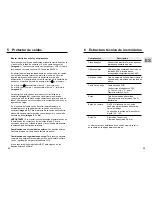
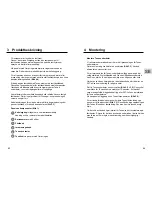
Per gli elementi inferiori Tenax si consiglia di eseguire un foro di 9
millimetri nel telone. Il foro può essere eseguito nel modo più
semplice mediante un punzone od anche una fustella a cavallotto
(

). In alternativa, si può utilizzare una taglierina appuntita.

Figura 3.3

Per contrassegnare la posizione dei fori per gli elementi inferiori
Tenax, posare il modulo nel punto scelto della copertura in materiale
tessile. Dalla parte inferiore della copertura, è ora possibile
contrassegnare la posizione degli elementi Tenax con un pennarello
o un gessetto.
Se si utilizza un punzone, è opportuno usare un supporto in legno
duro o una piastra di PVC per effettuare il foro.

Inserire poi gli elementi inferiori Tenax e avvitarli (

).

Figura 3.5 + 3.6

La chiave necessaria per le rondelle Tenax è fornita insieme al
modulo TX. Se del caso, può essere opportuno collocare una
doppiatura di tessuto o una lamina in PVC sotto i punti in cui si
trovano gli elementi inferiori Tenax.
Ora si può posare il modulo e collegare gli elementi Tenax (

Figura

3.8

).

Gli elementi di fissaggio Tenax devono essere sbloccati a mano,
sollevandone la testina, per rilasciare la congiunzione (

).

Figura 3.2

Grazie al necessario sbloccaggio, l'elemento Tenax è un tipo di
fissaggio sicuro. In questo modo, il modulo non può staccarsi da
solo.

Se in luogo degli elementi Tenax si devono usare delle asole,
rimuovere gli elementi superiori dal bordo di fissaggio. A tal fine si
deve svitare la rondella situata nel lato inferiore. In tale foro di 9
millimetri si può poi inserire un'asola di 10 millimetri mediante una
rivettatrice corrente.

Содержание TX-Solar

Страница 1: ...SunWare Solar TX Module TX Solar modules Installation Manual Bedienungsanleitung...

Страница 2: ...tructions odules solaires TX FR M Instructions d installation 20 Moduli solari TX IT Istruzioni per l installazione 30 M dulos solares TX ES 40 Instrucciones de instalaci n Zonnepaneel TX NL 50 Instal...

Страница 3: ...au lesen und beachten m ssen Bitte bewahren Sie f r den Zeitraum des Garantieanspruchs unbedingt Ihre Originalrechnung und die Originalverpackung auf Weitere Hinweise f r optimale Leistung Teilabschat...

Страница 4: ...Oberteile textiles Gelenk bei mehrfl geligen Modulen 3 Produktbeschreibung 3 5 6 4 Montage Tenax Unterteile montieren F r die Tenax Unterteile empfehlen wir ein Loch mit 9mm in die Persenning zu schne...

Страница 5: ...ferbar Bild 4 7 4 8 WICHTIG Beim Stecken der Kupplungen auf Sauberkeit der Kontakte und O Ring Dichtungen achten Sand und Schmutz gegebenenfalls sorgf ltig entfernen um die Dichtigkeit dauerhaft siche...

Страница 6: ...der Nennleistung unter Standardtestbedingungen 1 000W qm 25 C 1 5 AM diesen Leistungsverlust ersetzen sofern diese Verschlechterung auf Material oder Fertigungsfehler zur ckzuf hren ist Bei den rahme...

Страница 7: ...10 Solar Modules EN Installation Manual...

Страница 8: ...ax Solar modules can be bent a maximum of 3 This user manual provides important safety instructions that you should read carefully and follow Please retain your original invoice and the original packa...

Страница 9: ...e frame Tenax tops of multi wing modules Textile joint 3 Product description 5 6 13 4 Mounting Installing the Tenax base parts To attach the Tenax base parts we recommend cutting a 9mm hole into the t...

Страница 10: ...flange socket Pic 4 7 4 8 IMPORTANT When plugging in the couplers make sure that the contacts and O ring seals are clean Thoroughly remove any sand and dirt to ensure permanent sealing Combination wit...

Страница 11: ...capacity under standard test conditions 1 000 W sqm 25 C 1 5 AM provided such deterioration is the result of material or production faults The maximum permissible bending of frameless solar modules is...

Страница 12: ...Modules solaires TX FR Instructions d installation 20...

Страница 13: ...t conserver la facture d origine tout comme l emballage d origine pendant toute la dur e de garantie D autres conseils pour un rendement optimal viter si possible tout ombrage partiel chaque volet d u...

Страница 14: ...scriptif du produit 5 6 23 FR 4 Montage Monter les boutons Tenax m les Pour les boutons Tenax m les nous pr conisons la d coupe d un trou de 9 mm dans la b che Le plus simple pour percer le trou est d...

Страница 15: ...8 IMPORTANT Lors de l enfichage des connecteurs veiller la propret des contacts et des joints toriques Si n cessaire liminer m ticuleusement toute trace de sable et de salet pour garantir une tanch i...

Страница 16: ...s des conditions de test standard 1 000W m2 25 C 1 5 AM SunWare s engage remplacer cette perte de puissance dans la mesure o cette d gradation d coule de d fauts de mat riau ou de fabrication La d for...

Страница 17: ...30 IT Moduli solari TX Istruzioni per l installazione...

Страница 18: ...i trovano importanti informazioni di sicurezza che vanno lette e osservate attentamente Conservare per tutta la durata della garanzia la fattura e la confezione originali Ulteriori avvertenze Se possi...

Страница 19: ...x Articolazione in materiale tessile nei moduli a pi ante 3 Descrizione del prodotto 5 6 34 IT 4 Montaggio Montaggio degli elementi inferiori Tenax Per gli elementi inferiori Tenax si consiglia di ese...

Страница 20: ...inserire i giunti assicurarsi che i contatti e le guarnizioni ad anello siano puliti Se del caso eliminare accuratamente la sabbia e lo sporco e assicurarsi che siano a tenuta stagna durevolmente Comb...

Страница 21: ...ard dei test 1 000W qm 25 C 1 5 AM la SunWare riparer alla perdita di potenza se questa riconducibile a difetti di materiale o di produzione Nei moduli fotovoltaici senza cornice la deformazione massi...

Страница 22: ...M dulos solares TX Instrucciones de instalaci n 40 ES...

Страница 23: ...tar exacta atenci n e rogamos que durante L el per odo en que sean v lidos los derechos de garant a guarde sin falta su factura original y el embalaje original M s informaciones en lo posible evitar e...

Страница 24: ...inta de orlar Mitades superiores Tenax Articulaci n textil para paneles de varias hojas 3 Descripci n del producto 5 6 44 ES 4 Montaje Montar las mitades inferiores Tenax Para las mitades inferiores T...

Страница 25: ...PORTANTE Al enchufar los acoplamientos prestar atenci n en la limpieza de los contactos y de las juntas t ricas Si fuera necesario sacar con cuidado la arena y la suciedad para asegurar la estanqueida...

Страница 26: ...iones de prueba est ndar 1 000W qm 25 C 1 5 AM SunWare indemnizar esta perdida de potencia siempre y cuando sta disminuci n sea atribuida a desperfectos del material o de fabricaci n En caso de m dulo...

Страница 27: ...50 Zonnepanelen TX Installatiehandleiding NL...

Страница 28: ...ginele rekening en de originele verpakking gedurende de periode van de garantieverlening Aanvullende opmerkingen voorkom gedeeltelijke schaduw op het zonnepaneel iedere vleugel van een TX paneel werkt...

Страница 29: ...rienummer met 6 cijfers Bevestigingsband Omrandingsband Tenax bovendelen Textielscharnier bij meervleugelige panelen 3 Productbeschrijving 5 6 54 NL 4 Montage Tenax onderdelen monteren Voor Tenax onde...

Страница 30: ...n een flensdoos leverbaar afbeelding 4 7 4 8 BELANGRIJK Let op dat de contacten en de O ringafdichtingen schoon zijn als u de koppelingen in elkaar steekt Zand en veront reinigingen moeten zo nodig zo...

Страница 31: ...le vermogen onder standaardtestvoorwaarden 1 000 W m2 25 C 1 5 AM zal SunWare het vermogensverlies vervangen indien deze verslechtering terug te voeren is op materiaal of productiefouten Bij frameloze...

Страница 32: ...60 Solar moduler TX Installationsanvisning SE...

Страница 33: ...enom och f lja noggrant F rvara originalr kningen och originalf rpackningen under garantitiden Ytterligare information F r optimal effekt undvik om m jligt partiell skuggning Varje vinge p en TX panel...

Страница 34: ...mer med 6 siffror F stband Inramnningsband Tenax verdelar Textilled vid paneler med flera vingar 3 Produktbeskrivning 5 6 64 SE 4 Montering Montera Tenax underdelar Vi rekommenderar att sk ra ett 9mm...

Страница 35: ...suttag f r kontaktsystemet Bild 4 7 4 8 OBS Kontrollera vid kopplingarnas anslutning att kontakterna och O ring t tningarna r rena Avl gsna i f rekommande fall all sand och smuts f r att s kra varakti...

Страница 36: ...000W m 25 C 1 5 AM ers tter SunWare denna effektf rlust s vida den kan h nf ras till materialf rs mring eller tillverkningsfel Vid de raml sa solpanelerna r den max till tna deformationen 3cm per 1 m...

Страница 37: ...TX 70 GR...

Страница 38: ...71 1 SunWare Solartechnik Made in Germany www sunware de 2 1 x TX 1 x 1 x 1 x 1 x 20 x UV 1 x Tenax x Tenax 1 x TX T TX TX 5 1 5 2 TX TX TX TX 5 3 3 TX 72 2 GR 1m 3cm 3...

Страница 39: ...5 6 TX spray hood bimini top spray hood bimini top 4 6 Tenax Tenax Tenax 5 3 1 6 Tenax 3 74 GR 4 Tenax Tenax 9 3 3 Tenax Tenax PVC Tenax 3 5 3 6 Tenax TX PVC Tenax Tenax 3 8 Tenax Tenax 3 2 Tenax 9 1...

Страница 40: ...75 10 4 1 VDE GL DC 50V 16A 40 1 1 4 2 4 3 4 5 4 7 4 8 SunWare SunWare FOX Solar SunWare SunWare 5 6 76 3 EVA EVA PVC 2 1 5 x 6 5 7 8 20 8 140 160 Tenax Loxx 9 0 www sunware de GR...

Страница 41: ...77 7 8 SunWare 78 9 SunWare 3 SunWare 10 1 000W qm 25 C 1 5 AM 3 1 VA 3 TX SunWare TX SunWare GmbH Co KG 2 GR...

Страница 42: ......

Страница 43: ......

Страница 44: ......

Страница 45: ......

Страница 46: ......

Страница 47: ......

Страница 48: ......

Отзывы: