Sunrise JAY ConfigureFit Скачать руководство пользователя страница 16

14

116083

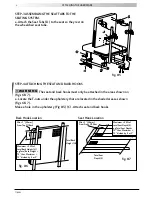
THORACIC LATERALS AND HIP GUIDES w/o TRACKS:
Depending on the choice of hardware thoracic 
laterals offer height, medial lateral adjustment along 
with angle and depth adjustment (fig# 13).
NOTE: T-Nut adjustments – Locate the T-Nuts 
under the upholstery ensuring they are in the 
correct adjustment location and will line up with the 
hardware parts. Puncture the upholstery to allow the 
fastener to thread in to the T-Nuts. Ensure that when 
attaching fasteners to the seat or back the threaded 
fastener inside the seat (T-Nut) is not dislodged.

MEDIAL THIGH SUPPORTS:
The  T-Nut patterns under the seats located in the front of the seat supply 
attaching points for the hardware base (fig # 14)

When all adjustments are completed, re-tighten all hardware and fasteners. 
Ensure that all moveable parts function correctly and lock into place.

fig. #13

fig. #14

SEATING SYSTEM COMPONENT ADJUSTMENT

Содержание JAY ConfigureFit

Страница 1: ...eFit Instruction Manual Important Consumer Information Notice This packet contains instructions that must be passed on to the user of this product Please do not detach this packet before delivery to t...

Страница 2: ......

Страница 3: ...all the instructions and manuals you received with your seating system The contain important user and safety information and should be referred to often FOR ANSWERS TO YOUR QUESTIONS Your authorized s...

Страница 4: ...ction 1 General Seating System Warnings 3 Attaching the Hardware 9 Testing the Seating System Fit to the Wheelchair 11 Seating System Component Adjustment 12 Cleaning and Maintenance 15 Warranty 16 TA...

Страница 5: ...often until they are second nature to you C WARNINGS The word WARNING refers to a hazard or unsafe practice that may cause severe injury or death to you or to other persons The Warnings are in four m...

Страница 6: ...seat a fall tip over or loss of control may occur and cause severe injury to the rider or others C SAFETY CHECKLIST Before Each Use Of Your Seat 1 Make sure the attachment mounting hardware is secure...

Страница 7: ...user to lean back when you tilt the chair backward If you fail to heed these warnings damage to your chair a fall tip over or loss of control may occur and cause severe injury to the rider or others...

Страница 8: ...e aware that there is a point during every transfer when the wheelchair seat is not below you To Avoid A Fall 1 Work with your health care advisor to learn safe methods a Learn how to position your bo...

Страница 9: ...r or under tightened fasteners may fail or cause damage to chair parts 3 If bolts or screws become loose tighten them as soon as you can 4 Sunrise recommends that all fasteners be checked for wear suc...

Страница 10: ...er or loss of control may occur and cause severe injury to the rider or others C SEAT SYSTEMS 1 Do not change the seat system of your chair UNLESS you consult your authorized supplier first If you fai...

Страница 11: ...ket Spacers fig 4 NOTE During the following steps tighten all hardware just enough to hold positions This will make it easier to adjust during assembly Ensure that when attaching fasteners to the seat...

Страница 12: ...a Locate the T nuts under the upholstery that are located in the shaded areas as shown figs 6 7 Make a hole in the upholstery Fig 5 C Attach seat and back hooks Seat Hook Location fig 6 fig 7 Back Ho...

Страница 13: ...NOT FIT OR LINE UP ON ANY OF THE HARDWARE MAKE THE NECESSARY INDIVIDUAL HARDWARE ADJUSTMENTS TO ENSURE A POSITIVE FIT W A R N I N G Revisit all fasteners and tighten securely before using the seating...

Страница 14: ...lotted hardware and track adjustments fig 12 shows the exploded views you may refer to during adjustment Loosen the fasteners slide the hardware pieces to the desired location and re tighten securely...

Страница 15: ...depth angle and width fig 11 SECONDARY SUPPORT SURFACES THORACIC LATERALS AND HIP GUIDES w TRACKS Depending on the choice of hardware thoracic laterals offer height medial lateral adjustment along wi...

Страница 16: ...ware parts Puncture the upholstery to allow the fastener to thread in to the T Nuts Ensure that when attaching fasteners to the seat or back the threaded fastener inside the seat T Nut is not dislodge...

Страница 17: ...all fasteners be checked for wear such as loose bolts or broken components every 3 months Loose fasteners should be retightened according to the installation instructions All fasteners should be tight...

Страница 18: ...your supplier to find out if international warranties apply 4 This warranty is not transferable and only applies to the first consumer purchase of this Seating System through an authorized Sunrise Med...

Страница 19: ......

Страница 20: ...2009 Sunrise Medical Inc 12 09 116083 Rev A Sunrise Medical Inc 7477 East Dry Creek Pkwy Longmont CO 80503 800 333 4000 www sunrisemedical com...

Отзывы: