background image

I X .   S e t - u p ,   A d j u s t m e n t   &   U s e

930547 Rev. C

22

IX. SET-UP, ADJUSTMENT & USE

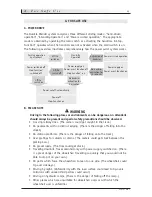
1. Work Surface For Set-Up: 

Use a flat surface, such as a table, to assemble, adjust and check your chair. 
This makes the steps easier and helps ensure a correct set-up. 

2. Fasteners: 

Many of the screws and bolts on this chair are special high-strength fasteners
and may have special coatings.

Many nuts are of the Nylock type. They have a plastic insert to help prevent
loosening. 

Only

use screws, bolts and nuts provided by Sunrise.

1. Use of improper fasteners may cause the chair to fail.
2.  Over- or under-tightened fasteners may fail or cause damage to chair parts.
3.  If bolts or screws become loose,tighten them as soon as you can. Loose

bolts or screws can cause damage to other chair parts causing them to fail.

3. Washers & Spacers: 

Note the position of washers and spacers before disassembly. 

To avoid damage to the frame, replace all washers and spacers when you
reassemble parts. 

4. Torque Settings: 

A torque setting is the optimal tightening for a particular fastener. Use a torque
wrench that measures inch-pounds to secure screws, nuts and bolts on this chair. 

NOTE– 

Unless otherwise noted, use a torque setting of 120 inch-pounds for all fasteners.

Содержание Quickie Xtender

Страница 1: ...Quickie Xtender User Instruction Manual Warranty ...

Страница 2: ... and telephone number below Sunrise Medical Customer Service Department 7477 East Dry Creek Parkway Longmont Colorado 80503 303 218 4500 or 800 333 4000 Be sure to return your warranty card and let us know if you change your address This will allow us to keep you up to date with information about safety new products and options to increase your use and enjoyment of this wheelchair If you lose your...

Страница 3: ...XII ASSEMBLING AND CHANGING THE WHEELS 29 A Dismantling the Wheels 29 B Fitting the Wheels 30 XIII TRANSPORT 31 XIV MAINTENANCE 32 A Inspection and Adjustment 32 B Anti Tip Tubes 32 C Tire Pressure 33 D Inspecting the Wheelchair Frame and Wheels 33 XV BATTERY 34 A Charging Environment 34 B Fitting the Battery into the Charger 34 C Charging Process 35 D If a Problem Arises During Charging 36 E Chec...

Страница 4: ... o n 930547 Rev C 4 III COMPONENT DESCRIPTION 1 Battery 2 Battery compartment 3 Quick release latch for the wheel 4 Torque sensing handrim 5 Battery release button 6 Quickie 2 manual wheelchair 7 ON OFF switch 8 Charger not shown 1 2 3 4 5 6 7 ...

Страница 5: ...his chair and adjust the controller settings for your level of function and ability level C REVIEW THIS MANUAL OFTEN Before using this chair you and each person who may assist you should read this entire Manual and make sure to follow all instructions Review the warnings often until they are second nature to you D WARNINGS The word WARNING refers to a hazard or unsafe practice that may cause sever...

Страница 6: ...re obvious and easy to avoid Others are not and you may not be able to avoid them 3 Powered wheelchairs may be susceptible to electromagnetic interference EMI emitted from sources such as radio stations TV stations amateur radio HAM transmitters two way radios and cellular phones 4 EMI can also be produced by conducted sources or electro static discharge ESD B WHAT EFFECT CAN EMI HAVE 1 EMI can ca...

Страница 7: ...our chair without you knowing it E IMMUNITY LEVEL 1 The level of EM energy is measured in volts per meter V m Every power wheel chair can resist EMI up to a certain level This is called its immunity level 2 The higher the immunity level the less the risk of EMI It is believed that a 20 V m immunity level will protect the power wheelchair user from the more common sources of radio waves 3 The confi...

Страница 8: ...ply to the rider also apply to you Notes 1 You need to work with the rider and the rider s doctor nurse or therapist to develop safe methods best suited to your abilities and those of the rider 2 To manually push the chair you should turn the power off 3 Propel this chair by the push handles only They provide secure points for you to hold the rear of the chair to prevent a fall or tip over Check t...

Страница 9: ... or brake release occurs turn your chair off as soon as it is safe E SAFETY CHECK LIST Before each use of this chair 1 Make sure the chair operates smoothly Check for noise vibration or a change in ease of use They may indicate low tire pressure loose fasteners or damage to your chair If you detect a problem make sure to repair or adjust the chair Deferring repair or adjustment could increase the ...

Страница 10: ... tub pool or sauna Do not use your chair in fresh or salt water such as at the edge of a stream lake or ocean Make sure all electrical connections are secure Dry the chair as soon as you can if it gets wet or if you use water to clean it 2 Proceed slowly and use extra care if you must operate your chair on a wet or slick surface Do so only if you are sure it is safe Stop if one or both main wheels...

Страница 11: ...r seat belts will not prevent this and further injury may result from the belts or straps 3 NEVER transport this chair in the front seat of a vehicle It may shift and inter fere with the driver 4 ALWAYS secure this chair so that it cannot roll or shift 5 Do not use any chair that has been involved in a motor vehicle accident L CENTER OF BALANCE The point where this chair will tip forward back or t...

Страница 12: ...d on footrests when you transfer Doing so may damage them or cause your chair to tip Make sure your feet do not hang up or get caught in the space between the footrests 7 Make sure armrests do not interfere 8 Transfer as far back onto the seat surface as you can This will reduce the risk that you will miss the seat or fall N REACHING OR LEANING Reaching or leaning affects the center of balance of ...

Страница 13: ...rward P OBSTACLES Obstacles you may have to overcome in daily use include door thresholds lifts ramps and hazards such as potholes and broken pavement These can damage your chair and may cause a fall tip over or loss of control 1 Be aware that thresholds are very dangerous Even a small change in height may stop a caster wheel and cause your chair to tip You may need to Remove or cover threshold st...

Страница 14: ...E THE RISK OF A FALL TIP OVER OR LOSS OF CONTROL 1 Never use your chair on a slope unless you are sure you can do so without losing traction 2 Always go as straight up and as straight down as you can Do not cut the corner on a slope or ramp Do not turn or change direction on a slope 3 Always stay in the center of the ramp Make sure ramp is wide enough that you are not at risk that a wheel may roll...

Страница 15: ...eed to add a section at the top or bottom to avoid a lip or drop off 5 Ramp must be sturdy Add bracing if needed so ramp does not bow when you ride on it U WHEELCHAIR LIFTS Wheelchair lifts are used in vans buses and buildings to help you move from one level to another 1 Always turn off all power to your chair when you are on a lift If you fail to do so you may touch the handrim by accident and ca...

Страница 16: ...t climb or descend a curb or step alone do so at your own risk and use extreme care Go as straight up or straight down as you can Never turn or climb or descend at an angle as a fall or tip over is likely Proceed slowly at a steady speed 4 Make sure that persons who assist you review the Tips For Attendants and heed all warnings W STAIRS Never use this chair to go up or down stairs even with an at...

Страница 17: ... the main frame C CUSHIONS SLING SEATS 1 Quickie sling seats standard foam cushions and other body supports are not designed for the relief of pressure 2 If you suffer from pressure sores or if you are at risk that they will occur you may need a special seat system or a device to control your posture Consult your doctor nurse or therapist to find out if you need such a device for your well being D...

Страница 18: ... use the ON OFF switch to stop the chair except in an emergency This may result in an abrupt stop and may cause you to fall 2 To slow your chair to a stop pull back on the handrims G PNEUMATIC TIRES Proper inflation extends the life of your tires and makes your chair easier to use 1 Do not use this chair if any of the tires are under or over inflated Check weekly for proper inflation level as list...

Страница 19: ...n accident or sudden stop you may be thrown from the chair A positioning belt will not prevent this and fur ther injury may result from the belt As a restraint A restraint requires a doctor s order On a rider who is comatose or agitated I PUSH HANDLES 1 Push handles provide secure points for an attendant to propel and control the chair This helps to prevent a fall or tip over 2 Check to make sure ...

Страница 20: ... Replace worn or torn fabric of seat sling and seat back as soon as you can If you fail to do so the seat may fail and cause you to fall Worn fabrics may increase the potential for a fire hazard 2 Sling fabric will deteriorate with age and use Look for fraying thin spots or stretching of fabric at rivet holes Replace fabric as required 3 Dropping down into sling seat will weaken fabric and result ...

Страница 21: ... edge 4 Continue forward until the rear wheels contact the face of the curb or step Lift and roll the rear wheels to the upper level B TO DESCEND A CURB OR SINGLE STEP The following is one way to safely help a rider descend a curb or single step going backward 1 Stay at the rear of the chair 2 Several feet before your reach the edge of the curb or step turn the chair around and pull it backward 3 ...

Страница 22: ...Use of improper fasteners may cause the chair to fail 2 Over or under tightened fasteners may fail or cause damage to chair parts 3 If bolts or screws become loose tighten them as soon as you can Loose bolts or screws can cause damage to other chair parts causing them to fail 3 Washers Spacers Note the position of washers and spacers before disassembly To avoid damage to the frame replace all wash...

Страница 23: ...The casters could get stuck between the grating bars On gravel roads The tires could get stuck Traveling downhill Travel downhill only with power supply switched on There is a great danger of the wheelchair travelling so quickly that you would not be able to stop it on your own On paths which force the wheelchair to lean to one side The wheelchair could tip over sideways Driving by night Unfamilia...

Страница 24: ... and you can hear a pip pip pip pip tone before the power drive stops In this instance the system is working normally WARNING Do not lift the wheelchair by its handrims the battery or the cable This could cause damage especially if the wheelchair and its passenger are lifted togeth er there is a risk of tipping over or falling out Please observe the following Put the brakes firmly on both wheels s...

Страница 25: ...battery deteriorates the diodes will not light up even when charging is finished see Troubleshooting Also its range is reduced 2 Check that the anti tip tubes are fitted and adjusted correctly see Inspection and Setting WARNING Never use the wheelchair without anti tip tubes If the wheelchair is used without anti tip tubes or if the tubes are less than standard length there is the risk of tipping ...

Страница 26: ... switch on pressure is being exerted on the handrims the warning pip sounds the safety system is active and the wheelchair cannot be driven Release your grip on the handrims and switch on again The battery is empty when the battery warn ing light is on or flashing Change the bat tery and start again If the red battery warning light is on imme diately after changing the battery the wheel chair cann...

Страница 27: ...s the release button Fit the new battery adjusting until you hear it click into place Put the protective cap on the old battery immediately Otherwise there is the danger of a short circuit if the connecting parts are not covered 8 When you stop activate the brakes with the handrims IMPORTANT apply brakes to both rear wheels when stopping or parking on a sloping surface NOTE to protect the battery ...

Страница 28: ...pectedly roll away tip over or cause you to fall out 2 Keep your wheelchair in a safe place with the power switched off when not in use WARNING For children or others who should not operate this wheelchair contact with the wheelchair is very dangerous Always place it out of the reach of third parties or remove the battery when the wheelchair is not in use 3 After removing the battery charge it for...

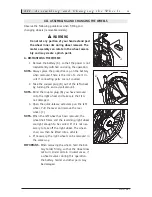
Страница 29: ...ng parts are not covered 2 Take the coupler plug B out of the left wheel by turning the end a small amount NOTE Wind the coupler plug B you have removed onto the right wheel and take care that it is not damaged 3 Open the quick release axle clamp on the left wheel Pull the lever and remove the rear wheel C NOTE When the left wheel has been removed the wheelchair frame and the remaining right wheel...

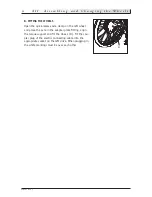
Страница 30: ...pen the quick release axle clamp on the left wheel and place the axle in the adapter plate fitting align the torque support and fit the wheel D Fit the cou pler plug of the electric connecting cable into the appropriate socket on the left drive When plugging in the white markings must be over each other D ...

Страница 31: ...ot trap the cable NOTE Flip up footplates Grasp the seat upholstery at the front and back and pull upwards Fold in handles 4 Hold the wheelchair frame firmly with both hands and lift into the vehicle NOTE Do not lift the wheelchair by its handrims the battery or the cable This could cause damage 5 During transport place a cushion or something similar under the wheelchair so that it does not rattle...

Страница 32: ...do not store the wheelchair anywhere where it is exposed to rain direct sunlight or high humidity This could lead to malfunction 5 Do not keep the battery where it is exposed to high temperatures IMPORTANT do not leave the battery in the car for long periods where the effect of the sun is strong A INSPECTION AND ADJUSTMENT If the wheelchair is used without anti tip tubes or if the tubes are shorte...

Страница 33: ...ily D INSPECTING THE WHEELCHAIR FRAME AND WHEELS Use of the wheelchair with irregularities in the frame or wheels can lead to sudden damage to the wheelchair and consequently to tipping over or imbalance Always monitor the condition of your wheelchair components If you identify any irregularities take your wheelchair to your dealer for inspection and repair Fracture in frame Loosening in connectio...

Страница 34: ...Areas where small children or household pets could come into contact with the charger There is the risk that they may get hurt and or that the equipment will be damaged B FITTING THE BATTERY INTO THE CHARGER For charging use no other equipment than the autho rized charger There is the risk of causing a fire or the possibility that the battery could be damaged 1 Use the connecting cable supplied to...

Страница 35: ... and charging begins automati cally Although the standby time varies depending on the temperature condi tions this lasts app 1 to 2 hours 3 The progress of recharging is shown on the battery capacity display The indica tors serve as a guide for the time up to the completion of the charging process 4 When charging is complete you will see the green charging light and the bat tery capacity display d...

Страница 36: ... intervals and the third LED on the battery capacity display flashes The contacts may be malfunctioning Please check if small objects have broken the electrical contact between the battery terminals and those of the charger and remove them If there is dirt or dust on the contacts remove it with a dry cloth ensuring that the contacts are not bent or damaged The battery fuse may have blown Open the ...

Страница 37: ...ed on both wheels F WHEN A BATTERY IS INSTALLED IN THE CHARGER 1 During a quick charge When the charging process starts the capacity display is automatically activat ed and indicates the progress of the charging process At the end of the charging process the capacity display automatically goes out Reading the display Permanently illuminated LEDs indicate the level of charging capacity A flashing L...

Страница 38: ... battery is capable of storing at most 60 of its original capacity Adequate use of the power drive is no longer possible Verdict Replace the battery with a new one Time for replacement NOTE Depending on the condition of the battery the capacity display can return to the original maximum capacity following successive charges Contact your dealer when no more than 3 LEDs on the capacity display light...

Страница 39: ...rising during charging under the header Charging I ENDING THE CHARGING PROCESS 1 Remove the charged battery after completing the charging process Remember to replace the protective cap on the battery before storing it Unprotected contacts can lead to a short circuit 2 Remove the plug from the socket IMPORTANT Do not pull by the cable itself as this could cause damage 3 Long term storage of the bat...

Страница 40: ...y fitted properly 3 Did the on off switch work while pressure was applied to the handrim 4 Was the on off switch automatically turned off by the automatic switch off function 1 Is the adapter plate loose 2 Is the power unit mak ing a strange noise 1 Is the battery complete ly charged 1 Is there sufficient tire pressure ACTION 1 Charge or replace the battery 2 Install the battery correctly 3 Switch...

Страница 41: ...arger and the battery 1 Is the battery completely full 1 Is the ambient temperature battery temperature and charger temperature normal ACTION 1 Connect power cable 2 Replace fuse 3 Charge in an area with suitable temperature 1 Try charging again after having waited until the temperature is suitable for the battery and the charger if all the LEDs on the battery capacity display do not light up afte...

Страница 42: ...y should be recharged every three months to ensure optimum performance after being stored 2 After operating the wheelchair on wet ground wipe off any drops of water with a dry cloth Wet equipment can rust 3 To remove mud and dirt rub off with a well wrung out cloth IMPORTANT Never bring into contact with water as this can cause an electrical mal function 4 Storage in rooms with low humidity IMPORT...

Страница 43: ...emperature 4 F to 140 F maximum load 250 lbs B CHARGER Electrical requirements Alternating current 100 to 220 V 50 60 Hertz Total output 150 W Battery Nickel metal hydride NiMh 24 V x 6 7 Ah 30 A plug in fuse Charging time Quick charge process 2 3 hours Refresh charging 9 12 hours Ambient temperature for charging 40 F to 105 F Operational range will vary greatly depending on the surface and the dr...

Страница 44: ...es in the USA only Check with your supplier to find out if international warranties apply D WHAT WE WILL DO Our sole liability is to repair or replace covered parts This is the exclusive remedy for consequential damages E WHAT YOU MUST DO 1 Return the warranty card 2 Obtain from us while this warranty is in effect prior approval for return or repair of covered parts 2 Return the wheelchair or part...

Отзывы: