Sunra Miku Max Скачать руководство пользователя страница 13

DESIGNED BY MIKU TEAM

DESIGNED BY MIKU TEAM

21/22

1

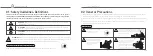
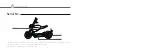
Take the Power pack out

Pull the button    at the bottom of storage csae to open the bottom case;
Disconnect the wire and take the power pack out.

1

Storage case

MIKU 

MAX

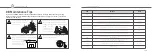
The power indicators show 5 levels of battery power. 
Each indicator show 20% of battery power.

The power indicators are blinking while the battery is
under charging.

The battery is located within the power pack and requires no special break in period.

BATTERY POWER

INDICATOR INSTRUCTIONS

The power pack is fully charged while 5 power indicators
are all staying on.

Содержание Miku Max

Страница 1: ...No 501 Xishan Road Anzhen Xishan District Wuxi Jiangsu Province P R China www sunraev com www mikuev com Email info sunraev com Tel 86 0510 88109820 Operator s Manual Electric Scooter Miku Max Cool t...

Страница 2: ...TION 05 SECTION 06 SECTION 07 SECTION 08 Safety Guidelines definitions General Precautions The Manual Of Smart Chip Charger Performane Fast Assembly Pre ride Checklist Power Pack Charging Maintenance...

Страница 3: ...structions are not followed 01 02 General Precautions 02 Read and follow all instructions in the manual of MIKU products before attempting to operate this scooter Don t discard this Operator s Manual...

Страница 4: ...age Never use this scooter to perform any type of racing stunt riding jumps spin outs donuts or other maneuvers You could kill or injure yourself or others and or cause property damage Check tire pres...

Страница 5: ...harger is designed and made for electric scooter battery charging use Don t make it for other use 10 Any incorrect usage which does not follow this instruction will lose guarantee from seller 11 While...

Страница 6: ...New vehicle with new battery Temperature at 20 C No wind All lights on the scooter off loading weight at 75kg standard pressure Riding habit Road conditions environment and temperature might shorten t...

Страница 7: ...d or others Pre Ride Checklist 06 DESIGNED BY MIKU TEAM DESIGNED BY MIKU TEAM 09 10 Step Fasten mirrors on the fixing holes at steering bar and tighten with a wrench Step Adjust mirrors in proper posi...

Страница 8: ...e lever Squeeze the right lever to engage the front brake The right lever must be squeezed gently at first to avoid locking the front wheel 6 Brake Levers Throttle 5 6 7 Ignition Switch 1 1 2 3 This p...

Страница 9: ...ut throttle by press Cruise control key The cruise performance will be canceled by any braking operation 6 1 2 3 4 5 6 Left Right Switch 7 Right turn signal 9 8 Total odometer Trip odometer 5 5 Riding...

Страница 10: ...sary Before Starting the Engine Motor 1 2 3 1 2 3 1 2 3 1 2 3 Energy level indicator This indicator and readout displays the amount of energy remaining in the power pack similar to the fuel gauge on a...

Страница 11: ...oter DESIGNED BY MIKU TEAM DESIGNED BY MIKU TEAM 17 18 Motor safety Keep the scooter free of dirt and debris especially in the throttle linkage area Never start the engine or motor unless you are prop...

Страница 12: ...process if the charging indicators are on Charging on scooter Connect the charger plug to the charging scoket on the scooter The charging is in process if the red charging indicator on the charger are...

Страница 13: ...k out 1 Storage case MIKUMAX The power indicators show 5 levels of battery power Each indicator show 20 of battery power The power indicators are blinking while the battery is under charging The batte...

Страница 14: ...off the scooter to aviod move unexpectedly OFF Item purpose Rate Daily Daily Weekly Weekly Weekly Weekly Monthly Monthly Monthly Monthly Monthly Brake Tyre Rim Shock absorber Ignition throttle Wire S...

Страница 15: ...required for all warranty work theft recovery and consumer safety The complete VIN also appears on a plate at the bottom of classis frame The VIN print is located at steering pipe of classis frame mot...

Отзывы: