background image

Sunpak® Infrared Heaters 

14 

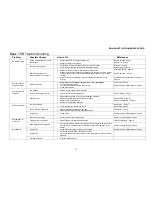
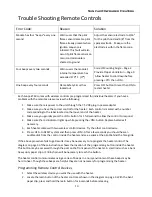
Trouble


Shooting


Remote


Controls


Error


Code:


Reason


Solution


Module


has


four


“beeps”


every


one


second


Warns


user


that


the


pilot


flame


sensor


detects


a


pilot


flame


already


present


when


ignition


sequence


is


initiated.


This


fault


will


also


occur


if


pilot


flame


sensor


on


main


control


module


is


shorted


to


ground


Adjust


the


sensor


electrode


to


3/16”


for


the


pilot


hood


and


3/8”


from


the


spark


electrode.


Make


sure


the


electrode


is


within


the


flame


zone.


Four


beeps


every


two


seconds


Warns


users


the


module’s


internal


temperature


has


exceeded


170

⁰  

F.


(77

)


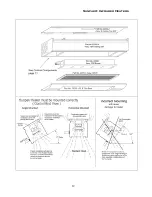
Correct


Mounting


Angle


Page


4


Provide


Proper


Ventilation


Page


9


Allow


heater


to


cool


down


before


pressing


<Off>


then


<ON>


One


beep


every


four


seconds


Flame


Safety


Circuit


has


locked


out


Press


OFF


button


to


reset


then


ON


to


restart


heater


Each


Sunpak


TSR


comes


with


wireless


controls


pre

programmed


for


individual


heaters.


If


you


have


a


problem


with


the


remotes,


please


review


the


following:


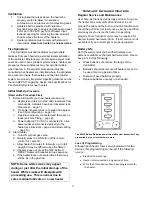
1.


Make


sure


there


is


power


to


the


unit


through


the


7.5


VDC


plug

in


power


adapter.


2.


Make


sure


you


have


the


correct


control


for


the


heater.


Each


control


is


marked


with


a


number


corresponding


to


the


label


located


on


the


louver


end


of


the


heater.


3.


Make


sure


you


genially


press


the


<ON>


button


for


1


full


second


to


allow


the


control


to


respond.


4.


Make


sure


the


red


indicator


lights


up


while


pressing


the


<ON>


button.


Replace


batteries


if


necessary.


5.


Each


heater


comes


with


two


wireless


control


devices.


Try


the


other


control


device.


6.


Press


<OFF>


to


RESET


system


and


then


press


<ON>.


After


a


few


seconds


you


should


hear


an


audible


click


from


the


control


inside


the


heater


and


see


a


spark


at


the


pilot


behind


the


face


grille.


If


the


above


procedure


fails


to


get


results


it


may


be


necessary


to


re

program


the


heater


control.


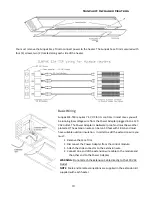
The


diagram


on


page


3


of


these


instructions


shows


the


location


of


the


programming


button


inside


the


heater.


This


button


may


be


accessed


through


the


port


on


the


front


panel


of


the


heater.


A


small


rod


such


as


a


bent


heavy


duty


paper


clip


or


1/8


inch


pin


will


be


necessary


to


reach


the


button.


The


heater


control


communicates


using


a


series


of


beeps.


In


a


noisy


environment


these


beeps


may


be


hard


to


hear.


Though


these


beeps


are


helpful


they


are


not


necessary


for


programming


the


heater.


Programming


Remote


Control


Devices


1.


Select


the


wireless


device


you


want


the


use


with


the


heater.


2.


Locate


the


learn


button


of


the


heater


control


as


shown


in


the


diagram


on


page


3.


With


the


bent


paper


clip,


press


and


hold


the


learn


button


for


6


seconds


before


releasing.


Содержание S34?TSR

Страница 1: ...ler must provide a copy of this manual to the owner Owner Keep this manual in a safe place in order to provide your service technician with the necessary information Warning These instructions are intended for qualified personnel specifically trained and experienced in the installation and repair of this type of equipment and related system components For Assistance Call Toll Free 888 317 5255 Inf...

Страница 2: ...oughly before installing or servicing this equipment Storage of gasoline and other flammable vapors and liquids in the vicinity of this or any other appliance may result in fire or explosion DO NOT store or use gasoline or other flammable vapors and liquids in the vicinity of this or any other appliance Always maintain clearance to combustibles as specified WARNING Not for indoor residential use T...

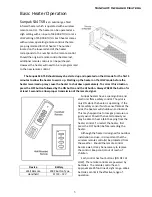
Страница 3: ...followed by the ON button and the HI button Always PRESS the button for at least 1 second to allow proper transmission of the remote signal Device Battery Wall Remote 2032 Button Type Handheld 21 23 12V Sunpak heaters have a spark ignition and electronic flame safety control The pilot is only ON while the heater is operating If the flame safety sensor fails to sense flame at the pilot the heaters ...

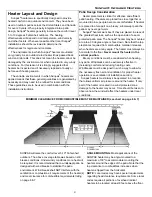
Страница 4: ...heater may be mounted at up to a 30 degree angle or face down Note that the top clearances required from combustible material increases when heaters are at any angle The heater must always be horizontal to the floor Never mount the heater in the vertical position Breezy conditions must be considered when heating any patio Windbreaks can be extremely effective in increasing comfort and reducing hea...

Страница 5: ...Sunpak Infrared Heaters 5 ...

Страница 6: ...Sunpak Infrared Heaters 6 Warning Heater must be level in the lengthwise direction ...

Страница 7: ...e C22 1 Part 1 applies Gas Supply The gas inlet supply pressure and manifold pressure required for each heater are listed below For gas supply line pressures in excess of psig consult with your gas service provider or the factory Gas Inlet Pressure Nat Gas Propane Maximum Pressure psig psig Minimum Pressure 6 W C 11 W C Manifold Pressure 5 W C 10 W C It is critical that the gas piping system be ad...

Страница 8: ...l and state plumbing and heating codes regarding sizing of gas lines 3 All gas pipe connections to the heater s must be sealed with a gas pipe compound resistant to liquefied petroleum gases 4 Installation of a drip leg or sediment trap in the gas supply line going to each heater is required to minimize the possibility of any loose scale or dirt within the gas supply line from entering the heater ...

Страница 9: ...l page 8 and Basic Wiring page 10 2 Start Heater a Turn ON manual gas valve b Genially press the ON button of the remote control for 1 second c Allow heater 5 minutes to full warm up in full daylight it may be difficult to see the flame d If heater locks out press the OFF Button to RESET Heater and repeat start up sequence e If the heater locks out several times there may still be air in the gas l...

Страница 10: ...s not water proof and must be weather protected The extension wire can be run 50 feet with 18 GA and must have suitable outdoor insulation In order to add the extension wire you must 1 Remove the Face Trim 2 Disconnect the Power Adapter from the control module 3 Attach the slide connector to the extension wire 4 Connect one end of the extension wire cable to the module and the other end to the Pow...

Страница 11: ...Sunpak Infrared Heaters 11 ...

Страница 12: ...Sunpak Infrared Heaters 12 ...

Страница 13: ...DC to heater Heater lights but turns off Loose or broken ground wire Secure ground wire to heater body Control System Page 11 Pilot Electrode Adjust pilot electrodes 3 16 from pilot hood and 3 8 apart Swap sensor and spark connections on module Replace TSR Control Module Replace Pilot Electrode Assembly Sunpak Pilot Page 15 Control Components Page 11 Not Enough Heat Low Gas Pressure Verify require...

Страница 14: ...el located on the louver end of the heater 3 Make sure you genially press the ON button for 1 full second to allow the control to respond 4 Make sure the red indicator lights up while pressing the ON button Replace batteries if necessary 5 Each heater comes with two wireless control devices Try the other control device 6 Press OFF to RESET system and then press ON After a few seconds you should he...

Страница 15: ...does not light repeat procedure 4 It is likely that there is still air in the gas line If the heater fails to light or fails to stay lit after several tries it may be necessary to purge the air from the gas line using safe practices Sunpak Pilot The two electrodes near the pilot provide for flame ignition and sensing It is important that these electrodes be position properly Electrodes should be l...

Страница 16: ... charges for forwarding the new heater or replacement part from the nearest distributor and returning the claimed defective heater or part to such distributor c All cost necessary or incidental for handling and administrative charges and for any materials and or permits required for installation of the replacement heater or part LIMITATION ON IMPLIED WARRANTIES Implied warranties including any war...

Отзывы: