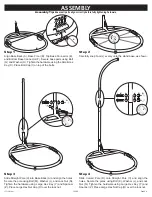

Step 1
Align Base Back (A), Base Front (B), Top Base Connector (E),
and Bottom Base Connector (F). Secure base parts using Bolt
(G) and Washer (H). Tighten the hardware using the Small Hex
Key (X). Place Bolt Cap (I) on top of the bolts.
Slide Straight Pole (C) into Base Back (A) and align the holes.
Secure the pole using Bolt (M), Washer (L), and Lock Nut (N).
Tighten the hardware using Large Hex Key (Y) and Spanner
(Z). Place Large Hex Nut Cap (O) over the lock nut.
Slide Curved Pole (D) onto Straight Pole (C) and align the
holes. Secure the poles using Bolt (K), Washer (L), and Lock
Nut (N). Tighten the hardware using Large Hex Key (Y) and
Spanner (Z). Place Large Hex Nut Cap (O) over the lock nut.
J
Carefully snap Foot (J) evenly onto the stand base, as shown.
Step 2
Step 3
Step 4
A
B
C
D
ASSEMBLY
Page 2 / 4
10/2019
JYF13103-set
Assembly Tip:
Ensure all parts align correctly before fully tightening hardware.
G
F
E
H
I
C
A
M
L
L
N
O
Z
Y
K
L
L
N
O
Z
Y
X


