background image

Features

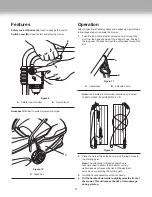
Safety Lock-off Button (A):

 Used to engage the switch

Switch Lever (B):

 Used to start and stop the mower

Grassbox (C):

 Used to collect mowed clippings.

Operation

After conducting all safety checks and necessary preparations, 
follow these steps to operate the mower:

1.

  Push the loop of the electric extension cord through the 

slot from the opposite side of the restraint hook. Position 
the loop over the hook and pull the cable back through the 
slot.


Note:

 Use a waterproof electrical extension cord rated 

14AWG. H05VV-F and H05RN-F in US.

2

.  Place the bulk of the extension cord on the lawn close to 

the starting point.


Note:

 The directional method of operation is 

recommended to obtain the maximum cutting 
performance and reduce the risk of the electrical 
extension cord entering the cutting path.

3.

  Hold the handle assembly with both hands.

4.


Tilt the handle downwards to slightly raise the front of 
the mower. This will reduce the risk of lawn damage  
during start-up.

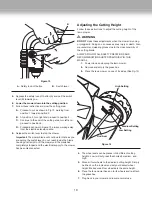
Figure 9

A

B

A. 

Safety lock-off button  

B.

  Switch lever

STAR

T

STOP

C

Figure 10

C. 

Grass box

Figure 11

B

A. 

Cable relief   

B.

  Extension cord

A

4

1

3

Figure 12

2

8

Содержание MJ401ERM

Страница 1: ... the equipment plug extension cord receptacle or extension cord plug in anyway m Contact with moving parts may cause entanglement dismemberment or other serious bodily injury Always keep body parts i e hands feet away from moving parts Ensure all covers and guards are securely in place before use Hot surfaces i e motor may ignite flammables or combustibles and cause a fire or explosion resulting i...

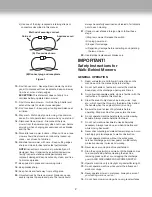
Страница 2: ...ct for damage iv Repair any damage before restarting and operating the lawn mower 22 Use identical replacement blades only IMPORTANT Safety Instructions for Walk Behind Mowers GENERAL OPERATION 1 Read understand and follow all instructions on the machine and in the manual s before starting 2 Do not put hands or feet near or under the machine Keep clear of the discharge opening at all times 3 Only ...

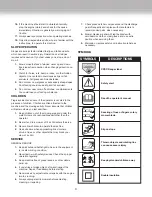
Страница 3: ...ep children out of the mowing area and under the watchful care of a responsible adult other than the operator 2 Be alert and turn mower off if a child enters the area 3 Never allow children to operate the machine 4 Use extra care when approaching blind corners shrubs trees or other objects that may block your view of a child SERVICE GENERAL SERVICE 1 Keep all nuts and bolts tight to be sure the eq...

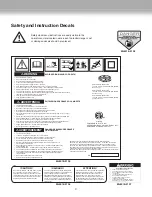
Страница 4: ...mie de collecte bac à herbe et remplacer les pièces usées ou détériorées par des pièces recommandées Risque de mutilation des doigts ou des orteils Garder enfants et autres personnes à distance Replacement manual available by sending model and serial numbers to Snow Joe LLC 86 Executive Avenue Edison NJ 08817 or visit www snowjoe com El manual de reemplazo está disponible al enviar los números de ...

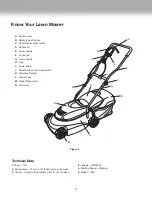
Страница 5: ...e F Knobs x2 G Lower handle H Flap I Power cable J Reset button of over load switch K Grassbox Catcher L Mower deck M Wheel Wheel cover N Top cover 5 Technical Data 1 Power 12A 2 Performance Cut up to 14 36cm wide in one pass 3 Control Adjust cutting height up to 2 4 6 1cm deep 4 Voltage 120V 60Hz 5 Rotating Speed 3500rmp 6 Weight 13kg Figure 2 ...

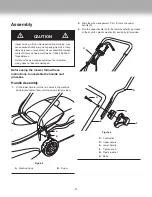
Страница 6: ... E by means of the knob F plastic washer G and bolts H provided m CAUTION m Inspect wiring which if damaged during shipping may cause serious bodily injury during equipment use If any damage is seen or suspected do not assemble Instead contact Snow Joe Customer Service 1 866 766 9563 for assistance Handle with care during assembly so that electrical wiring does not become damaged Figure 3 A Machin...

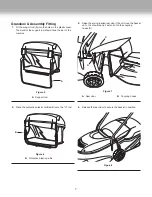
Страница 7: ...hine 2 Place the protective plastic profiles B onto the U rod 3 Raise the spring loaded rear door C and move the basket up to the mower body Fasten it onto the coupling hooks D 4 Release the rear door to secure the basket in position Figure 5 A A Support rod Figure 6 B B Protective plastic profile Figure 7 A Rear door B Coupling hooks C D Figure 8 ...

Страница 8: ...a waterproof electrical extension cord rated 14AWG H05VV F and H05RN F in US 2 Place the bulk of the extension cord on the lawn close to the starting point Note The directional method of operation is recommended to obtain the maximum cutting performance and reduce the risk of the electrical extension cord entering the cutting path 3 Hold the handle assembly with both hands 4 Tilt the handle downwa...

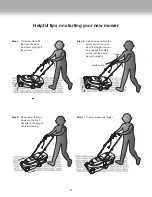
Страница 9: ...htly off the ground Step 3 Slowly lower the lawn mower so the front wheel is on the ground and start mowing Step 2 Press down and hold the safety switch then pull back the trigger You can now release the safety switch Let the mower get up to speed Step 4 To stop release the trigger trigger safety switch 9 ...

Страница 10: ... these instructions to adjust the cutting height of the lawn mower m WARNING DO NOT make these adjustments when the mower is running or plugged in Doing so can cause serious injury or death Also we recommend wearing gloves due to the close proximity of the cutting blade ALWAYS FOLLOW ALL SAFETY PRECATIONS AND RECOMMENDATIONS LISTED PREVIOUSLY IN THIS MANUAL 1 Power down and unplug the lawn mower 2...

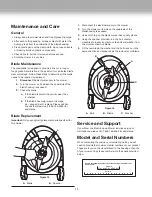
Страница 11: ...766 9563 for assistance Blade Replacement Important Only use original replacement parts specified for this mower 1 Disconnect the electrical supply to the mower 2 Turn the mower on its side so the underside of the bladehousing is exposed 3 Use a cloth to grip the blade or wear heavy duty gloves 4 Using the spanner provided turn the bolt counter clockwise to loosen and remove the bolt and washer fr...

Страница 12: ...is warranty Parts used that are not genuine Snow Joe parts are not covered by this warranty Damages resulting from misuse alteration improper assembly improper adjustment neglect or accident which requires repair is not covered under this warranty Belts augers and tines are not covered under warranty belts augers and tines wear out and can be purchased at www snowjoe com or by calling 1 866 766 95...

Отзывы: