Sundirect Footwarmer220-Pro Скачать руководство пользователя страница 8

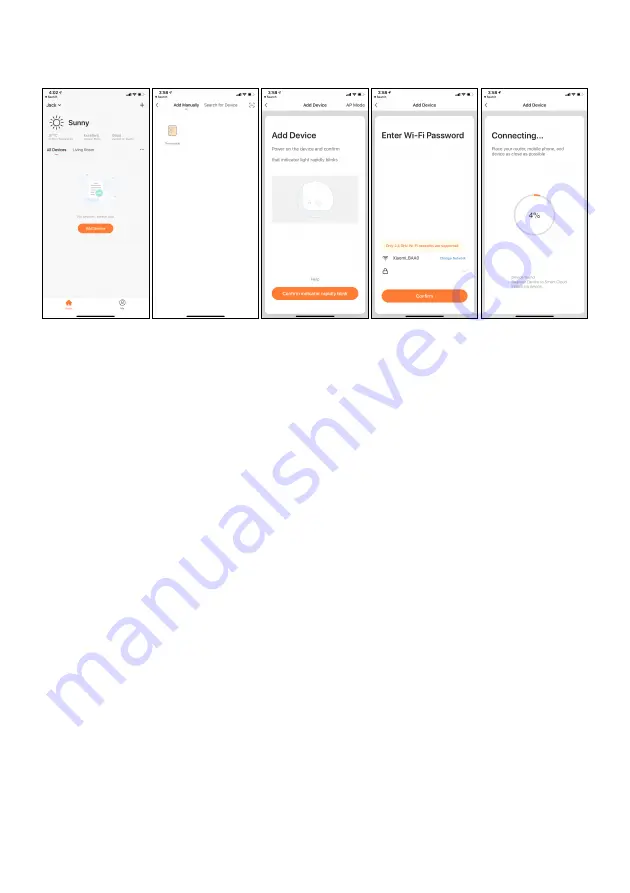
4.4.2 Connect to WIFI: 

Step1: 

Turn on the power of the heater by pressing the


“Power” button. The WIFI signal will start to 

flash rapidly. Open the APP on your smartphone and add your device. Choose “Add Device”, then 
“Add Manually”, and then choose “Thermostat” to add the device. 

Step2:

 Enter the WIFI password of your home network. Please make sure your home WIFI is working 

and keep the heater and smartphone as close as possible to the WIFI router.  

Please notice that this heater is only working with 2.4GHz WIFI networks, it doesn’t support 5GHz 
networks currently. Also, make sure your internet router has enough capacity to add a new device. 

Step3:

 Wait till the connection status shows 100% to finish the settings and the WIFI signal on the 

control box will stop flashing. 

If the heater failed to connect, please power off the heater and power it back on again after a few 
seconds.  Long  press  the  “WIFI”  button  on  the  control  box  until  the  WIFI  sign  on  the  screen  is 
flashing slowly and repeat the connection process. 

4.5 WIFI reset 

If you change to a new router or if you would like to disconnect the heater from your current mobile 
device you can reset the WIFI by following these steps: Turn on the heater and long press the “M” 
button for 5 seconds, then the WIFI signal on the screen will start to flash again. 

4.6 

Activate/deactivate WIFI function 

Long press “-” button for 10 seconds to deactivate the WIFI function of this heater and the WIFI sign 
on the screen will disappear, long press “Timer” button for 10 seconds to activate it on again.  

8

Содержание Footwarmer220-Pro

Страница 1: ...Smart Wifi Infrared Heater Footwarmer220 Pro Installation Operation Instructions Version SDUM FW220 P 2001...

Страница 2: ...2 Language Page EN P3 P9 DE P10 P16...

Страница 3: ...o this product WARNING In order to avoid the heater overheating do not cover it The crossed out wheeled bin symbol indicates that the item should be disposed of separately from household waste The ite...

Страница 4: ...of less than 3 years should be kept away unless continuously supervised Children aged from 3 years and less than 8 years shall only switch on off the appliance provided that it has been placed or inst...

Страница 5: ...ter and never splash water on it Clean the heater with a soft damp cloth For glass models use a soft cloth and glass cleaner Never use a wet cloth and make sure to dry the heater when clean with a dry...

Страница 6: ...3 Mounting This heater is designed to be portable please follow the procedure below to mount the heater onto the feet stand 6 1 3 2...

Страница 7: ...the power cable into the electricity outlet activate the power switch Nr 9 from position 0 to 1 Then press the foot switch until the power signal light on the power switch is on Now the heater is oper...

Страница 8: ...tatus shows 100 to finish the settings and the WIFI signal on the control box will stop flashing If the heater failed to connect please power off the heater and power it back on again after a few seco...

Страница 9: ...ny other occurring costs such as installation cost or any other consequential losses however incurred Please note that tampering with or opening the heater in any way will void your warranty The remov...

Страница 10: ...op ischen Richtlinien WARNUNG Um zu verhindern dass die Heizung berheizt nicht abdecken Das Symbol der durchgestrichenen M lltonne weist darauf hin dass der Artikel getrennt vom Hausm ll entsorgt werd...

Страница 11: ...ahren kennen Kinder d rfen nicht mit dem Ger t spielen Reinigung und Wartung d rfen nicht von Kindern ohne Aufsicht durchgef hrt werden Kinder unter 3 Jahren sollten ferngehalten werden sofern sie nic...

Страница 12: ...en st ndig beaufsichtigt 2 Wartung Ihrer Sundirect Heizung 2 1 Reinigung Vor jeder Reinigung sollte das Ger t abgesteckt werden und abk hlen Tauschen Sie das Ger t niemals in Wasser oder leeren Fl ssi...

Страница 13: ...3 Montage Diese Heizung ist mobil Befolgen Sie die folgenden Anweisungen um die Heizung am Fu st nder zu montieren 13 1 3 2...

Страница 14: ...icher dass der Temperatursensor Nr 8 w hrend des Gebrauchs immer herausgezogen ist 4 3 Steuerung ber Fu schalter und manuelle Tasten Stecken Sie das Netzkabel in die Steckdose und schalten Sie den Net...

Страница 15: ...ch an den WLAN Router Bitte beachten Sie dass dieses Heizger t nur mit 2 4 GHz WLAN Netzwerken funktioniert und derzeit keine 5 GHz Netzwerke unterst tzt Stellen Sie au erdem sicher dass Ihr Internet...

Страница 16: ...wie Installationskosten oder sonstige Folgesch den Bitte beachten Sie dass durch Manipulationen oder ffnen des Paneels die Garantie erlischt Das Entfernen der Seriennummer auf der R ckseite des Heizg...

Страница 17: ......

Страница 18: ......

Страница 19: ...eat output elmin 0 0 kW Single stage heat output and no room temperature control No In Standby mode elSB 0 001 kW two or more manual stages no room temperature control No with mechanic thermostat room...

Страница 20: ...Yiqiao Xiaoshan district 311256 Hangzhou China Sundirect Logistics Europe Hofbauer GmbH Zimmeterweg 4 6020 Innsbruck Austria Europe info sundirect heater com www sundirect heater com 2020 Sundirect Te...

Отзывы: