background image

- 30 -

Step 3:


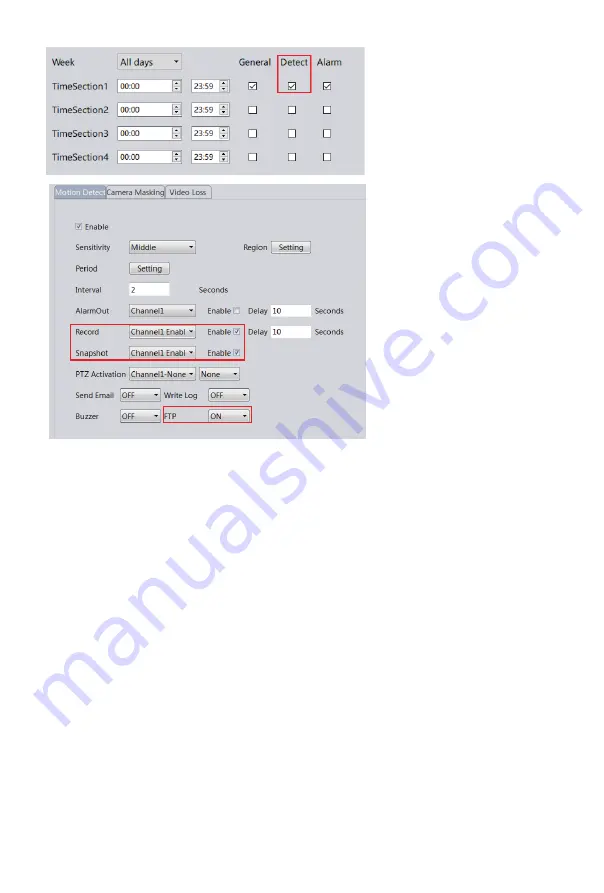
Enable the motion 

detection (in Video Detect or 

Video Motion). 

See Chapter 15. Then enable 

the FTP option. 

Snapshots:


You must also 

enable snapshot in Video 

Detect.

Videos: 

You must also enable 

record in Video Detect and 

have a storage media in order 

to upload the videos to FTP. 

Like many other network 

cameras, you will need to have 

a TF card (install inside the 

camera’s built-in memory slot) 

or a NVR as a forwarding 

transfer station to your FTP. 

This is required because 

without storage media, the 

camera does not have enough 

RAM to hold large video files 

before it establishes a connec-

tion with your FTP. 

18. Reset the Camera

Option 1: 

Reset the camera parameter and configuration(IE/VMS/CMS)

Device Config 

 Default

Option 2: 

Reset the camera parameter and configuration

Press the button inside the camera manually. 
(Option 2 is only available for model 405-ECO WiFi version.)

Option 3: 

Reset camera network setting including ports and IP address

Device Manager 

 Reset Config

Option 4: 

Reset/modify camera network setting after lock-up (time out 

login error)
Download the third party tool called ONVIF Device Manager

Option 5: 

Reset the password  

You can reset the password if you’ve set up and remembered the security 
quesstions for your device in Device Config-Account-Safe Questions.  

Option 6: 

Reset Tool (Factory Reset)

Please go to http://reset.sunba.net to download the reset tool and send 
the safety code to Sunba Support Team ([email protected]) to retrieve a 
reset code. The reset code is exclusive for each individual safety code. 

Содержание 507-D20X

Страница 1: ...oor Surveillance Ideal for House or Project Site 2022 06 Version 10 0 Network PTZ Camera User Guide V10 0 Visit http lite sunbatech com to access the step by step YouTube video tutorials for setting up Sunba IP PTZ camera Lite Series ...

Страница 2: ...tion of the device is thus limited by the following two conditions 1 it is not permitted to cause harmful interference to any authorized radio communications and 2 it must accept any interference it receives WARNING Please test the camera indoor before mounting it outside Stay at least 24 hours to test both daytime and night vision IR LED ...

Страница 3: ... IP 8 Access by 3rd Party Software 9 Remote Access 10 Presets Patrol and Pattern 11 The Full Preset List 12 Camera OSD Menu 13 Camera Configuration 14 Account Management 15 Motion Detection 16 Face Capture 17 FTP Communication 18 Reset the Camera 19 Cable Waterproof Measures 20 Audio Setting 02 03 05 08 12 13 16 17 18 19 21 22 25 28 29 29 29 30 31 32 ...

Страница 4: ...nch test because DC power drops quickly along the transmission A bench test helps you rule out all problems caused by power supply Underpower causes problems such as 1 PTZ issues 2 unstable infrared camera reboots repeatedly and 3 spinning dome Type A With DC12V Aadapter non PoE Type B With PoE Injector Switch IP Camera Router PoE Injector Computer Computer IP Camera Router ...

Страница 5: ...camera rotate when powered up Check the video streaming quality 2 Live View and Picture Quality 3 Pan Tilt and Zoom Check whether the camera performs the pan tilt zoom actions properly 4 Night Vision Shield the camera front lens turn off the lights and draw the curtains to see if the camera is able to automatically turn to infrared night vision mode PoE Standard Note 802 3at is also known as PoE 8...

Страница 6: ...elect Cloud Login push notification requires a cloud account to store picture alert This section will provide the user with information on how to setup the PTZ camera using smartphone for the first time NOTE iSunba iSunba Pro XMEye These APPs are suitable for Sunba Lite Series cameras APP Download iOS Android XMEye ...

Страница 7: ...all Sunba devices in LAN Use Search if your camera and smartphone are connected to the same WiFi Remote or with 4G manually scan or enter the camera QR code to add device 4 3 Press the camera to watch live view Modify other settings such as password for the camera 5 ...

Страница 8: ...sing their computer Control pan tilt and zoom watch live view and set delete call presets from this page Press to speak device must support speaker Check playback PTZ control Set call preset cruise Switch between HD SD display Turn on off microphone Record a video and save the clip to your smartphone Take a snapshot and save the image to your smapphone ...

Страница 9: ...re no one can have unauthorized access to your surveillance software This is not the credential for individual IP camera VMS for PC admin admin VMS for Mac admin blank Try the following if no device shows up A Temporarily disable the firewall B Connect the camera directly to your parental router C Connect the camera directly to your PC Mac for testing D Contact support sunba net ...

Страница 10: ... RTSP 554 Those values must also be unique to each other Right click and select Main Stream to start live view click to open PTZ panel Step 3 Live View Please go to the Live View page Now the camera status should show Connected Connected status indicates the camera is online ...

Страница 11: ... camera is powered on and completes the self test you can directly search and add the camera via XMEye APP on smartphone Attention Make sure the distance among the camera phone and the router within 2m Fill in the correct WiFi password 3 Click the icon to add device 1 Select WiFi Config 2 Attention Make sure your phone is in 2 4GHz WiFi network and 5GHz or other network is not supported video tuto...

Страница 12: ... 09 Enter password 6 Click and start live view 7 Device searching Click the green IPC icon 5 Click Yes 4 ...

Страница 13: ...bove steps to search again 1 Please manually press the button to default the camera as shown below 2 You can directly connect the camera with a PC or laptop and default the camera via VMS IE browser 10 Remove the 4 screws to take off the camera back cover Press and hold the black button for about 8 10 seconds ...

Страница 14: ...ngs Click Search to select a WiFi with stable and strong signal Fill in the correct WiFi password Click Apply and OK to save the settings Attention After checking Enable in the first step you must click Apply to save the settings otherwise the WiFi signal will not be searched After adding the camera please go to Device Config Network WiFi In Internet Explorer please go to Device Config Netservice ...

Страница 15: ... Router POE out POE 802 3at 100 250ft POE ELV Extra Low Voltage System Wiring method Injector Swith 12 5 Mounting Outdoor Wiring Type A Power of Ethernet Solution 100V 250V Data in Router Non PoE ELE Force Electricity Wiring method 18 wire gauge DC 12V Power Adapter Wiring Type B Non PoE DC12V Solution ...

Страница 16: ...isk Relevant 1 Using 24VAC or higher voltage adapter 16V 24V will immediately dam age the camera and void the warranty 2 The camera will be exposed to high risks of motherboard damage and void the warranty if you use passive PoE injector splitter 13 6 Web Access Step 1 Check Device IP from VMS or Device Manager tool Users can download VMS or Device Manager from the CD ROM Both software will displa...

Страница 17: ...b browser Internet Explorer Step 3 Install the web plugin Download and install the web plugin by clicking the download tab or by installing the WebPlugin from the CD ROM Please make sure the browser is CLOSED during the installation If you are unable to download the plugin or if your software disc is damaged during transit please visit plugin sunba net to download the plugin Restart the browser co...

Страница 18: ...orer Mode in Edge Browser on Windows 10 1 Open Edge Browser and click then click Settings Never Allow Restart 2 Select Default browser and then select according to the following figure 3 Search for Internet Explorer in Program Files 15 ...

Страница 19: ...lect the DHCP option Step 3 Change the camera IP and click Apply to save the changes Power cycle the unit to activate the new setting 8 Access by 3rd Party Software This chapter introduces how to add the camera to a selected few popular 3rd party software 8899 Fill in the boxes with corresponding network info of your camera By default the ONVIF port is 8899 and RTSP port is 554 Make sure the encod...

Страница 20: ...F by diffrent surveillance manufacturers only ptz video and recording may work depending on specific ONVIF version 9 Remote Access Tips Go to Sunba website FAQ page and type keyword mobile to gain the setup page for popular smartphone app such as XMEye TinyCam Pro IP Cam Viewer Type 1 Sunba Cloud P2P Warning P2P function may not work if you modify the default media port 34567 of the camera or the ...

Страница 21: ...uter for detailed steps of port forward in order to remotely access using a WAN IP Other apps such as Tiny Cam or IP Cam Viewer may require you to forward ONVIF and RTSP port as well Disclaimer Though it is a popular method Sunba does not recommend setting up port forwarding as it opens all ports to the public network and increases chances of information leak Type 2 Port Forwarding Please refer to...

Страница 22: ...the router at your home where the camera is installed Please remember the username and password of the VPN Then at any remote location you can always setup a new network using VPN to remotely access your camera at home PTZ Preset Position Sunba dome cameras can set preset PTZ positions for which cameras can memorize and travel directly by calling the preset Preset positions are repre sented by num...

Страница 23: ...l need to save corre sponding presets you want to tour across For example preset 1 10 can be called by using special preset 88 see The Full Preset List Pattern Different from patrol which enables the camera to travel between different points patterns are continuous sets of movement that Sunba cameras can perform in a record and replay fashion Note Patterns will not be activated unless Motion Detec...

Страница 24: ...English OSD display Not available on models 405 ECO WiFi and 507 D20X 4K 360 continuous scan For model 507 D20X 4K only 355 Manually turn IR on half side on Manually turn IR off Set the IR mode to auto default Manually turn IR on all side on Set the Park Action to None Set the Park Action to360 continuous scann For model 507 D20X 4K only 355 97 182 CALL Set the Park Action to frame scan auto scan ...

Страница 25: ...t Set the Frame Scan Speed to 5 12 Camera OSD Menu Please call preset 95 to open the OSD menu Use the up and down key to browse and move the cursor left key to go back to the previous menu right key to select and confirm How to activate and control the OSD The On Screen Display menu is not available on models 405 ECO WiFi and 507 D20X 4K Preset 95 Call to activate the OSD Menu Move the cursor up v...

Страница 26: ...CURRENT LEVEL is equivalent to darker environment AUTO MODE is selected by default B MANUAL Turn on and off the IR LED manually This can be accomplished using special presets 100 103 as well Please check specialpreset sunba net IR ON SENS The adjustable darkness threshold to turn on the IR LED default is 210 IR OFF SENS The adjustable darkness threshold to turn off the IR LED default is 185 How th...

Страница 27: ...l commands are sent from users This option has the same function as 84 Add PRESET To set up a pattern you must use direction zoom key to add actions and Iris key to end the setting Each pattern scan can memorize no more than 31 actions Note If you open the video motion video blind function the pattern scan will be disabled The waiting time or idle time before the camera executes its PARK ACTION se...

Страница 28: ...e of the camera You need to download the upgrade the file bin format first Image Storage Take timed snapshot and store it to Email FTP or TF Card if supported FRAME SPEED It controls the speed when the dome does the 360 scan or frame scan For model 507 D20X 4K only 355 DWELL TIME It represents the residence time the dome stops at each preset during the patrol auto scan This function enables the au...

Страница 29: ...n alarm when a video loss happens Alarm Input External connection linkage alarms such as infrared sensor etc not built in by camera need additional support in qualified NVR Alarm Output Alarm output can be an external lights siren etc not built in by camera need additional support in qualified NVR Abnormal Set an alarm for special events such as storage device access failure or IP conflict with ot...

Страница 30: ...me time title and other display setting Camera Parameter Configure camera parameter such as exposure level wide dynamic range shutter speed image direction flip mirror etc HDD Manage Manage the storage device TF card Account Add delete and change account info username password and their authority level AutoMaintain Set the automatic reboot plan and empty the cache of the camera Default Set the cur...

Страница 31: ...ption when adding a user if you wish to have the same user account accessed by multiple people CMS IE Device Config Account VMS Device Config Tool Manager User Manager To protect your account safety please always remember to modify your default password Modify your password here Modify your password here Warning Camera accounts are NOT the same as VMS software account When you open VMS a prompt wi...

Страница 32: ... Detection 16 Face Capture 17 FTP Communication Enable motion detect Enable human detection Modify the detection region Edit the detection schedule Phone Report Enable this option register an account in the XMEye app of your smartphone or via xmeye net and activate push notification to receive text alerts Human Detection Human shape detection will filter out other motion objects and have the camer...

Страница 33: ...meter and configuration IE VMS CMS Device Config Default Option 2 Reset the camera parameter and configuration Press the button inside the camera manually Option 2 is only available for model 405 ECO WiFi version Option 3 Reset camera network setting including ports and IP address Device Manager Reset Config Option 4 Reset modify camera network setting after lock up time out login error Download t...

Страница 34: ...tain models have waterproof ethernet kit shipped together with the camera To apply the waterproof kit you have to cut the crystal head thread the ethernet cable through the waterproof kit and then finally use crimper tool to add the crystal head back to the cable 2 Using electricial waterproof tape is one of the most popular ways of protecting connectors from water exposure 3 Using waterproof conn...

Страница 35: ...audio Enable it Note The camera has built in microphone with sound pick up capacity There is no need to install additional microphone on this model click the headset icon to turn on the audio Please remove the plastic film before installation to get the audio If the plastic film is not removed there may be no sound Built in mic Remove the plastic film ...

Страница 36: ... request Please put your RMA sheet inside the box for reference to expedite the refund process All products must be returned within 14 days from the RMA issuing date Complete Package Rule Please return the product with its original packaging including manuals brackets and toolkit that come with the unit for a full refund According to Amazon s restocking fee policy returns with incomplete materiall...

Отзывы: