background image

3-2

Guía de instalación del sistema de distribución de alimentación eléctrica • Noviembre del 2002

1. Retire la cubierta de la abrazadera de la regleta de alimentación, la propia 

abrazadera de la regleta de alimentación y el panel lateral del bastidor.

Содержание 816-7766-10

Страница 1: ...end comments about this document to docfeedback sun com Power Distribution System Installation Guide Guide d installation du syst me de distribution d alimentation Gu a de instalaci n del sistema de d...

Страница 2: ...registeredtrademarksof SunMicrosystems Inc intheU S andinother countries All SPARCtrademarksareusedunder licenseandaretrademarksor registeredtrademarksof SPARCInternational Inc intheU S andinother cou...

Страница 3: ...llation des harnais de c bles 2 1 Installation des barrettes d alimentation 2 6 Installation des s quenceurs d alimentation 2 7 Etiquettes pour c bles d alimentation 2 8 3 Instalaci n de un sistema de...

Страница 4: ...iv Power Distribution System Installation Guide November 2002...

Страница 5: ...may label the system power cords with the labels provided Installing Cable Harnesses Each cable harness consists of three cables bundled together on a carrier plate Viewed from the back of the rack t...

Страница 6: ...1 2 Power Distribution System Installation Guide November 2002 1 Remove the power strip bracket cover and the power strip bracket and the rack side panel...

Страница 7: ...rds the front of the rack As you slide the carrier plate in the front end is guided by a vertical channel on the front cover plate As the carrier is close to being fully inserted a small tab on its bo...

Страница 8: ...ight side of the input panel Position each cluster under the power input panel with the open side up The cables are positioned on the left side of the power input panel The connectors engage with the...

Страница 9: ...tem 1 5 5 Attach the input power panel to the rack with two 8 mm screws split washers and flat washers FIGURE 1 3 Attaching the Power Input Panel to the Rack 6 Reinstall the power strip mounting brack...

Страница 10: ...of the connector to ensure proper alignment The master large key on the power strip is on the power strip bracket side of the connector Alternately you may attach the connector after the power strip i...

Страница 11: ...rack and connect them to the rear panel of the power sequencer Cable A0 or B0 attaches to the bottom connector and A1 or B1 to the middle connector The top connector has five keys to ensure proper al...

Страница 12: ...ncer 5 Reinstall the rack side panel 6 Apply the provided labels A and B to their respective sequencers Power Cable Labels 1 Note the power strip outlet number for each system connected to the power s...

Страница 13: ...le d sirez apposer les tiquettes sur les cordons d alimentation Installation des harnais de c bles Chaque harnais de c bles comporte trois c bles regroup s sur une plaque support A l arri re du rack l...

Страница 14: ...ion du syst me de distribution d alimentation novembre 2002 1 Retirez le couvercle du support de fixation de la barette d alimentation puis le support de fixation de la barette d alimentation et le pa...

Страница 15: ...u rack Tandis que vous glissez la plaque support l int rieur de la fente la partie avant est dirig e par un canal vertical sur la plaque du couvercle avant Lorsque le support est quasiment introduit u...

Страница 16: ...t du panneau d entr e d alimentation Placez chaque groupe sous le panneau d entr e d alimentation le c t ouvert vers le haut les c bles sont plac s sur la partie gauche du panneau d entr e d alimentat...

Страница 17: ...tr e d alimentation au rack avec deux vis de 8 mm deux rondelles grower et deux rondelles plates FIGURE 2 3 Branchement du panneau d entr e d alimentation au rack 6 R installez le support de fixation...

Страница 18: ...iche m le du connecteur pour assurer un alignement correct La broche principale la plus grande de la barrette d alimentation se trouve sur la partie du support de fixation de la barette d alimentation...

Страница 19: ...a pas d importance FIGURE 2 5 Installation d un s quenceur d alimentation 1 Tirez les trois c bles travers la fente du s quenceur d alimentation sur la partie avant du rack et branchez les au panneau...

Страница 20: ...eux vis l avant 4 R p tez ces op rations pour le second s quenceur d alimentation 5 R installez le panneau lat ral du rack 6 Collez les tiquettes A et B au bloc s quenceur correspondant Etiquettes pou...

Страница 21: ...er colocar las etiquetas proporcionadas en los cables de alimentaci n del sistema Instalaci n de los arneses de cables Cada arn s de cables est formado por tres cables en haz situados en una placa por...

Страница 22: ...del sistema de distribuci n de alimentaci n el ctrica Noviembre del 2002 1 Retire la cubierta de la abrazadera de la regleta de alimentaci n la propia abrazadera de la regleta de alimentaci n y el pan...

Страница 23: ...placa portadora hacia dentro el extremo frontal de sta recorre un canal vertical hasta alcanzar la placa de la cubierta frontal Cuando la placa portadora est apunto de introducirse por completo una p...

Страница 24: ...ado derecho del panel de entrada Coloque cada bater a debajo del panel de entrada de alimentaci n el ctrica con la abertura hacia arriba Los cables quedan colocados en el lado izquierdo del panel de e...

Страница 25: ...entrada de alimentaci n el ctrica al bastidor mediante dos tornillos de 8 mm arandelas hendidas y arandelas planas FIGURA 3 3 Conexi n del panel de entrada de alimentaci n el ctrica con el bastidor 6...

Страница 26: ...ta de alimentaci n B Existen cinco muescas en el lado del enchufe hembra del conector que se alinean con los cinco resaltes del lado del enchufe macho del conector para garantizar que la alineaci n se...

Страница 27: ...tornillos de la parte superior de la abrazadera de montaje de la regleta de alimentaci n 5 Vuelva a realizar los pasos desde el Paso 2 hasta el Paso 4 con la regleta de alimentaci n A 6 Coloque las et...

Страница 28: ...ador de alimentaci n en la ranura correspondiente de las situadas en el lado derecho del bastidor cuando se observa desde la parte frontal 3 Cuando el secuenciador de alimentaci n est colocado correct...

Страница 29: ...4 1 4 Sun Rack 3 4 1 4 6 4 7 3 1 B A B...

Страница 30: ...4 2 2002 11 1...

Страница 31: ...4 4 3 2 4 1 3 A 2...

Страница 32: ...4 4 2002 11 4 2 4 2 B 2 1 A B 2...

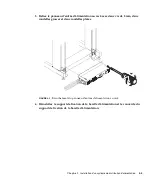
Страница 33: ...4 4 5 5 2 8 mm 4 3 6...

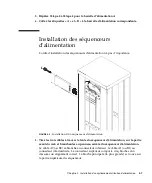
Страница 34: ...4 6 2002 11 B A B 4 4 1 2 B B 5 3 4 5 A 2 4 6 A B...

Страница 35: ...4 4 7 4 5 1 3 A0 B0 A1 B1 5 2 3 2 4 2...

Страница 36: ...4 8 2002 11 5 6 A B 1 2...

Страница 37: ...5 1 5 Sun Rack 5 1 5 6 5 7 B A B...

Страница 38: ...5 2 2002 11 1...

Страница 39: ...5 5 3 2 5 1 3 A 2...

Страница 40: ...5 4 2002 11 4 5 2 B A B...

Страница 41: ...5 5 5 5 8mm 5 3 6...

Страница 42: ...5 6 2002 11 B A 5 4 1 2 B B 5 V 5 3 4 5 2 4 A 6 A B...

Страница 43: ...5 5 7 5 5 1 A0 B0 A1 B1 5 2 3 4 5 6 A B...

Страница 44: ...5 8 2002 11 1 2...

Страница 45: ...6 1 6 Sun 6 1 6 6 6 7 B A B...

Страница 46: ...6 2 2002 11 1...

Страница 47: ...6 6 3 2 6 1 3 A 2...

Страница 48: ...6 4 2002 11 4 6 2 B A B...

Страница 49: ...6 6 5 5 8 6 3 6...

Страница 50: ...6 6 2002 11 B A 6 4 1 2 B B 3 4 5 A 2 4 6 A B...

Страница 51: ...6 6 7 6 5 1 A0 B0 A1 B1 2 3 4 5 6 A B...

Страница 52: ...6 8 2002 11 1 2...

Страница 53: ...7 1 7 Sun 7 1 7 6 7 7 B A B...

Страница 54: ...7 2 2002 11 1...

Страница 55: ...7 7 3 2 7 1 3 2 A...

Страница 56: ...7 4 2002 11 4 7 2 B A B...

Страница 57: ...7 7 5 5 8 7 3 6...

Страница 58: ...7 6 2002 11 B A 7 4 1 2 B B 3 4 5 2 4 A 6 A B...

Страница 59: ...7 7 7 7 5 1 A0 B0 A1 B1 2 3 4 5 6 A B...

Страница 60: ...7 8 2002 11 1 2...

Страница 61: ...Etats Uniset dansd autrespays et exclusivement souslicencepar X OpenCompany Ltd Sun SunMicrosystems lelogoSun docs sun cometSolarissont desmarquescommercialesoudesmarquesd pos esdeSunMicrosystems Inc...

Страница 62: ...UniversidaddeCalifornia UNIXesuna marcaregistradaenlosEE UU yotrospa ses conlicenciaexclusivadeX OpenCompany Ltd Sun SunMicrosystems el logotipodeSun docs sun comySolarissonmarcascomercialesomarcasreg...

Страница 63: ...SPARC SPARCInternational Inc SPARC SunMicrosystems OPENLOOK OpenBoot JLE ATOK ATOK8 ATOK8 ATOKServer ATOK12 ATOKServer ATOK12 OPENLOOK SunGraphical UserInterface SunMicrosystems SunMicrosystems Xerox...

Страница 64: ...n com patents Sun Sun Sun Berkeley BSD University of California UNIX X Open Company Ltd Sun Sun Microsystems Sun docs sun com Solaris Sun Microsystems Inc SPARC SPARC International Inc SPARC Sun Micro...

Страница 65: ...patents Sun Sun Berkeley BSD Sun University of California UNIX X Open Company Ltd Sun Sun Microsystems Sun docs sun com Solaris Sun Microsystems Inc SPARC SPARC International Inc SPARC Sun Microsyste...

Страница 66: ...ttp www sun com patents Sun Sun Berkeley BSD UNIX X Open Company Ltd Sun Sun Microsystems Sun docs sun com Solaris Sun Microsystems Inc SPARC SPARC International Inc SPARC Sun Microsystems Inc OPEN LO...

Отзывы: