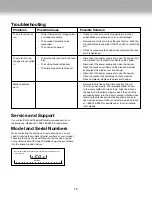
Sun joe Chipper Joe CJ601E Скачать руководство пользователя страница 9

Maintenance

m


WARNING!

 Always turn off the garden shredder and 

unplug the power cord from the outlet before maintaining  
the shredder.

m


WARNING!

 Always wear gloves when cleaning.

1. 

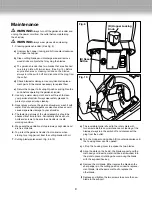
Cleaning garden shredder: (See Fig. 9)

  a) 

Unscrew the hopper locking knob (D) counter clockwise 
and open the hopper.

  b) 

Clean cutting blades and discharge area and remove 
wood sticks or objects that may clog the blades.

  c) 

The garden shredder has two blades that are attached 
to a rotary plate with two screws, (See Fig. 10). Before 
any maintenance or cleaning is done on the blades, 
always turn the switch off and disconnect the plug from 
the outlet.

  d) 

Check blades for damage. Use only identical replace-
ment parts if it becomes necessary to replace them.

  e) 

Return the hopper to its upright position and tighten the 
knob before operating the garden shredder.

2. 

Use only a warm damp cloth and a soft brush to clean 
your garden shredder. Always wear safety glasses to 
protect your eyes during cleaning.

3. 

Never spray water on the garden shredder or wash it with 
water. Do not use detergents or solvents as these could 
cause irreparable damage to your shredder.

4. 

The fastening screws of the stand assembly should be 
checked from time to time. Periodically check all nuts, 
bolts and screws to be sure the shredder is in safe  
working condition.

5. 

Make sure the ventilation slots are always kept clean and 
are free of debris.

6. 

To protect the garden shredder from corrosion when 
storing for a long period, treat the cutting blade with oil.

7. 

Cutting blade replacement. (Fig. 9 & 10)


  a) 

The reversible blade is fixed to the rotary plate with 
two screws. Before any maintenance or cleaning of the 
blades, always turn the switch off and disconnect the 
plug from the outlet.

  b) 

Turn the Hopper Locking Knob (D) counterclockwise until 
the housing cover can be opened.

  c) 

Lift up the housing cover to expose the two blades.

  d) 

Align the slots on the board, the blade support and the 
main body and insert a metal rod like a screwdriver into 
the slots to prevent rotating when removing the blade 
with the supplied hex key.

  e) 

Remove the old blade. Either reverse the blade so the 
sharp edge is in the cutting position or insert a replace-
ment blade. Use the same method to replace the  
other blade.

  f) 

Replace and tighten the two screws to secure the new 
blade to the support.

OFF

ON

REMOVE
TO LOCK

CI

RC

UIT BREAKE

R

PR

ESS TO RES

ET

Fig. 9

(D) Hopper Locking 

Knob

(B) Reset  

Button

Fig. 10

9

Содержание Chipper Joe CJ601E

Страница 1: ...the greatest possible safety EXTENSION CORD Make sure your extension cord is in good condition Use only extension cords having an electrical rating not less than the rating of the product An undersiz...

Страница 2: ...unded three wire extension cord and re ceptacle that are made of rubber and intended for outdoor use The machine is designed to operate on 120 Volt AC household current The chipper power cord has a gr...

Страница 3: ...should be carefully checked to determine that it will operate properly and perform its intended function Check for alignment of moving parts binding of moving parts breakage of parts mounting and any...

Страница 4: ...ome to a complete stop Disconnect from power supply and take the following steps Inspect for damage Check for and tighten any loose parts m WARNING Never reach into the hopper until the garden shredde...

Страница 5: ...mble and operate Do not use in wet weather conditions Wear eye protection dust mask protection and ear protection Double Insulation Wear protective gloves when using the machine and handling debris We...

Страница 6: ...tor 4 Stand Assembly 5 Axle 6 Hopper 7 Main Body 8 Power On Off Trigger Switch 9 Paddle 10 Paddle Holder 11 Wheels two Rated voltage 120V AC 60Hz 14A No Load Speed 4 300 RPM Max Cutting Diameter 1 IN...

Страница 7: ...t to the axle with the supplied wrench to secure Fig 2 and Fig 3 4 Press the wheel covers into the wheels to cover the ends of the axles You may use a hammer to seat them securely over the axles There...

Страница 8: ...ing ensure that the feed inlet is empty m WARNING Always wear ear and eye protection and wear gloves during operation m CAUTION Longer material standing out from the shredder could lash out when being...

Страница 9: ...ur shredder 4 The fastening screws of the stand assembly should be checked from time to time Periodically check all nuts bolts and screws to be sure the shredder is in safe working condition 5 Make su...

Страница 10: ...ned Disconnect the power supply and open the hopper Pull the material from the feed inlet Replace the hopper Disconnect the power supply and open the hopper Open the blade cover Remove the blocked mat...

Страница 11: ...NOTES 11...

Страница 12: ...warranty Parts used that are not genuine Snow Joe parts are not covered by this warranty Damages resulting from misuse alteration improper assembly improper adjustment neglect or accident which requi...

Отзывы: