

will draw. An undersized extension cord will cause a drop
in line voltage resulting in loss of power and overheating.
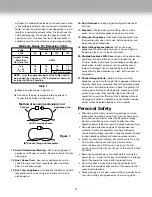
Table 1 shows the correct size to use depending on cord
length and nameplate ampere rating. If in doubt, use the
next heavier gauge. The smaller the gauge number, the
heavier the cord. To reduce the risk of disconnection of
appliance cord from the extension cord during operating:
i)
Make a knot as shown in Figure 1 or
ii)
Use one of the plug-receptacle retaining straps or
connectors described in this manual.
13. Avoid Unintentional Starting –
Don’t carry plugged-in
appliance with finger on switch. Be sure switch is off when
plugging in.
14. Don’t Abuse Cord –
Never carry appliance by cord or
yank it to disconnect from receptacle. Keep cord from
heat, oil, and sharp edges.
15. Don’t Force Appliance –
It will do the job better and with
less likelihood of a risk of injury at the rate for which it
was designed.
16. Don’t Overreach –
Keep proper footing and balance at
all times.
17. Stay Alert –
Watch what you are doing. Use common
sense. Do not operate appliance when you are tired.
18. Disconnect Appliance –
Disconnect the appliance from
the power supply when not in use, before servicing, and
when changing accessories.
19. Store Idle Appliances Indoors –
When not in use,
appliances should be stored indoors in dry, and high or
locked-up place – out of reach of children.
20. Maintain Appliance With Care –
Keep cutting edge sharp
and clean for best performance and to reduce the risk
of injury. Follow instructions for lubricating and changing
accessories. Inspect extension cords periodically and
replace if damaged, have it repaired by an authorized
service facility. Keep handles dry, clean, and free from oil
and grease.
21. Check Damaged Parts –
Before further use of the
appliance, a guard or other part that is damaged should be
carefully checked to determine that it will operate properly
and perform its intended function. Check for alignment of
moving parts, binding of moving parts, breakage of parts,
mounting, and any other condition that may affect its
operation. A guard or other part that is damaged should
be properly repaired or replaced by an authorized service
center unless indicated elsewhere in this manual.
Personal Safety
•
Stay alert, watch what you are doing and use common
sense when operating a power tool. Do not use a power
tool while you are tried or under the influence of drugs,
alcohol or medication. A moment of inattention while
operating power tools may result in serious personal injury.
•
Use personal protective equipment. Always wear eye
protection. Protective equipment such as dust mask,
non-skid safety shoes, hard hat, or hearing protection used
for appropriate conditions will reduce personal injuries.
•
Prevent unintentional starting. Ensure the switch is in the
OFF-position before connecting to power source
and/or battery pack. Picking up or carrying the tool:
carrying power tools with your finger on the switch invites
accidents.
•
Remove any adjusting key or wrench before turning the
power tool on. A wrench or a key left attached to a rotating
part of the power tool may result in personal injury.
•
Do not overreach. Keep proper footing and balance at
all times. This enables better control of the power tool in
unexpected situations.
•
Dress properly. Do not wear loose clothing or jewelry, keep
your hair clothing and gloves away from moving parts,
Table 1
Minimum Gauge For Extension Cords
25
18
18
16
50
16
16
16
100
16
14
150
14
12
Volts
120V
0 – 6
6 – 10
10 – 12
Total length of cord in feet
AWG
NOTE
– Only the applicable parts of the Table need to
be included. For instance, a 120-volt product need not
include the 240-volt heading.
Not Recommended
Ampere Rating
More than
Not more than
(B) Connect plug and receptacle
Figure 1
Cord set
Appliance cord
(A) Tie cord as shown
Method of securing extension cord
3
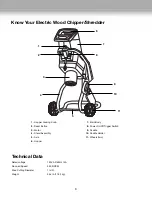
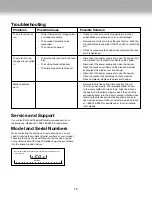
Содержание Chipper Joe CJ601E
Страница 11: ...NOTES 11...