background image

15 


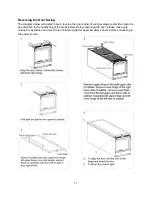
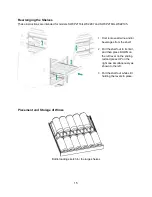
Rearranging the Shelves 

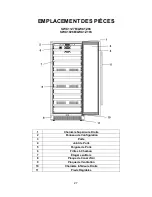
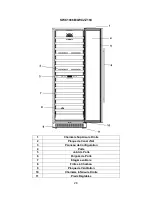
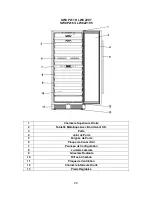
These instructions are intended for models SWCP2116/LWC2Z97 and SWCP2163/LWC2Z195. 


1. 

First remove all wine and/or 
beverages from the shelf.  


2. 

Pull the shelf out to its limit, 
and then press DOWN on 
the left lever on the sliding 
rail and press UP on the 
right one simultaneously as 
shown to the left. 


3. 

Pull the shelf out while still 
holding the levers in place


Placement and Storage of Wines 


                                               Bottle loading sketch for the large shelves 


Содержание LWC1Z193

Страница 1: ...ND OPERATING INSTRUCTIONS IN THIS MANUAL AVANT L UTILISATION VEUILLEZ LIRE ET SUIVRE TOUTES LES R GLES DE S CURIT ET LES INSTRUCTIONS D UTILISATION DE CE MANUEL Write Model and Serial Numbers here Mod...

Страница 2: ...Appliance 9 Installing your Appliance 9 Installing the Door Handle 10 Reversing the Door Swing 11 Built in Cabinet Instructions 12 13 Electrical Connection 14 Extension Cord 14 Rearranging the Shelve...

Страница 3: ...he words DANGER WARNING or CAUTION DANGER means that failure to heed this safety statement may result in severe personal injury or death WARNING means that failure to heed this safety statement may re...

Страница 4: ...ing should be referred to a qualified technician This appliance is CFC and HFC free and contains small quantities of Isobutane R600a which is environmentally friendly but flammable It does not damage...

Страница 5: ...nded in accordance with the National Electrical Code and local codes and ordinances is required Do not kink or pinch the power supply cord of appliance The fuse or circuit breaker size should be 15 am...

Страница 6: ...S SWC1127B LWC1Z96 SWC1926B LWC1Z193 1 Right Upper Hinge 2 Control Panel 3 Door 4 Door Seal 5 Door Handle 6 Charcoal Filters 7 Wooden Shelf 8 Air Channel Plate 9 Vent Kick Plate 10 Right Lower Hinge 1...

Страница 7: ...7 SWC1966B LWC2Z194 1 Right Upper Hinge 2 Air Channel Plate 3 Control Panel 4 Door 5 Door Seal 6 Door Handle 7 Wooden Shelf 8 Charcoal Filters 9 Vent Kick Plate 10 Right Lower Hinge 11 Adjustable Feet...

Страница 8: ...5 1 Right Upper Hinge 2 Wire Shelf with S S Front Edge 3 Door 4 Door Seal 5 Door Handle 6 Air Channel Plate 7 Control Panel 8 Slide Light 9 Rolling Slideway 10 Charcoal Filters 11 Vent Kick Plate 12 R...

Страница 9: ...Installing your Appliance This appliance is designed for freestanding or built in fully recessed installation Place your appliance on a floor that is strong enough to support it when it is fully load...

Страница 10: ...1 Pull the door gasket 1 away from the door where the handle is to be installed as shown in the first illustration below The gasket is easily displaced by hand no tools are necessary 2 Align the handl...

Страница 11: ...erse the door swing of your beverage cooler Be careful to pay attention to the numbering of the steps below Before reversing the door please make sure unplug the appliance and must be let it stand upr...

Страница 12: ...tion If you plan to use this unit in a built in application please follow the requirements shown below Be sure that airflow under the appliance is not blocked SWC1127B LWC1Z96 and SWCP2116 LWC2Z97 Cab...

Страница 13: ...13 SWC1926B LWC1Z193 SWC1966B LWC2Z194 and SWCP2163 LWC2Z195 Cabinet Opening Dimensions IN min CM min Width 23 7 8 60 5 cm Depth 28 71 2 cm Height 70 3 4 180 cm...

Страница 14: ...ich has a voltage rating that matches the rating label on the appliance This provides the best performance and also prevents overloading house wiring circuits that could be a fire hazard from overheat...

Страница 15: ...ine and or beverages from the shelf 2 Pull the shelf out to its limit and then press DOWN on the left lever on the sliding rail and press UP on the right one simultaneously as shown to the left 3 Pull...

Страница 16: ...eaux bottles in total SWCP2163 LWC2Z195 was designed to store a maximum of 163 Bordeaux bottles in total NOTE Bottle sizes even standard Bordeaux style may vary in exact sizing and details between dif...

Страница 17: ...atures for Chilling Wine Press and hold for two seconds on the control panel to turn the cooler on or off When the cooler is turned off the appliance will stop working and totally shut down Light Sett...

Страница 18: ...y to stop the alarm from sounding When the temperature inside the appliance is above 77 F 25 C for over 6 hours the alarm will sound and the LCD screen will display Press any key to stop the alarm fro...

Страница 19: ...ide your cooler To replace your filter 1 Remove the bottles cans stored on the two shelves in front of the filter 2 Remove the shelves and set aside to be replaced once you have changed the filter 3 H...

Страница 20: ...ompressor starts and stops frequently The external temperature is high A large quantity of bottles has been put into the cellar The appliance is opened too frequently The door is not properly closed T...

Страница 21: ...tion installation not in accordance with electrical or plumbing codes or use of products not approved by warrantor 4 Replacement parts or repair labor costs for units operated outside the United State...

Страница 22: ...ATION VEUILLEZ LIRE ET SUIVRE TOUTES LES R GLES DE S CURIT ET LES INSTRUCTIONS D UTILISATION DE CE MANUEL crivez ici les num ros de mod le et de s rie Mod le ______________________ En S rie No _______...

Страница 23: ...votre Appareil 30 Installation de votre Appareil 30 Installation de la Poign e de Porte 31 Inverser la Porte Battante 32 Instructions d Armoire Int gr e 33 34 Connexion lectrique 35 Rallonge 35 R org...

Страница 24: ...AVERTISSEMENT ou ATTENTION DANGER signifie que le non respect de cette d claration de s curit peut entra ner des blessures graves ou la mort AVERTISSEMENT WARNING signifie que le non respect de cette...

Страница 25: ...parations doivent tre confi es un technicien qualifi Cet appareil est sans CFC et HFC et contient de petites quantit s d isobutane R600a qui est respectueux de l environnement mais inflammable Il n en...

Страница 26: ...ode national de l lectricit et aux codes et r glements locaux est requise Ne pas plier ni pincer le cordon d alimentation de l appareil La taille du fusible ou du disjoncteur doit tre de 15 amp res Il...

Страница 27: ...926B LWC1Z193 1 Charni re Sup rieure Droite 2 Panneau de Configuration 3 Porte 4 Joint de Porte 5 Poign e de Porte 6 Filtres Charbon 7 tag re en Bois 8 Plaque de Canal d Air 9 Plaque de Ventilation 10...

Страница 28: ...ni re Sup rieure Droite 2 Plaque de Canal d Air 3 Panneau de Configuration 4 Porte 5 Joint de Porte 6 Poign e de Porte 7 tag re en Bois 8 Filtres Charbon 9 Plaque de Ventilation 10 Charni re Inf rieur...

Страница 29: ...Tablette M tallique Avec Bord Avant S S 3 Porte 4 Joint de Porte 5 Poign e de Porte 6 Plaque de Canal d Air 7 Panneau de Configuration 8 Lumi re Lat rale 9 Glissi re Roulante 10 Filtres Charbon 11 Pl...

Страница 30: ...st con u pour une installation autonome ou encastr e enti rement encastr e Placez votre appareil sur un sol suffisamment solide pour le supporter lorsqu il est compl tement charg Pour mettre votre app...

Страница 31: ...instructions 4 Retirez le joint de porte 1 dans la zone o la poign e doit tre install e comme indiqu dans la premi re illustration ci dessous Le joint se d place facilement la main aucun outil n est...

Страница 32: ...ez la charni re sup rieure du c t sup rieur droit de l armoire Retirez la charni re inf rieure du c t inf rieur droit de l armoire retirez le couvercle des trous de vis des c t s sup rieur et inf rieu...

Страница 33: ...d utiliser cet appareil dans une application int gr e veuillez suivre les exigences indiqu es ci dessous Assurez vous que le flux d air sous l appareil n est pas bloqu SWC1127B LWC1Z96 et SWCP2116 LWC...

Страница 34: ...34 SWC1926B LWC1Z193 SWC1966B LWC2Z194 et SWCP2163 LWC2Z195 Dimensions d Ouverture de l Armoire IN min CM min Largeur 23 7 8 60 5 cm Profondeur 28 71 2 cm Hauteur 70 3 4 180 cm...

Страница 35: ...e indiqu e sur l appareil Cela offre les meilleures performances et emp che galement la surcharge des circuits de c blage de la maison qui pourraient tre un risque d incendie de surchauffe Ne d branch...

Страница 36: ...Retirez d abord tous les vins et ou les boissons de l tag re 5 Tirez la tablette jusqu sa limite puis appuyez BAS sur le levier gauche du rail coulissant et appuyez simultan ment sur HAUT sur la droit...

Страница 37: ...u pour stocker au maximum 163 bouteilles de Bordeaux au total NOTEZ Les tailles de bouteille m me le style bordelais standard peuvent varier en taille exacte et en d tails entre les diff rents product...

Страница 38: ...r Chilling Wine Appuyez et maintenez pendant deux secondes sur le panneau de commande pour allumer ou teindre la glaci re Lorsque le refroidisseur est teint l appareil cesse de fonctionner et s arr te...

Страница 39: ...quelle touche pour arr ter l alarme Lorsque la temp rature l int rieur de l appareil d passe 25 C 77 F pendant plus de 6 heures l alarme retentit et l cran LCD affiche Appuyez sur n importe quelle tou...

Страница 40: ...eur Pour remplacer votre filtre 1 Retirez les bouteilles canettes stock es sur les deux tag res devant le filtre 2 Retirez les tag res et mettez les de c t pour les remplacer une fois que vous avez ch...

Страница 41: ...mpresseur d marre et s arr te fr quemment La temp rature ext rieure est lev e Une grande quantit de bouteilles a t mise en cave L appareil est ouvert trop fr quemment La porte n est pas correctement f...

Страница 42: ...garant 10 Pi ces de rechange ou frais de main d uvre de r paration pour les unit s exploit es en dehors des tats Unis 11 R parations de pi ces ou de syst mes r sultant de modifications non autoris es...

Отзывы: