background image


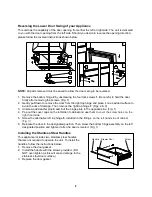
Reversing the Lower Door Swing of your Appliance


This unit has the capability of the door opening from either the left or right side. The unit is delivered 
to you with the door opening from the left side. Should you desire to reverse the opening direction, 
please follow the reversal instructions shown below. 


NOTE:

 All parts removed must be saved to allow the door swing to be reversed. 

 
1.  Remove the bottom hinge 

2

 by unscrewing the four lock screws 

1

. Be careful to hold the door 

firmly after removing the screws. (Fig. 1) 

2.  Gently pull down to remove the door from the right top hinge and place it on a padded surface to 

avoid the risk of damage. Then remove the right top hinge 

7

. (Figs. 2 & 3) 

3.  Unscrew and transfer pins 

4

 and 

3

 of the hinge plate to the opposite side. (Fig. 1) 

4.  Pop out the cover caps on the left side of cabinet and use them to 

cover the screw holes on the 

right hand side.


5.  Screw the alternative left top hinge 

8

, included in the fittings, 

on the left hand side of cabinet. 

(Fig. 3)


6.  Relocate the door to the designated position. Then screw the bottom hinge assembly on the left 

designated position and tighten it after the door is leveled. (Fig. 1) 


Installing the Stainless Steel Handles


This appliance includes two stainless steel handles 
that are not required to operate the unit. To install the 
handles, follow the instructions below: 
1.  Remove the door gasket. 
2.  Install the handle with the screws provided. (DO 

NOT over-tighten as this will cause damage to the 
stainless steel door surface.) 

3.  Replace the door gasket. 


Handle

Screw

Drawer Door


Содержание FF616TD

Страница 1: ...EASE READ AND FOLLOW ALL SAFETY RULES AND OPERATING INSTRUCTIONS Felix Storch Inc An ISO 9001 2015 registered company 770 Garrison Avenue Bronx NY 10474 www summitappliance com Write Serial No on lowe...

Страница 2: ...your Appliance 8 Installing the Stainless Steel Handle 8 Operating your Appliance 9 11 Control Panel 9 10 Sabbath Mode 10 Temperature Memory Function 10 Temperature Alarm Door Alarm 10 Door Lock 10 De...

Страница 3: ...outlet do not remove grounding prong do not use an adapter and do not use an extension cord Replace all panels before operating It is recommended that a separate circuit serving only your appliance be...

Страница 4: ...s wind rain water spray or drips The appliance should not be located next to ovens grills or other sources of high heat The appliance must be installed with all electrical water and drain connections...

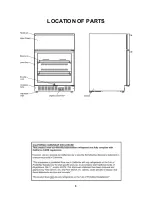
Страница 5: ...5 LOCATION OF PARTS...

Страница 6: ...7 mm of space between the back and sides of the unit are suggested which allows the proper air circulation to cool the compressor and condenser for energy saving Even for built in installation it is a...

Страница 7: ...tage rating that matches the rating label on the appliance This provides the best performance and also prevents overloading house wiring circuits that could cause a fire hazard from overheating Never...

Страница 8: ...nge 7 Figs 2 3 3 Unscrew and transfer pins 4 and 3 of the hinge plate to the opposite side Fig 1 4 Pop out the cover caps on the left side of cabinet and use them to cover the screw holes on the right...

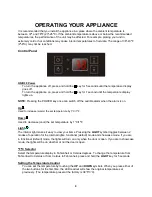
Страница 9: ...Used to increase warm the set temperature by 1 C 1 F Down Used to decrease cool the set temperature by 1 C 1 F Light The interior light makes it easy to view your items Pressing the LIGHT symbol toggl...

Страница 10: ...s if the storage temperature is not cold enough The temperature display flashes at the same time The cause of the temperature being too high may be Warm items were placed inside Too much warm ambient...

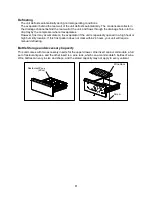
Страница 11: ...on the evaporator if the unit is repeatedly opened in a high heat or high humidity location If this frost pattern does not clear within 24 hours your unit will require manual defrosting Bottle Storag...

Страница 12: ...of time you need to take the proper steps to protect the contents Vacation Time Short vacations Leave the appliance operating during vacations of less than three weeks Long vacations If the appliance...

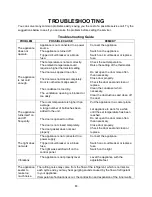
Страница 13: ...nser when necessary Clear the obstructions and clean off the dust The appliance turns itself on and off frequently The room temperature is higher than average A large number of bottles has been added...

Страница 14: ...door switch failure Call for service The alarm sounds and the temperature display flashes Has the appliance door been open for longer than 60 seconds If not then the temperature has risen higher or fa...

Страница 15: ...15 NOTES...
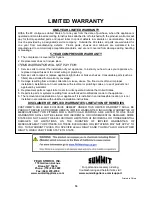
Страница 16: ...lation installation not in accordance with electrical or plumbing codes or use of products not approved by warrantor 4 Replacement parts or repair labor costs for units operated outside the United Sta...

Отзывы: