background image

4

9

S E T   U P   &   U S E :

Table Top or Wall Mounting: 

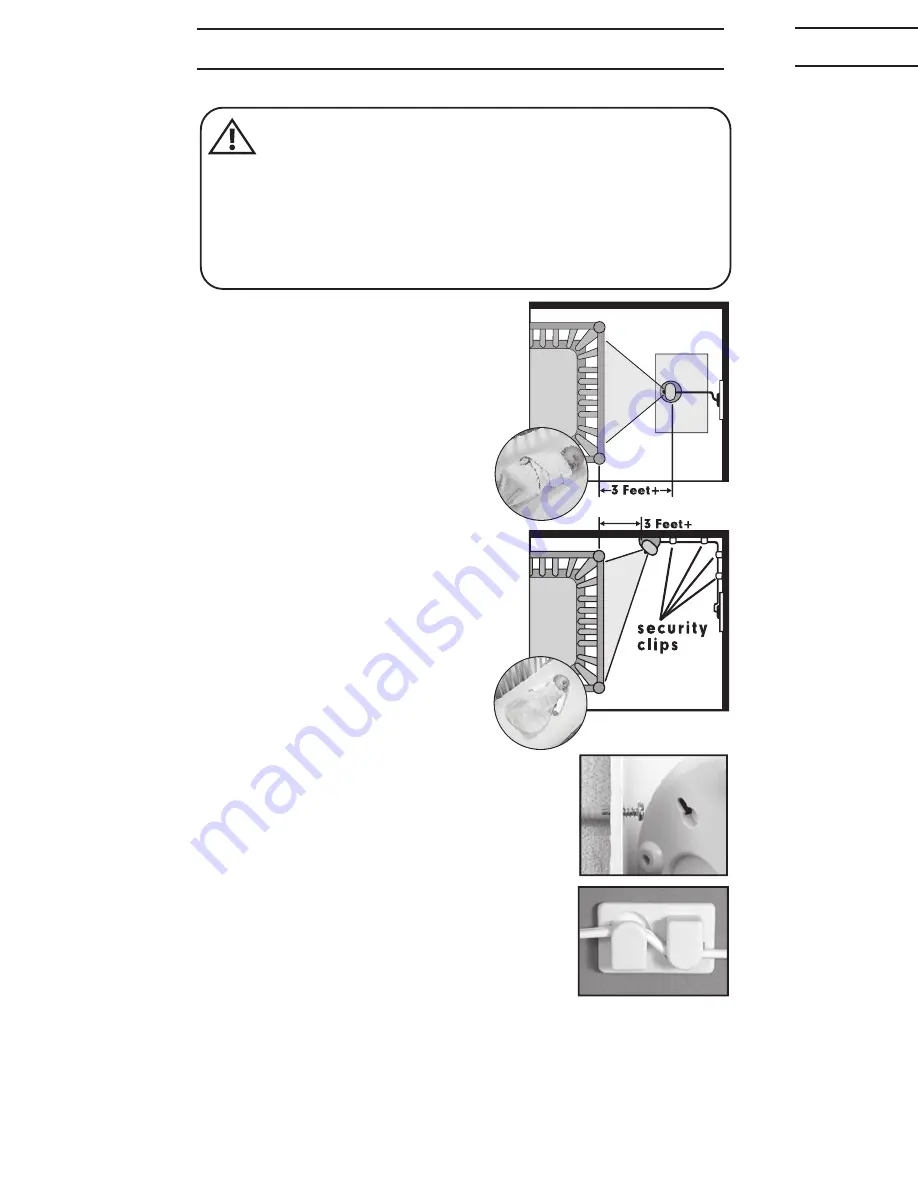
Determine a location for the CAMERA 
that will provide the best view of your 
baby in his crib. Place the CAMERA 
on a flat surface, such as a dresser, 
bureau, or shelf (Figure A). Or mount 
the CAMERA on a wall (Figure B). 
NEVER place camera or cords 
within 3 feet of the crib. Secure 
the cord to the wall using the 
6 Security Clips included to keep 
cord away from baby’s reach. 

Be sure to test reception and 
CAMERA positioning before 
mounting to a wall (see "Testing 
Your Initial Set Up" section).

To Wall Mount:

a) Pre-drill a hole in the wall (3/16", 
4.8mm, drill bit) (Figure C).
b) Insert the wall anchor 
 

(included) into the hole and 


with a hammer, tap gently on 


the end until the wall anchor is 


flush with the wall.

c) Insert the screw (included) into the 
 

wall anchor and tighten screw 


until only 1/4" (6.2mm) of the 


screw is exposed.

d) Insert smaller AC Adapter into 
 

the CAMERA’s AC Adapter Jack. 

e) Slide the back of the CAMERA 
 

down onto the screw until the 


CAMERA is secure to the wall.

f)  Plug the AC Adapter into a 
 

standard electrical outlet.

g) Secure the cord to the wall using the 

  6 Security Clips

 included to keep cord 


away from baby's reach (Figures B & D).

h)  Slide switch on side of Camera to ON and the 
 

POWER ON LED will illuminate solid green.

C

D

STRANGULATION HAZARD

 - Keep cord out of baby’s reach. 

NEVER place camera or cords within 3 feet of the crib. 
Use enclosed Security Clips to help secure cord away from 
baby’s reach. Never use extension cords with AC Adapters. 
Only use the AC Adapters provided.

WARNING:

CAMERA

B

A

P R O B L E M   S O LV I N G :

No picture or sound on Monitor
  • Make sure the Monitor is turned on
  • Make sure the AC Adapters are plugged in
  • Make sure the outlets are working
  • Make sure Monitor and Camera are SYNCHED up.
     (refer to  “Synching MONITOR and CAMERA” section on  
      page 7)

Sound but no picture on Monitor
  • Press the Quick View/Video On/Off Button once to turn on  
  video 

mode

  • Try adjusting the Brightness Control on the Monitor
  • Test reception by moving the Monitor and/or CAMERA to  
  different 

locations

Picture but no sound
  • Turn up the volume on the Monitor using the Volume Control

Picture not clear
  • Position the Monitor closer to the CAMERA if necessary 
 • 

Move Monitor away from other monitors, cordless phones,  

  walkie-talkies, 

etc.

  • Try adjusting the Brightness Control on the Monitor
  • Test reception by moving the Monitor and/or CAMERA to
  different 

locations

Squealing sound
  • Move the CAMERA and the Monitor further away from  
  each 

other

Meijer.com

Содержание 28030

Страница 1: ...se harmful d including oved by Summer ment mply with the limits C Rules These ainst harmful generates uses lled and used in erference to radio erference will not ause harmful e determined by d to try to correct es he receiver ent from that an for help e requirements a d between the r must not be tenna or STRANGULATION HAZARD Keep cord out of baby s reach NEVER place camera or cords within 3 feet o...

Страница 2: ...re is proper ventilation around all monitor components Do not place on sofas cushions beds etc which may block ventilation Nursery monitors use public airwaves to transmit signals This monitor may pick up signals from other monitors or similar devices and signals broadcast by this monitor may be picked up by other receivers This product is not a toy Do not allow children to play with it This produ...

Страница 3: ...Meijer com ...

Страница 4: ...osed d Insert smaller AC Adapter into the CAMERA s AC Adapter Jack e Slide the back of the CAMERA down onto the screw until the CAMERA is secure to the wall f Plug the AC Adapter into a standard electrical outlet g Secure the cord to the wall using the 6 Security Clips included to keep cord away from baby s reach Figures B D h Slide switch on side of Camera to ON and the POWER ON LED will illumina...

Страница 5: ...MAIN MENU item BRIGHTNESS move up and down buttons on Camera Menu Control Panel to adjust brightness Refer to Adding Additional Camera section for other menu functions MONITOR REMOTE CONTROL FUNCTIONS The Monitor can control the movement of the CAMERA The camera head has the ability to rotate up down right left and zoom Step 1 Press the left or right buttons on Camera Menu control panel to move th...

Страница 6: ...onitor requires 1 3 7V LITHIUM ION rechargeable battery included Tips Before using Monitor in portable mode battery be sure to charge battery 12 16 hours To charge battery plug the Monitor AC Adapter into the Monitor s AC Adapter Jack Plug the other end into a standard electrical outlet After initial 12 16 hour charge to achieve optimal battery life charge battery overnight and unplug all day duri...

Страница 7: ...ou can clip the Monitor to your belt or waistband after a battery has been installed Figure F Footrest The Monitor has a built in footrest for tabletop convenience Simply flip out footrest and place the Monitor on a stable level surface Figure G Synching Monitor and CAMERA The Monitor and Camera are synched at the factory for privacy reasons If the Monitor and Camera are not synching with each oth...

Страница 8: ...es A V Cable To view video through your TV plug the A V cable jack connection into monitor and connect the other ends into the corresponding color coded parts on your TV Scroll through A V inputs on your television s menu until monitor picture is visible Note The Monitor s power button must be turned ON and CAM pre selected before connecting the A V cable Once the A V cable is connected the Monito...

Страница 9: ...nce to turn on video mode Try adjusting the Brightness Control on the Monitor Test reception by moving the Monitor and or CAMERA to different locations Picture but no sound Turn up the volume on the Monitor using the Volume Control Picture not clear Position the Monitor closer to the CAMERA if necessary Move Monitor away from other monitors cordless phones walkie talkies etc Try adjusting the Brig...

Страница 10: ...Meijer com ...

Страница 11: ...hen the power supply cord or plug is damaged b If liquid has been spilled or objects have fallen into the product c If the product has been exposed to rain or water d If the product does not operate normally by following the operating instructions Adjusting only those controls that are covered by the operating instructions as an improper adjustment of other controls may result in damage and will o...

Страница 12: ...erates uses and can radiate radio frequency energy and if not installed and used in accordance with the instructions may cause harmful interference to radio communications However there is no guarantee that interference will not occur in a particular installation If this equipment does cause harmful interference to radio or television reception which can be determined by turning the equipment off ...

Отзывы: