4
5
6
*DWH
*DWH
72 & 5 ( $7 ( $ ) 5 ( ( 6 7$ 1 ' , 1 *
3 / $< <$ 5 ' 8 6 , 1 * 7 :2 * $7 ( 6
6WHS
Remove the two screws from
the Upper Gate Hinge on one end panel
and replace with the Upper Connection
Hinge (Figure Q).
6WHS
Remove the two screws
from the Lower Gate Hinge on the same
panel and replace it with with the Lower
Connection Hinge (Figure R).
6WHS
Repeat steps 1-2 on one
of the end panels of the second
assembled gate.
6WHS
Attach ends of each gate
by lining up the Upper and Lower
Hinges on each gate. The Lower Hinge
should snap into place (Figure S).
6WHS
Turn the hinge knobs
clockwise on each gate to tighten.
8SSHU*DWH
+LQJH
8SSHU
&RQQHFWLRQ
+LQJH
/RZHU*DWH
+LQJH
/RZHU
&RQQHFWLRQ
+LQJH
3DQHO*DWH
For openings 65” – 87” (165 cm - 221 cm) use 2 panels.
For openings greater than 87” - 141” (221 cm - 358 cm) use 3 panels.
:DOO
7HPSODWHV
(2 on 1 sheet)
8SSHU
:DOO
+LQJHV
(2)
/RZHU
:DOO
+LQJHV
(2)
:RRG6FUHZV
(8)
)HHW
(2)
:DOO$QFKRUV
(8)
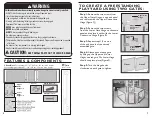
) ( $7 8 5 ( 6 & 2 0 3 2 1 ( 1 7 6
Children have died or been seriously injured when gates are not securely installed.
• ALWAYS install and use gate as directed using all required parts.
• Install according to manufacturer’s instructions.
• Stop using when a child can climb over or dislodge the gate.
• Use only with the locking/latching mechanism securely engaged.
• To prevent falls, never use at top of stairs.
•
NEVER
use a gate to keep child away from pool.
•
NEVER
leave child unattended.
•
ALWAYS
close and lock the gate behind you.
• Do not use on uneven surfaces.
• Periodically check all hinge knobs to ensure they are tight and secure.
• This product will not necessarily prevent all accidents. Proper adult supervision is required
at all times.
• Do not use if any components are missing or damaged.
• Adult assembly required. Exercise care when unpacking and assembling product.
CAUTION
:
KEEP SMALL PARTS OUT OF CHILD’S REACH.
WARNING


