


Section 7
MAINTENANCE
33
DISASSEMBLY
Prior to performing this, be sure all pressure is re-
moved from the system.
1. Remove the retaining cap. Push down on the coil
while prying the nameplate/retainer cover in the
direction of the arrow [
] (See Figure
Nameplate/retainer cover will slip forward, releas-
ing the coil assembly. Slip the coil assembly and
spring washer off of the solenoid base subas-
sembly.
2. Unscrew solenoid base sub-assembly from
manual operator body.
3. Unscrew manual operator body from valve body.
Then remove body gasket and stem retainer.
4. All parts are now accessible for cleaning or re-
placement.
REASSEMBLY
1. Lubricate all gaskets with Dow Corning
r
111
Compound lubricant, or equivalent high-grade sil-
icone grease. If replacing parts, exchange worn or
damaged parts with new parts found in the replac-
ment kit, and/or replacement coil.
2. Position core assembly with core spring into base
of manual operator body. Then install stem/
spacer sub-assembly into manual operator body
to engage with core assembly.
3. Reinstall stem retainer on body and stem/spacer
sub-assembly.
NOTE
See Figure
.The spacer on the stem/spacer sub-
assembly must be outside of the stem retainer for
external spring construction.
4. Replace body gasket and install manual operator
assembly in valve body. Torque manual operator
body to 175
±
25 in-lbs (19.8
±
2.8 Nm).
5. Replace solenoid base gasket and solenoid base
sub-assembly. Torque solenoid base sub-assem-
bly to 175
±
25 in-lbs (19.8
±
2.8 Nm).
External Spring Type Solenoid-
SPACER
STEM
RETAINER
Spacer Location
Figure 7-7 Solenoid Valve (P/N 02250044-392)
6. Check manual operator for proper operation. Turn
stem clockwise and couterclockwise; stem should
turn freely without binding.
*Replacement Kit P/N 02250122-521
Figure 7-8 Pressure Regulator (P/N 02250100-362)
7.7.7
CONTROL PRESSURE REGULATOR (P/N
02250100-362) MAINTENANCE
Refer to Figure
. Maintenance for this control
pressure regulator normally requires the replace-
ment of the internal diaphragm, o--ring, and dia-
phragm gasket.
Use replacement kit no.
02250122-521, and follow the procedure below for
proper installation.
WARNING
!
DO NOT remove caps, plugs, and/or other compo-
nents when compressor is running or pressurized.
Stop compressor and relieve all internal pressure
before doing so.
NOTE
When replacing parts, always visually inspect
those parts that are not included with the kit. If
these parts show wear, consult Sullair factory.
1. Loosen the locknut and turn the adjusting screw
counterclockwise until the inner spring tension is
relieved. The adjusting screw should turn freely
when the spring tension is relieved.
2. Remove the spring chamber from the body to allow
access to internal parts.
Содержание DR-13 Series
Страница 6: ...NOTES ...
Страница 14: ...8 NOTES ...
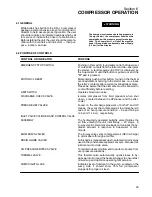
Страница 18: ...Section 4 COMPRESSOR SYSTEMS 12 Figure 4 5 Piping and Instrumentation Diagram Air cooled ...
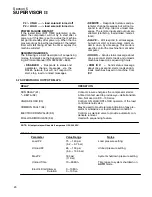
Страница 21: ...Section 5 SUPERVISOR II 15 Figure 5 1 Supervisor II Panel ...
Страница 28: ...22 NOTES ...
Страница 32: ...26 NOTES ...
Страница 42: ...Section 7 MAINTENANCE 36 Table 1 Installation Data ...
Страница 46: ...40 NOTES ...
Страница 48: ...Section 9 ILLUSTRATIONS AND PARTS LIST 42 9 3 COMPRESSOR MOTOR AND FRAME ...
Страница 50: ...Section 9 ILLUSTRATIONS AND PARTS LIST 44 9 4 AIR INLET SYSTEM ...
Страница 52: ...Section 9 ILLUSTRATIONS AND PARTS LIST 46 9 5 COOLER ASSEMBLY ...
Страница 54: ...Section 9 ILLUSTRATIONS AND PARTS LIST 48 9 6 LP HOT LP COLD ...
Страница 56: ...Section 9 ILLUSTRATIONS AND PARTS LIST 50 9 7 HP DISCHARGE ...
Страница 58: ...Section 9 ILLUSTRATIONS AND PARTS LIST 52 9 8 LUBE SYSTEM ...
Страница 60: ...Section 9 ILLUSTRATIONS AND PARTS LIST 54 9 9 ELECTRICAL BOX ...
Страница 62: ...Section 9 ILLUSTRATIONS AND PARTS LIST 56 9 10 CONTROL SYSTEM CONDENSATE DRAIN ...
Страница 64: ...Section 9 ILLUSTRATIONS AND PARTS LIST 58 9 11 CANOPY ...
Страница 66: ...Section 9 ILLUSTRATIONS AND PARTS LIST 60 9 12 DECALS ...
Страница 68: ...Section 9 ILLUSTRATIONS AND PARTS LIST 62 9 12 DECALS ...
Страница 70: ...Section 9 ILLUSTRATIONS AND PARTS LIST 64 9 12 DECALS ...
Страница 72: ...Section 9 ILLUSTRATIONS AND PARTS LIST 66 9 13 DECAL LOCATIONS ...
Страница 74: ...Section 9 ILLUSTRATIONS AND PARTS LIST 68 9 13 DECAL LOCATIONS ...
Страница 76: ...Section 9 ILLUSTRATIONS AND PARTS LIST 70 9 13 DECAL LOCATIONS ...
Страница 78: ...Section 9 ILLUSTRATIONS AND PARTS LIST 72 9 14 WIRING DIAGRAM ...
Страница 79: ...NOTES ...


