background image

18

Maintenance and cleaning

1.The fan‘s natural movement can cause certain connections to loosen. Check mounting connections, fastening parts, 

and blade accessories twice a year. Check that they are well fastened.

2. Clean the fan periodically to help maintain its new appearance. Do not use water to clean it, as this may damage the 

motor or the wood, or could cause electrical shock.

3.

 Use only a soft brush or microfiber cloth as to not scratch the finish. The veneer is sealed with a layer of lacquer to 

minimize discoloration or loss of shine.

4. It is not necessary to oil the fan. The motor contains bearings with permanent lubrication.

Note: 

Failure to comply with these instructions results in the loss of the equipment warranty.

Warranty service

The manufacturer’s warranty covers real failures that may occur but not minor complaints such as the noise generated by 

the device, as all electric motors generate a certain amount of noise.

Operating the fan with slightly loose components (screws not adequately tightened) or the deformation of blades due to 

excessively vigorous cleaning may cause excessive noise and wobbling, which will not be covered by the warranty. Taking 

regular care to retighten elements and clean carefully is enough to prevent these problems.

Wobbling

All ceiling fans tend to wobble during their operation. A wobble of 2 cm is perfectly acceptable and does not indicate any 

malfunction nor will it cause the fan to fall, as long as it was mounted to the ceiling correctly following the instructions in this 

manual. This ceiling fan has a completely secure mounting system that uses steel brackets and connecting spheres to allow 

it to rotate and to prevent the transmission of vibrations to the ceiling structure. Please note that even fans of the same 

model can have different wobbles, which is totally acceptable and does not imply any malfunction or manufacturing defect.

Increased perception of noise during nighttime operation

The manufacturer’s warranty does not cover the fact that during the night, when the surrounding environment is quieter, 

the fan’s operating noise is more apparent. In addition, during the night, the power supply may experience alterations that 

may produce increased noise generated by the device, which does not indicate any malfunctioning or manufacturing defect 

in the device.

Fan lighting system

Noises and vibrations can be greater when the lighting system is turned on. For example, the light diffuser can produce a 

slight buzz if not adequately attached. Once again, non-aggressive care and regular check to ensure that all elements are 

properly fastened will prevent these disturbances. Glass light diffusers are covered by the warranty to the distributor ware-

houses, and are subject to verification during delivery.

Warranty

Manufactures guarantees the proper functioning of this equipment, repairs or spare parts of the model owing to faulty 

manufacture during 2 years after the surrender date, 8 years exclusively in the case of the fan motor. Responsibility will not 

be accepted, however, for damages or injury caused through misuse. For any claims the sale ticket must be presented. The 

company agrees to repair any defect or malfunction found in the item and any damages said defect or malfunction might 

directly provoke. If the reparation should fail to satisfy the customer and/or the object fail to present the optimum condition 

for the use to which it is destined the guarantee holder will have the right to the substitution of the acquired item for ano-

ther identical characteristics or a complete refund of the purchase price. Terms and conditions of warranty. 

www.sulion.es

Maintenance and information of warranty

EN

Содержание MUSTANG 72209

Страница 1: ...a sat sulion es y a trav s de nuestra web www sulion es donde encontrar s un acceso a v deos instrucciones y una gu a de preguntas frecuentes In the event of any questions incidents or missing parts b...

Страница 2: ...is 19 26 Portugues 27 34 Deutsch 35 42 Italiano 43 50 Instalaci n del ventilador Installing the fan Installation du ventilateur Instalando o ventilador Installieren Sie den L fter Installazione della...

Страница 3: ...erior a 2 3 m sobre el suelo 5 El punto de anclaje del ventilador debe ser capaz de soportar un peso de 30 kg como m nimo Si el montaje se realiza sobre una caja de uni n al techo debe asegurar el sop...

Страница 4: ...ligero bamboleo lo cual no indica que tengan malfuncionamiento Peligro Estos equipos no han sido dise ados para ser usados por ni os o personas con discapacidad f sica sensorial o mental o falta de ex...

Страница 5: ...alquier parte del mismo Extraer todos los componentes Situar el motor sobre un trapo o supercie blanda para evitar da ar su acabado supercial Manipular cuidadosamente el conjunto para evitar que su ca...

Страница 6: ...que impide el funcionamiento normal Cuando esto sucede debe quitar los obst culos que bloqueen el ventilador Entonces presione el bot n de apagado en el control remoto para resetear el receptor Ahora...

Страница 7: ...r est desconectado Esto es esencial para el proceso de sincronizaci n A menos que el proceso de sincronizaci n haya resultado exitoso el ventilador funcionar parcialmente o no funcionar Por defecto to...

Страница 8: ...lica a continuaci n 1 Encienda el ventilador en la velocidad m s alta para que se produzca mayor balanceo 2 Apague el ventilador Seleccione un aspa y coloque el clip ver figura en ella a medio camino...

Страница 9: ...e fijaci n de las aspas est n flojos Seguir las instrucciones indicadas en la secci n de Equilibrado de este manual C Aspas deformadas Seguir las instrucciones indicadas en la secci n de Equilibrado d...

Страница 10: ...almente aceptable pues no supone ning n malfuncionamiento o defecto de fabricaci n Mayor percepci n de ruidos durante el funcionamiento nocturno La garant a del fabricante no cubre el hecho de que dur...

Страница 11: ...hes as it will cause the fan to malfunction and or will damage the motor The fan must be directly connected to a properly protected installation cir cuit magnetothermal differential switch with the ad...

Страница 12: ...appear Some fans may wobble slightly which does not indicate any malfunction Danger These devices have not been designed to be used by children people with physical sensory or mental disabilities or p...

Страница 13: ...n a table that is sufficiently large such that no pieces may fall Verify that all parts are present before starting assembly Check the packaging to find elements believed to be missing Exa mine all el...

Страница 14: ...peration When this happens you must remove the obstacles blocking the fan Then press the off button on the remote control to reset the receiver Now you can continue to use the fan normally Note Unless...

Страница 15: ...the learning process Make sure the fan is disconnected This is essential for the synchronization process Unless the synchronization process has been successful the fan will work partially or will not...

Страница 16: ...e greatest amount of wobbling is produced 2 Turn off the fan Select a blade and place a clip on it see diagram halfway between the fastening and the far edge of the blade 3 Turn on the fan and check w...

Страница 17: ...s are loose Follow the instructions indicated in the Balan cing section of this manual C Deformed blades Follow the instructions indicated in the Balan cing section of this manual 3 Excessive noise wh...

Страница 18: ...se note that even fans of the same model can have different wobbles which is totally acceptable and does not imply any malfunction or manufacturing defect Increased perception of noise during nighttim...

Страница 19: ...r et ou des dommages au niveau du mo teur Il doit tre directement connect un circuit de l installation d ment prot g interrupteur magn to thermique et diff rentiel aux dimensions adapt es au fonctionn...

Страница 20: ...peuvent l g rement osciller ce qui n indique pas un dysfonction nement Danger Ces quipements n ont pas t con us pour tre utilis s par des enfants ou des personnes handi cap es physiques sensorielles...

Страница 21: ...tre mont sur le sol ou sur une table suffisamment grande pour qu aucun composant ne puisse tomber V rifiez que vous avez toutes les pi ces avant de commencer le montage V rifiez l emballage afin de d...

Страница 22: ...ventilateur Lorsque cela se produit vous devez ter les obstacles qui bloquent le ventilateur Pressez alors le bouton off de la t l commande afin de r initialiser le r cepteur Maintenant vous pouvez co...

Страница 23: ...ous que le ventilateur est d branch Ceci est essentiel pour le processus de synchronisation Si le processus de synchronisation n a pas r ussi le ventilateur fonctionnera partiellement ou ne fonctionne...

Страница 24: ...mani re suivante 1 Allumez le ventilateur vitesse maximale afin qu il y ait le plus d oscillation possible 2 teignez le ventilateur S lectionnez une pale et placez le clip voir mod le dessus mi chemin...

Страница 25: ...es vis de fixation des pales sont desserr es Suivez les instructions de la section quilibra ge de ce manuel C Pales d form es Suivez les instructions de la section quilibra ge de ce manuel 3 Bruit exc...

Страница 26: ...que m me s il s agit du m me mod le deux ventilateurs peuvent pr senter une oscillation diff rente tout fait acceptable car elle ne suppose aucun dysfonctionnement ou d faut de fabrication Plus grande...

Страница 27: ...ventoinha a uma altura n o inferior a 2 3 m do ch o 5 O ponto de fixa o da ventoinha deve ser capaz de suportar um peso m nimo de 30 kg Se a montagem for realizada numa caixa de jun o do teto assegur...

Страница 28: ...nuas para que se elimine Alguns aparelhos podem ter uma ligeira oscila o o que n o representa uma avaria Perigo Estes equipamentos n o s o projetados para serem usados por crian as ou pessoas com def...

Страница 29: ...uma superf cie suficientemente grande para que nenhuma pe a possa cair Verifique a exist ncia de todas as pe as antes de iniciar a montagem Verifique a embalagem para detetar elementos aparen temente...

Страница 30: ...a o seu funcionamento normal Ao dar se esta situa o retire os objetos que estejam a bloquear a ventoinha De seguida pressione o bot o de desligar no comando para reiniciar o recetor Conti nue a fazer...

Страница 31: ...lador est desconectado Isso essencial para o processo de sincroniza o A menos que o processo de sincroniza o tenha sido bem sucedido o ventilador funcionar parcialmente ou n o funcio nar Por padr o to...

Страница 32: ...e se produza uma maior oscila o 2 Desligue a ventoinha Selecione uma das p s e coloque um clipe a meio caminho entre o suporte e a extremidade da p ver figura 3 Ligue a ventoinha e verifique se a osci...

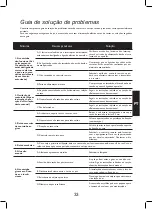
Страница 33: ...to deste manual B Os parafusos de fixa o das p s est o soltos Seguir as instru es indicadas na sec o de Balanceamento deste manual C P s deformadas Seguir as instru es indicadas na sec o de Balanceame...

Страница 34: ...ue duas ventoinhas ainda que do mesmo modelo podem apresentar oscila es diferentes Maior perce o de ru do durante o funcionamento noturno A garantia do fabricante n o cobre o facto de durante a noite...

Страница 35: ...ers nicht an Dimmer Potentiometer oder Lichtschalter an da dies zu Fehlfunktio nen des L fters f hrt und oder den Motor besch digt Der Ventilator muss direkt an einen entsprechend gesch tzten Stromkre...

Страница 36: ...fter k nnen leicht wackeln was nicht auf eine Fehlfunktion hindeutet Gefahr Diese Ger te sind nicht f r die Verwendung durch Kinder Personen mit k rperlichen sensorischen oder geistigen Einschr nkung...

Страница 37: ...sreichend gro en Tisch aufgestellt werden so dass keine Teile herun terfallen k nnen Stellen Sie sicher dass alleTeile vorhanden sind bevor Sie mit der Montage beginnen berpr fen Sie dieVerpackung umT...

Страница 38: ...m ssen Sie die Objekte die den Ventilator blockieren beseitigen Dr cken Sie dann die Aus Taste auf der Fernbedienung um den Empf nger zur ckzusetzen Nun k nnen Sie den L fter normal weiterverwenden Hi...

Страница 39: ...ht angeschlossen ist Dies ist wichtig f r den Synchronisationsprozess Wenn der Synchronisationsprozess nicht erfolgreich war arbeitet der L fter teilweise oder wird nicht funktionieren Stan dardm ig s...

Страница 40: ...n ist 2 Schalten Sie denVentilator aus W hlen Sie einVentilatorblatt aus und platzieren Sie einen Clip siehe Abbildung auf der Mitte zwischen der Halterung und der hinteren Kante desVentilatorblattes...

Страница 41: ...ieses Handbuchs C VerformteVentilatorbl tter Befolgen Sie die Anweisungen im Abschnitt Austa rieren dieses Handbuchs 3 berm iger L rm w hrend desVentilatorbe triebes A Oberes Geh use ber hrt die Decke...

Страница 42: ...indern Bitte beachten Sie dass auch Ventilatoren des gleichen Modells unterschiedlich Wackeln k nnen was v llig akzeptabel ist und nicht auf Fehlfunktionen oder Herstellungsfehler hindeutet Erh hte L...

Страница 43: ...ero causare malfunzionamento e o danneggiare il motore Il ventilatore dev essere connesso correttamente a un circuito di insta llazione adeguatamente isolato dotato di un interruttore magnetotermico d...

Страница 44: ...e leggermente ma questo non indice di alcun mal funzionamento Attenzione Questi dispositivi non sono stati ideati per essere usati da bambini persone con disabilit fisiche sen soriali o mentali o pers...

Страница 45: ...a terra o su di un tavolo sufficientemente largo da non far cadere nessun pezzo Verificare la presenza di tutte le parti prima di cominciare l assemblaggio Controllare bene nella confezione in caso di...

Страница 46: ...venga rimuovere l os tacolo che blocca il ventilatore poi premere il pulsante off sul telecomando per resettare il dispositivo Sar poi possibile usare normalmente il ventilatore Nota Se non si rimuove...

Страница 47: ...he la ventola sia scollegata Questo essenziale per il processo di sincronizzazione A meno che il processo di sincronizzazione non abbia avuto successo la ventola funzioner parzialmente o non funzioner...

Страница 48: ...la massima oscillazione 2 Spegnere il ventilatore Scegliere una pala e posizionare su di essa una molletta come nel diagramma a met della sua lunghezza 3 Accendere il ventilatore per controllare se l...

Страница 49: ...uire le istruzioni nella sezione Bilancia mento di questo manuale C Le pale sono deformate Seguire le istruzioni nella sezione Bilancia mento di questo manuale 3 Il ventilatore emette troppo rumore du...

Страница 50: ...o importante considerare che ventilatori dello stesso modello potrebbero avere oscilla zioni diverse cosa completamente accettabile che non indice di malfunzionamenti o difetti di fabbricazione Aument...

Страница 51: ...51 Instalaci n ventilador Installing the ceiling fan Installation du ventilateur Instala o da ventoinha Installation des ventilators Installare il ventilatore 1 2 3 4 5 6 7 8...

Страница 52: ...52 9 10 11 12 13 14 15 16...

Страница 53: ...53 17 18 19 20 21 22 23 24 OFF Click...

Страница 54: ...54 25 26 27 28 29 30 ON ON...

Страница 55: ...os indicados a seguir fo ram fabricados em conformidade com os seguintes padr es europeus DE SULION erkl rt in eigenerVerantwortung dass die nachfolgend aufgef hrten Produkte in be reinstimmung mit de...

Страница 56: ......

Отзывы: