background image

ICE CONTAINER REMOVAL

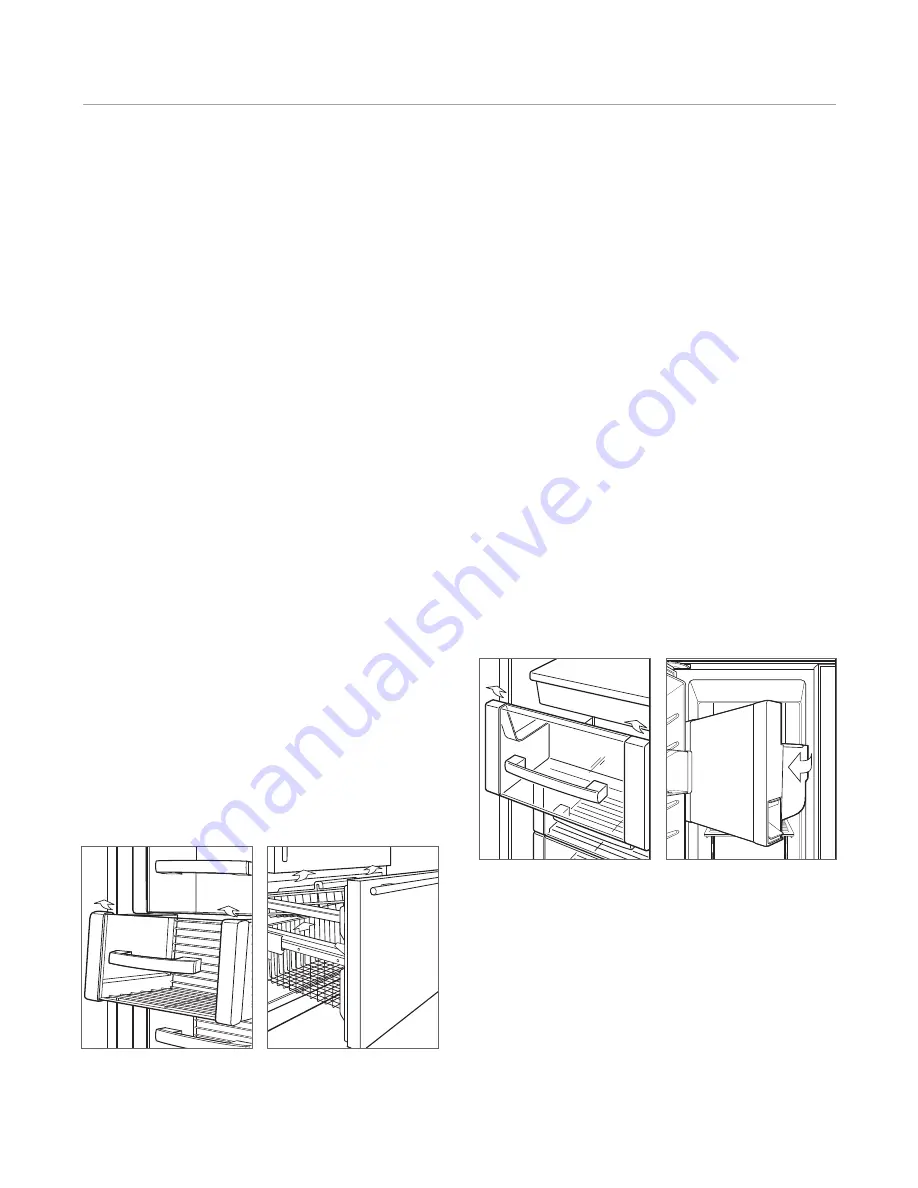
Model BI-36F and over-and-under models:

To remove the

ice container, pull the freezer basket or the freezer drawer

out until it stops and lift the ice container out.

Models BI-36S, BI-42S and BI-48S:

To remove the ice

container, pull the container forward until it stops and lift

the container to clear the carrier assembly along the back

edge of the container. Once the container has cleared the

assembly, pull forward and out. If the door opening is

limited to 0°, use the same procedure, but when lifting

the ice container out, pivot the right side of the container

toward you and out. This will allow the ice container to

clear the door. Refer to the illustration below.

Models BI-42SID, BI-42SD, BI-48SID and BI-48SD:

To remove the ice container, pull the container out

partially, then rotate the right side of the container as you

continue to pull the container out. Refer to the illustration

below.

Built-In Use & Care

17

subzero.com

Freezer Storage

FREEZER BASKET REMOVAL

IMPORTANT NOTE:

Unload freezer baskets before removal.

Model BI-36F and side-by-side models:

To remove the

freezer basket, pull it out until it stops. Behind the bottom

two corners of the front face of the basket are metal clips.

Pull these clips toward the front of the basket, lift and

rotate the basket up. Refer to the illustration below.

To reinstall, push the drawer slides back into the freezer.

Align the basket with the slides and push the basket back

onto the slides until it stops. Press down on the front of

the basket to engage the basket clips with the slides.

IMPORTANT NOTE:

To remove freezer baskets from

models BI-36S, BI-42S, BI-42SID or BI-42SD, the basket

must be raised and pulled through the opening in the door

liner after disengaging the basket from the slides.

IMPORTANT NOTE:

If models BI-36F or BI-36S are limited

to a 0° opening, it may be necessary to remove the

basket and shelf above in order to remove the basket.

Over-and-under models:

To remove the upper freezer

basket, lift up on the front and pull forward to release the

basket. To remove the lower freezer basket, lift the basket

directly upward and out. Refer to the illustration below.

To reinstall the lower freezer basket, insert the basket into

the four corner retainers. To reinstall the upper freezer

basket, position the basket onto the slide rails. Slide the

basket towards the back until you hear a click.

Freezer basket (BI-36F and
side-by-side models).

Freezer basket (over-and-
under models).

Ice container (BI-36S, BI-42S
and BI-48S).

Ice container (BI-42SID,
BI-42SD, BI-48SID, BI-48SD).

Содержание BI-36UFD

Страница 1: ...USE CARE GUIDE Built In Refrigeration...

Страница 2: ...owed Contents Built In Refrigeration 3 Built In Features 4 Built In Models 5 Electronic Control System 14 Refrigerator and Freezer Storage 16 Ice Maker Operation 18 Air Purification System 19 Water Fi...

Страница 3: ...uilt in line continues the Sub Zero tradition of superior quality and reliability Sub Zero pioneered the development of our dual refrigeration system giving you optimum fresh and freezer food storage...

Страница 4: ...ve a microprocessor to give you better control automatic defrosting that senses and adapts to your use patterns The microprocessor continuously monitors each section and should a problem arise a servi...

Страница 5: ...ser reference cards High humidity crisper drawer Stationary door shelves Adjustable door shelves Location of rating plate Triple pane UV resistant glass door Four sided magnetic gaskets Removable kick...

Страница 6: ...etic gaskets Removable kickplate Removable ice container Adjustable wire shelves Lighted electronic control panel Water filtration system Freezer storage baskets Automatic ice maker Adjustable door sh...

Страница 7: ...torage drawer Four sided magnetic gaskets Adjustable door shelves User reference cards Location of rating plate Triple pane UV resistant glass door Two tier freezer storage baskets Removable kickplate...

Страница 8: ...drawer Four sided magnetic gaskets Adjustable door shelves User reference cards Location of rating plate Triple pane UV resistant glass door Two tier freezer storage baskets Removable kickplate High...

Страница 9: ...oof glass shelves Air purification system Lighted electronic control panel Easy access flip up grille Water filtration system Automatic ice maker Pivoting center door seal Full extension roll out free...

Страница 10: ...umidity crisper drawer Adjustable spill proof glass shelves Adjustable door shelves Model BI 42S SIDE BY SIDE Adjustable dairy compartment Air purification system User reference cards Removable kickpl...

Страница 11: ...Adjustable spill proof glass shelves Adjustable door shelves Model BI 42SD SIDE BY SIDE WITH EXTERNAL DISPENSER Air purification system Ice and water dispenser User reference cards Removable kickplat...

Страница 12: ...vable ice container Adjustable door shelves Location of rating plate Lighted electronic control panel Easy access flip up grille Water filtration system Freezer storage baskets Four sided magnetic gas...

Страница 13: ...Adjustable spill proof glass shelves Adjustable door shelves Model BI 48SD SIDE BY SIDE WITH EXTERNAL DISPENSER Air purification system Ice and water dispenser User reference cards Removable kickplat...

Страница 14: ...The temperature ranges are 5 F 21 C to 5 F 15 C in the freezer section and 34 F 1 C to 45 F 7 C in the refrigerator section It is normal for temperatures to fluctu ate slightly depending on external...

Страница 15: ...ons VISUAL SERVICE DISPLAY The electronic control system monitors refrigerator and freezer temperatures as well as the ice maker system If there is a temperature or ice maker problem you will be alert...

Страница 16: ...ure before immersing in warm water Refrigerator Storage STORAGE DRAWERS To remove a storage drawer in the refrigerator section pull the drawer out until it stops Lift the font of the drawer slightly a...

Страница 17: ...front face of the basket are metal clips Pull these clips toward the front of the basket lift and rotate the basket up Refer to the illustration below To reinstall push the drawer slides back into th...

Страница 18: ...ng ice activate the ICE MAKER key pad on the control panel IMPORTANT NOTE The ice maker system will continue to operate even if the ice container is not in place When removing the ice container for an...

Страница 19: ...position Remove the cartridge To replace put the new cartridge into place with the connector pointing down Once in place close the flap until you hear a click Then flip down the outside cover until it...

Страница 20: ...trol system monitors the life of the water filter cartridge and indicates when it needs to be replaced WATER FILTER CARTRIDGE REPLACEMENT When it is time to replace the water filter cartridge the indi...

Страница 21: ...ice cubes become hollow or smaller or the water flow from the dispenser has slowed significantly IMPORTANT NOTE The warranty for the water filter cartridge supplied with the unit only covers defects i...

Страница 22: ...door must be opened to access the dispenser IMPORTANT NOTE Make sure the dispenser key pads are clean and dry to avoid problems with dispenser operation The dispenser was designed to accommodate a 16...

Страница 23: ...glass If less ice is desired hold the ICE key pad for less than two seconds For more ice hold the ICE key pad until the dispensing cycle repeats For larger quantities of ice open the refrigerator door...

Страница 24: ...reak Also for external dispenser models make sure the glass is sitting vertically on the water grille to avoid breakage For internal dispenser models make sure the glass is securely pressed against th...

Страница 25: ...or area This fan runs with either compressor AUTOMATIC DEFROST Sub Zero built in models are equipped with an automatic defrost system The refrigerator section will defrost during each off cycle of the...

Страница 26: ...diffuser in the top of the unit Place your hands under the light diffuser and slide back firmly until the slots on the sides of the diffuser drop past the bracket pegs Lower the light diffuser to remo...

Страница 27: ...and push the ice container assembly to the back of the unit Once the assembly is against the back wall of the unit the bulb will be accessi ble under the fixed shelf in front of the ice maker Models...

Страница 28: ...WER key pad Then release both key pads Double dashes will appear in the control panel display Refer to the illustration below Repeat the process to turn the section back on Refer to electronic control...

Страница 29: ...on of the finish Better results are obtained by keeping the cloth in continuous contact with the stainless steel CONDENSER CLEANING For all built in models the condenser is located behind the flip up...

Страница 30: ...d be discarded and replaced with a new filter before start up For short vacations remove all perishable items Shut off the ice maker and empty the ice container Do not change the electronic control se...

Страница 31: ...y designed to combat these changes and keep your food fresh longer The individual refrigerator and freezer systems have been designed to maintain accurate consistent temperatures and proper humidity l...

Страница 32: ...ake sure they re fresh Use extra care when buying deli food Buy only the amount you will use in 1 2 days Discard hot or cold deli food that has been at room temperature for more than two hours WHEN YO...

Страница 33: ...e quart of water WHEN YOU COOK FOOD Cook meat to an internal temperature of 165 F 75 C or above and poultry to 180 F 80 C or above For cuts more than two inches thick use a meat thermometer to check t...

Страница 34: ...those that are ethylene sensitive Refer to the chart on page 37 Frozen Food Storage Freezer storage Wrap foods in material designed for frozen food storage The wrap must seal out air and moisture Do n...

Страница 35: ...ap if foods will be frozen for more than a couple of months HOTDOGS AND LUNCH MEATS hotdogs opened package hotdogs unopened package lunch meats opened package lunch meats unopened package 34 35 F 1 2...

Страница 36: ...ow storage directions on package chinese cabbage corn sweet cucumbers daikon eggplant endive escarole garlic horseradish 34 F 1 C 34 F 1 C 45 F 7 C 34 F 1 C 45 F 7 C 34 F 1 C 34 F 1 C 34 F 1 C 2 3 mon...

Страница 37: ...uce follow storage directions on package Refer to the list of ethylene sensitive and ethylene producing vegetables and fruits Sensitive to chill injury a cause of spoilage Damage may not be apparent u...

Страница 38: ...ess you can place unripe fruit in a paper bag that has holes poked in it Close the bag and set it on a counter The fruit will produce ethylene a gas that initiates the ripening process Check the bag e...

Страница 39: ...ter opening rewrap tightly in plastic wrap or aluminum foil Thaw frozen cheese in the refrigerator to reduce crumbling EGGS fresh in shell hard cooked liquid pasteurized or egg substitutes opened unop...

Страница 40: ...mg L 8 50 6 50 0 0002 mg L Toxaphene 53 0 015 mg L 10 0 015 mg L 0 001 mg L 0 001 mg L 3 33 3 33 0 003 mg L Turbidity 53 11 1 NTU 10 7 NTU 0 31 NTU 0 4 NTU 7 10 5 42 0 5 NTU Cysts 53 Minimum 50 000 L...

Страница 41: ...California Certification 41 subzero com...

Страница 42: ...peration of fans and compres sors Sounds will be accentuated based on the place ment of the unit and overall room design TEMPERATURE IMPORTANT NOTE Unless the unit is being serviced make sure the powe...

Страница 43: ...at 800 222 7820 The audible chime can be reset for 24 hours by holding the ALARM key and pressing the POWER key The indicator is flashing in the control panel display An error in water flow has been d...

Страница 44: ...period Be sure that food is not obstructing proper door closing Has a large amount of food been added recently On hot days and in warm room temperatures the compressor runs longer There may be normal...

Страница 45: ...he unit thoroughly Cover all food tightly Clean the drain pan and unit drain pipe You need product information Call Sub Zero customer care at 800 222 7820 or visit our website subzero com for planning...

Страница 46: ...u may register by one of the following options 1 Mail in the completed Sub Zero product registration card 2 Register online at subzero com 3 Register by phone by calling Sub Zero customer care at 800...

Страница 47: ...tive in materials or workmanship TERMS APPLICABLE TO EACH WARRANTY The warranty applies only to products installed for normal residential use The warranty applies only to products installed in any one...

Страница 48: ...SUB ZERO INC P O BOX 44848 MADISON WI 53744 SUBZERO COM 800 222 7820 7021792 REV A 7 2011...

Отзывы: